Emoneyblue
New Member
Question did we ever get that wiring diagram posted on the control box?

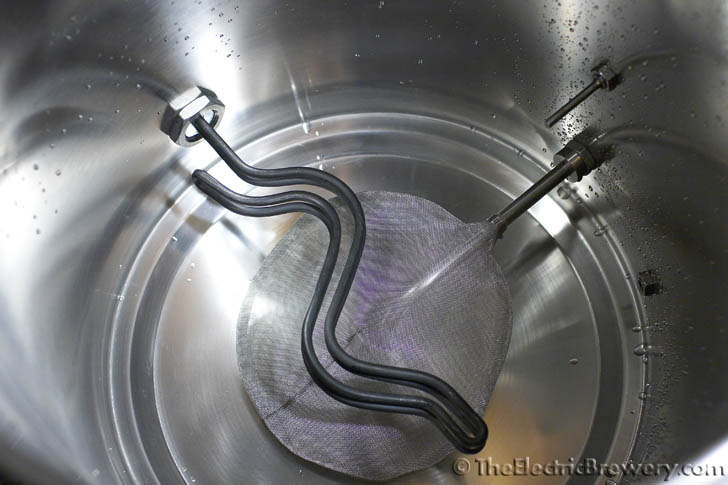
What is the lowest you can/should install the heating element? I would like to leave as much space as possible for my IC.
I know Pol said in one of these post he put it at the 2 1/2 gal mark, but can you go lower, or will it hurt efficiency of the heating? My guess would be he put it right in the middle of the wort that way, since he did 5 gal batches with this.
Where does everyone else put it? I was thinking of putting it right where the side of the keggle starts to straighten out.
I put mine as low as possible without interfering with my Hopstopper:
Kal
Q: What are Lime Life elements?
A: These elements are BEST. They are made of nickel/stainless steel and are ultra low watt-density. These features prevent lime buildup and extend the life of the element. A Lime Life element is not affected by dry-firing. These elements carry a limited lifetime warranty. Because of the low watt-density, these elements are folded back to reduce the length. Some are rippled to further reduce the length to fit the diameter of the tank.
2.5 gallons is plenty low enough, unless you leave your element on while you are draining the BK I mean, this is in a BK, why would you have the element on when you are draining it anyway?
Because mistakes happen.I mean, this is in a BK, why would you have the element on when you are draining it anyway?
Well, in that case you would be looking in the kettle before you turned it on, so it would be really difficult to accidentally energize it before it was submerged.
Frick, I wont energize mine until my BK is full, it boils too quick
I never turn on the BK element until it's all full since I want to do all these things first: Add my salts, measure pH, measure gravity. You can't measure pH and pre-boil gravity until you've finished sparging.You'll have to wait longer while the MLT is draining until the BK is about half full before you can energize the boil BK element vs starting to boil almost right away with the element placed lower in your BK.
I never turn on the BK element until it's all full since I want to do all these things first: Add my salts, measure pH, measure gravity. You can't measure pH and pre-boil gravity until you've finished sparging.
Kal
Why do you feel that this is a better solution, and do you have a link to something that would work for this situation?My opinion on using a float switch for the heating element is that over-temp protection on the element is a better solution.
Because most of the heated tanks we have use over-temp protection instead of float switches. We have several tanks with float switches (for other reasons) and floats get stuck. Over-temp can fail too but it seems less likely.Why do you feel that this is a better solution, and do you have a link to something that would work for this situation?
I thought that that was another version of a level indicator, not an overtemp sensor...As I already replied in posting 697, this unit
I thought that that was another version of a level indicator, not an overtemp sensor...
But still stick with 10 ga. for the 240V i would assume.. and keep everything with the proper 4 colors wire..
The voltage has nothing to do with the size of the wire. You can use 18ga on 240VAC. It is about load, not voltage
I don't remember where this thread left off on the ground/neutral issue/3-prong, but this can run unsafely by having all your grounds go to a ground bar and then attach that ground bar to the neutral wire coming in from a 3-prong outlet. This of course is without a GFI. BUT It is pretty easy (and cheap) to run a ground wire from your circuit breaker, or even just from a copper pipe drain (that might not actually be safe, I'm not an electrician so don't listen to anything i say) to supplement a 3-prong outlet.
but running a ground wire in combination with a 3-prong outlet can allow one to wire in a GFI and be as safe as a 4-prong outlet if done correctly.
A GFI can not run on a 3-prong cord (without ground) was my only point - making it even more unsafe.
Some may be wondering how I mounted my SSR and heatsink.... here is how.
[SNIP]
The hole was cut with a jigsaw and the heatsink was epoxied to the back of the box centered on the SSR hole. I then ran a small bead of caulk around the edges of the heat sink....
Enter your email address to join:
