Cheap and easy aeration gadget

Homebrew Talk - Beer, Wine, Mead, & Cider Brewing Discussion Forum

Help Support Homebrew Talk - Beer, Wine, Mead, & Cider Brewing Discussion Forum:

This site may earn a commission from merchant affiliate links, including eBay, Amazon, and others.
I think the whole point of this method is to do 2 things at once: 1. transfer the wort and 2. aerate it.

However, I have had zero luck with this method and have tried one hole in a smaller tube between 2 larger tubes towards the end, lots of small holes in the top of the tube and placed near the top, run the wort fast, run it slow, run it in between the most I can get is a sporadic inch of bubbles. So..... I just transfer wide open, then hit it with the wine degassing wand (SS) and whip up a 4 inch froth in about 90 seconds. I do pitch my yeast before this. Do you think it gets them dizzy?
 
For the Venturi effect to be best, from what I have read, the "hole" needs to be after the smaller diameter and in the place where the pressure change is happening.

Here's how it should look.
ventur1.gif
 
Finally got it figured out. I have a quick connect (female) with a 1/2 hose attached which is about 10 inches long. Then I slid a 3/8 hose into that and drilled a single hole. Tried it this last batch by transferring slow and then wide open on the second transfer. Wide open gave the best results.


For the Venturi effect to be best, from what I have read, the "hole" needs to be after the smaller diameter and in the place where the pressure change is happening.

Here's how it should look.
ventur1.gif

Bernoulli says static pressure plus dynamic pressure is constant. Since the wort in the kettle has no dynamic pressure since it's (basically) not moving, the static pressure (and therefore total pressure) is 1 atm. Since the wort in the tubing is moving, it has dynamic pressure, so the static pressure in the tubing is less than 1 atm, so it will suck air in (since the air is at 1 atm) regardless of how your tube is shaped. Although, making the tube skinner like in your pic would locally reduce the static pressure further, enhancing the effect.
 
Bernoulli says static pressure plus dynamic pressure is constant. Since the wort in the kettle has no dynamic pressure since it's (basically) not moving, the static pressure (and therefore total pressure) is 1 atm. Since the wort in the tubing is moving, it has dynamic pressure, so the static pressure in the tubing is less than 1 atm, so it will suck air in (since the air is at 1 atm) regardless of how your tube is shaped. Although, making the tube skinner like in your pic would locally reduce the static pressure further, enhancing the effect.

In layman's terms, speedy things are at lower pressure than slow (or not moving) things. :tank:
 
For those using pumps for the transfer I would think that placing the Venturi hole in the line prior to the pump would produce the effect without the problem of turning the Venturi hole into a sprayer, since prior to the pump the fluid is being sucked and not pushed.
 
For those using pumps for the transfer I would think that placing the Venturi hole in the line prior to the pump would produce the effect without the problem of turning the Venturi hole into a sprayer, since prior to the pump the fluid is being sucked and not pushed.


Hmmm... and risk that the pump runs dry/full of air?
 
I recently switched my tubing from 3/8 vinyl to 1/2 inch silicone, because I wanted faster transfers and tubing that could be sanitized by dunking it in the boil. It works great, but will require some tweaking of the inline aerator.

Here's the first attempt: a short section of 1/2 inch CPVC with an approximately 1/8 inch hole. It draws air into the stream even though the ID of the CPVC isn't much smaller than the ID of the thin-wall silicone tube. However, I didn't see enough foaming in the wort after transfer to make me feel comfortable with it, so I shook up my fermenter before pitching. I think it may need more and smaller holes to be as effective as the original racking cane + 3/8 inch tubing gadget.

IMG00069.jpg

IMG00070.jpg

Sorry for the poor image quality. The camera on my blackberry sucks rocks.
 
I just found this thread and find it pretty interesting as I've been thinking I'd like to aerate my wort better. I didn't read every single post but how many of you that use this hole in the tube method use an auto-siphon? That's what I have and I'm wondering if it works with that also.
 
I just found this thread and found it interesting as I've been thinking of a good way to easily aerate my wort when transferring it. The question I have is how many of you who use this hole in the tube method use an auto-siphon to transfer your wort? When I do my transfer I have my boil kettle on our counter and the primary on the floor. The siphon works fine doing this but I can't help but wonder if the suction of the siphon is enough to make this method of aeration work.
 
Oxygenate it then and get past the 8 ppm hump. The OP posted the following:
As a KISS brewer, I don't oxygenate.

Honestly, I cannot imagine anything simpler than using an oxygen tank and regulator to pump some pure oxygen into the solution. Any ambient air method gets you no better than 8 ppm, but 10-12 ppm is idea and can only be achieved with Oxygen, so just skip the shenannegans and get to it!
 
Oxygenate it then and get past the 8 ppm hump. The OP posted the following:


Honestly, I cannot imagine anything simpler than using an oxygen tank and regulator to pump some pure oxygen into the solution. Any ambient air method gets you no better than 8 ppm, but 10-12 ppm is idea and can only be achieved with Oxygen, so just skip the shenannegans and get to it!

Jolly good, nuff said.
 
Alright...so this thing has been posted since 06/08 and I missed it? WTF! :drunk:

I've been using the siphon sprayer but will add a venturi to the mix!

One always needs more gadgetry. Great idea, thanks JDS!
 
Honestly, I cannot imagine anything simpler than using an oxygen tank and regulator to pump some pure oxygen into the solution. Any ambient air method gets you no better than 8 ppm, but 10-12 ppm is idea and can only be achieved with Oxygen, so just skip the shenannegans and get to it!

See, that's the beauty of the craft of brewing. There are a lot of different paths to making great beer, and most of them are right. This aeration method is one of the right paths, and so is oxygenation.
 
I was thinking about trying my Venturi wine aerator and did a search and found this thread. This is a great idea and the same principal as my wine aerator but no spillage! The wine aerator is meant for pouring wine one glass at a time and not 5+ gallons. I'll skip the Venturi wine aerator and just use this method. Yes, that is a bottle of Two Buck Chuck.
DSC_0219.jpg
 
Last night I decided to test out a simple venturi tube to aerate the wort while transferring from brew kettle to primary. I crimped a 2" piece of 3/8" OD copper tubing to create an area of high pressure and drilled a 1/32" hole on the downstream taper so that air can be introduced into the flow.

Trial 1: Attached a 3" piece of 5/16" ID tubing to the upstream side of the venturi tube and a 54" piece of 5/16" ID vinyl hose to the downstream side of the venturi tube. Using this configuration I could not maintain a siphon.

Trial 2: Attached a 54" piece of 5/16" ID tubing to the upstream side of the venturi tube and a 3" piece of 5/16" ID vinyl hose to the downstream side of the venturi tube. Using this configuration I was able to maintain a siphon, however I noticed that the flow downstream of the venturi tube was still repetitively uniform.

Trial 3: Attached a 37" piece of 5/16" ID tubing to the upstream side of the venturi tube and a 20" piece of 5/16" ID vinyl hose to the downstream side of the venturi tube. Using this configuration I was able to maintain a siphon and the flow downstream of the venturi tube was turbulent.

Overall I am pleased with the results.
 
I know I'm dredging up an old thread, and I'm probably going to get flamed for this, but I think there are some physics in play here people aren't considering. People keep talking about the venturi effect. While I'm sure its possible to make a venturi to pull in ambient air into a hose, I think what has been overlooked is that as the wort is falling, which if you think about it, is what is happening when you siphon or drain the BK.
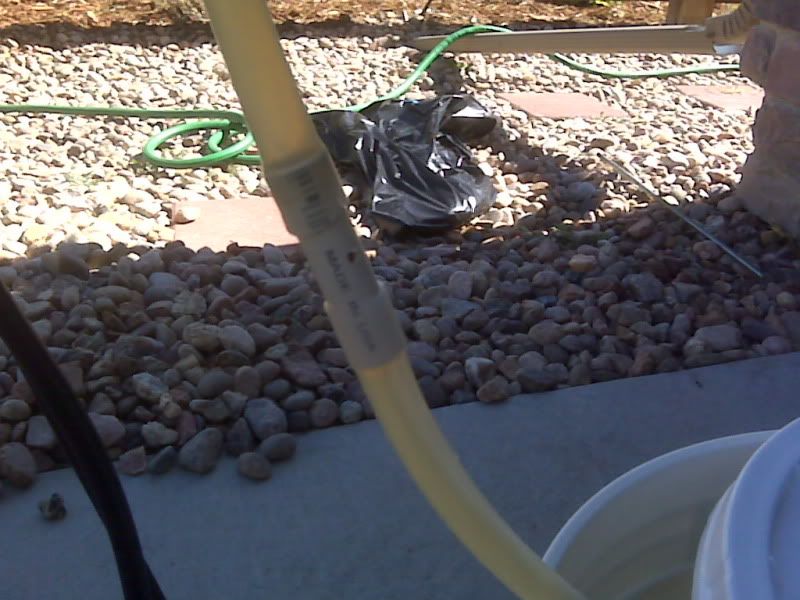
Since everything falls at a rate of 32ft per second per second (rate of acceleration) what happens normally, is that a falling drop of liquid that has fallen further than the drop behind it, will also be falling faster. Now when you are controlling the "fall" in a piece of tubing, the uncompressable liquid is forced to move at the same rate throughout the entire tube since it can't expand, BUT if you poke a small hole in the tube (below the level of the bottom of the BK so as not to break the siphon) gravity will cause the wort downstream of the hole to accelerate. Since the liquid can't expand to fill the void, air is drawn in through the hole. This explains why the pin hole trick doesn't work well with a pump. The pump negates the effect of gravity since it is overcome by pressure.
You can see this in action at your kitchen faucet. Turn on the faucet so that it is running a very thin, but constant stream of water. At the faucet it will appear to be continous, but the bottom of the stream will have broken apart into more seperate droplets by the time it lands in the sink. That is because the water that is about to land in the sink is falling faster than when it origionally left the faucet.

Just to be clear though, I'm not saying that a venturi in your siphon can't be made to work, but it is going to be much more difficult to achieve, and the pin hole would have to be in exactly the right place for it to work. Buy simply putting a smaller piece of tube in the middle, you are only creating a restriction, not a venturi. To create a venturi, the flow rate at the end would have to remain the same with or without the "venturi".

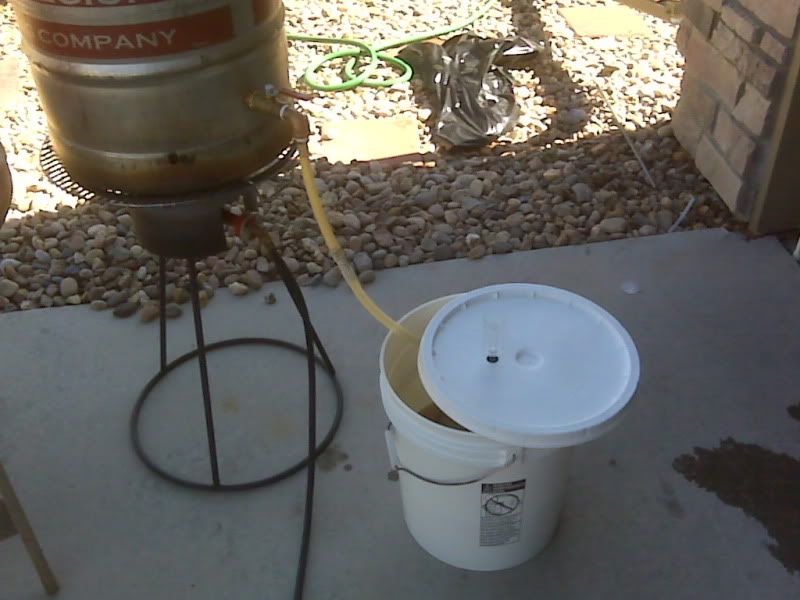
So, I'm willing to bet that a series of small holes in the tube about 10-20 inches up from the end of your siphon or BK drain tube produces about the best effect you can expect from this without ever having to neck down the size of the tubing to try and get a venturi. This should even work if you use a piece of garden hose as a siphon to drain the BK into the fermenter. The pins holes just can't be so big as to break the siphon, and they need to be several inches up from the end of the tube, but well below the bottom of the BK to work well. (which, I believe is what the OP said he did:p).
 
They is pretty much correct. I don't use a flow restriction for my aerator...I just punched a hole in my tubing below the bottom of my pot and inserted a small straw, (like the kind on compressed air cans or WD40 cans), into the hole, inline with the stream. The straw allows air to be sucked in nicely.

While your "falling drops" analogy does work in this case, the effect would however still exist if my siphon tube was horizontal after it got below the level of the bottom of my pot. If it was horizontal there would be no gravity acceleration any more, but air would still get sucked in. Why? The faster a fluid flows, the lower pressure it is at (thanks Bernoulli). Since both ends of the siphon are open to air, the pressure inside the tube is (ambient pressure) - (pressure drop from flow)...that is to say the fluid in the tube is at lower pressure than the air around it, so air gets "sucked" (really pushed) in.

Again you are right, a pump negates this effect, but it does so because it's increasing the pressure inside the tube above ambient. If you used a small enough restriction though, you could overcome the pump's pressure increase with a venturi, (a true venturi, since the flow rate would be kept constant by the pump, regardless of restriction size), and you can still suck air into a stream that is being pumped with positive pressure.

What I'm trying to say is that the air is sucked in for a number of reasons: necking of the tube causes a drop in pressure, faster flowing fluid inside the tube gives a pressure drop below atmospheric, gravity accelerating the stream downwards causes a pressure drop. Adding these conditions together, (faster flowing fluid + a vertical tube, for example), increases the amount of air drawn in, but any of these conditions alone will also cause (a lesser amount) of air to be drawn in.

Oh, and the water droplet thing is not specifically due to gravity alone, it's also got a very large component of surface tension, (try pouring a very thin stream of lower IFT fluid and it won't break up the same). Low surface tension fluids will simply elongate under acceleration, not break up. Water breaks into droplets specifically because it's energetically favorable once it necks down, (high surface tension). A stream of a low surface tension fluid will neck down as it falls, however, still illustrating your point in a different way.

Not an argument, just a clarification...
 
I've got a Vinturi Wine Aerator that I use for wines I drink. I've never even thought about using it as I transfer wort into my fermentor... but it might actually work! What do you guys think?

Here's a link to youtube... turn speakers down... you've been warned! :)


KC
 
Last edited by a moderator:
I got this to work with the pump. I squished the copper pipe at the hole a little bit to make the flow faster there. I covered the hole with another piece of silicone tubing such that I can move it on and off to bubble or not (I stick the end of the tubing back into my boil kettle and don't want it to bubble while i recirculate to sanitize everything).

I do have to make sure I have a good flow going from the pump before I open up the small hole or it will spray out the hole. Also I didn't get any foam in my carboy, but probably because of the FermCap foam control. Bubbling away in the fermefreezer with Nottingham now.

Do you still use this method to oxygenate? I like the idea of inserting the T section in after the pump and CFC.
 
WTF: How is this not due to a pressure drop in the smaller tubing? I don't see how the fluid would be moving faster, due to gravity, after the holes. The siphon is not broken, that is, if the hole or holes aren't too big. The fluid becomes an air and water mixture but it is still moving (at the same rate) due to the overall height difference.

As long as the pressure in the tubing at the point of the holes is lower than atmostpheric, I think this will work whether a siphon or a pump is moving the wort. I suppose it's possible to have too high a pressure in the line with a pump but it is possible to have too much pressure from a siphon as well.

What am I missing? Fluid dynamics seems more hocus pocus than science sometimes.

Who wants to volunteer to test your normally working holy tube with a siphon from a second or third story? How high can you go before it fails?
 
If you're siphoning in a 1/2" od (3/8" id) racking cane and tubing, using a small piece of 3/8"od (1/4"id) plastic tubing as your restriction will work great.

So to clarify, you are poking holes in the 3/8" od plastic tubing, right?

Can you just slide the small tubing 3/8" od inside the 1/2" od tubing?

I've seen flasks implode from the vacuum generated by running tap water through a venturi. Pretty neat stuff.

I've looked for a video of a flask imploding like you mentioned and can't find one. You would'nt happen to have one would you?
 
This might be a dumb question, but how do you guys use this if you don't have a valve in your BK? Just use a regular racking cane when transferring to the primary? I just dump my wort through a strainer into primary right now to get all the hop material out. If I used a racking cane, how would I prevent the hops from clogging it? Thanks for any help.
 
Well my first attempt at a Venturi was unimpressive and very messy. I drilled one small 3/16 hole in an old racking cane which I inserted into the tube of my siphon. So the whole racking cane was the venturi.

I saw a small stream of air flowing into the cane but only when the small hole wasn't spraying wort out everywhere. I was doing this by myself and it was hard to keep everything in the right position so that it didn't spray out.

And at the end of it all, the wort wasn't all that oxygenated. It had a very small amount of foam at the top (I don't use fermcap,yet) so I shook the carboy for a bit and put it up.

Now, almost 15 hours later, still no activity. I think fermentation is coming soon, but this method didn't blow me away with great aeration and swift fermentation this time. I guess I'll just have to try it again next time
 
I was inspired by this thread, here's my take. I think the hole is a bit big, so I've picked up a 1/16th bit (previous one broke). Can't wait to see it in action on my next brew day.

image-881876170.jpg


image-3383399344.jpg
 
Well, I am very interested in this, but I had a performance question. About two brews ago, I switched from the whirlpool/siphon method or transferring to the dump the BK into a strainer method. Would the Venturi be as or more effective as dumping the brew (splashes and all) into a strainer, which would then cause there to be multiple small streams dropping into the bucket?

T
 
I swear someone ran some numbers on that and found them to be about equal. I cant find it though, so could just be talking out of my backside. Either way, it is a whole lot easier than picking up 5gal of wort and dumping it.
 
Just to update, I finally got this gadget working well (previous attempts were foiled by hops clogging my pickup tube on my kettle, false bottom to the rescue).

I brewed some of Da Yopper APA on Sunday, and after cooling I used the gadget. I could hear it sucking in a lot of air, and it created a ton of foam in the fermenter. Fermentation took off by the next morning, and by that evening I needed a blow off tube (first time I’ve actually needed one of these). I’m very happy with this little cheap homemade gadget.
 
I have been using one of these made from a section of copper tubing and it works great. FWIW, I cut a bunch of copper sections and tried various configurations: crimped tube, straight tube, multiple holes, different size holes, different hole locations. What ended up working best for me was a 1.5" section of straight 3/8" OD copper tubing with a single 1/16" hole in the middle.
 
Is it really necessary to insert the thinner 'Venturi' tube in the middle of the transfer tube as many seem to do? Would the Venturi effect be the same by simply using a few inches of the thinner tube(with the hole) as the wort leaves the bottom of the transfer tube??
Sorry if this has been answered already, just don't have time at the moment to read the whole thread!

Thanks

L

As long as it's never submerged i don't see why not. but others may have differing opinions or actual tests ;)
 
Larso said:
Is it really necessary to insert the thinner 'Venturi' tube in the middle of the transfer tube as many seem to do? Would the Venturi effect be the same by simply using a few inches of the thinner tube(with the hole) as the wort leaves the bottom of the transfer tube??
Sorry if this has been answered already, just don't have time at the moment to read the whole thread!

Earlier in the thread, someone claimed that it's better to have a length of tube after the air enters, since it prolongs the contact time (of the bubbles with the wort). But I haven't tried this yet either way -- so this is the blind leading the blind.

EDIT: Here's the post I'm thinking of (#13).
 
Thanks tophmck, read that. Makes some sense I suppose. Would love to borrow a do meter and do some testing
 
You should, Larso! It would be great to nail down how much the placement matters, and to double check that this actually gets the wort close to 8 ppm...
 

Latest posts

Back
Top