Show us your sculpture or brew rig

Homebrew Talk - Beer, Wine, Mead, & Cider Brewing Discussion Forum

Help Support Homebrew Talk - Beer, Wine, Mead, & Cider Brewing Discussion Forum:

This site may earn a commission from merchant affiliate links, including eBay, Amazon, and others.
https://picasaweb.google.com/113655723751766168656/Cooling#5678163737395004690

https://picasaweb.google.com/113655723751766168656/Cooling#5678163904099115010

Apologies for the links, i tried to 'insert image' but no joy!

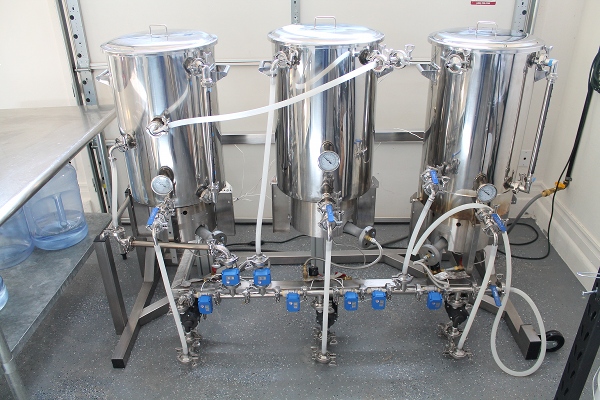
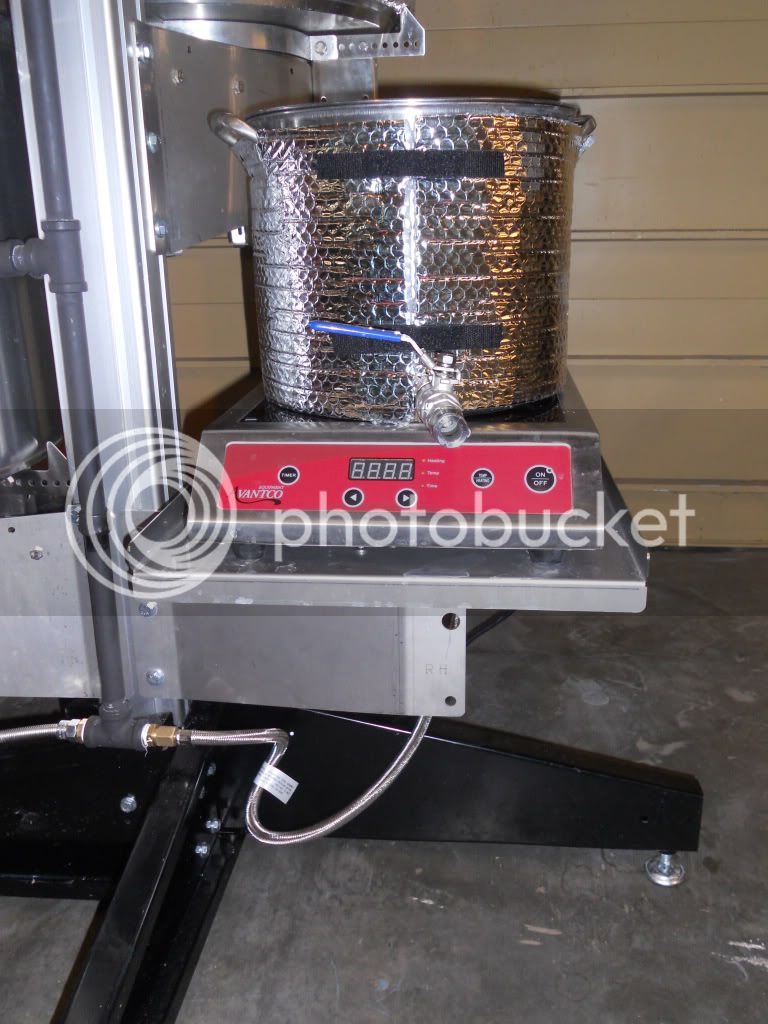
This is my attempt(mid build) of a wall mounted heating and cooling unit. I live in the North of Scotland and as such cooling is rarely a problem! Air cooling to ambient will suffice, heating will take place in the top dome with a lightbulb. Copper coils have to be formed and fitted then insulated. I will hook it up to a ATC and fluid movement will come from a 24v Speck Mag coupled pump. Its too early to be showing this really but i am very happy with the look so far. I am also enjoying making a fermentation temperature control unit that is different from the 'standard' wooden box & fridge.
 
Oops, I forgot about this thread and posted my own. I thought it deserved a spot with all the other great brew systems out there....so here is a picture and a link for more images and details:

5838-system.jpg


https://www.homebrewtalk.com/f51/its-alive-287229/
 
Almost %100 analog.
Three 20 gallon Update International pots
False bottom in Mash Tun and Kettle
HERMS coil in HLT lid that doubles as immersion chiller
3500 watt 240V induction heater with Grundy for decoctions and part sanitation
March pump
Blichmann Auto-Sparge

DSCN0441.jpg

DSCN0439.jpg
 
Here is my 2x4 and 3" gold screw brew stand that I built this weekend. Wanted to build in a way that incorporated my double burner. Sturdy as all hell, wooden (I know I will catch some crap for this), and has already been tested while bringing the keg to a full boil and held for there for 20 minutes. The wood barely got warm (and if all else fails and I feel it may be a safety issue, metal flashing will be installed next to protect the wood). May cut the tall piece down (for a laptop/ingredients table, and use the double burner for the HLT and to set the MLT on. Then I can place the keg on the ground, fill, then lift up the keg to the burner when doing the boil. May get a pump and pump all of my fluid around, so no lifting... Not sure, guess I will see what I figure out. Now its time to brew some beer! I will have to post pics with it in action. Eventually, I will cut the tall part off, and make it a single tier, but I am not quite that far yet. Let me know what you guys think.

Ryan M.

001.jpg


002.JPG


003.JPG


004.JPG
 
Here is my 2x4 and 3" gold screw brew stand that I built this weekend. Wanted to build in a way that incorporated my double burner. Sturdy as all hell, wooden (I know I will catch some crap for this), and has already been tested while bringing the keg to a full boil and held for there for 20 minutes. The wood barely got warm (and if all else fails and I feel it may be a safety issue, metal flashing will be installed next to protect the wood). May cut the tall piece down (for a laptop/ingredients table, and use the double burner for the HLT and to set the MLT on. Then I can place the keg on the ground, fill, then lift up the keg to the burner when doing the boil. May get a pump and pump all of my fluid around, so no lifting... Not sure, guess I will see what I figure out. Now its time to brew some beer! I will have to post pics with it in action. Eventually, I will cut the tall part off, and make it a single tier, but I am not quite that far yet. Let me know what you guys think.

Ryan M.

Hell yeah! Looks good to me:mug:
 
Here is my 2x4 and 3" gold screw brew stand that I built this weekend. Wanted to build in a way that incorporated my double burner. Sturdy as all hell, wooden (I know I will catch some crap for this), and has already been tested while bringing the keg to a full boil and held for there for 20 minutes. The wood barely got warm (and if all else fails and I feel it may be a safety issue, metal flashing will be installed next to protect the wood). May cut the tall piece down (for a laptop/ingredients table, and use the double burner for the HLT and to set the MLT on. Then I can place the keg on the ground, fill, then lift up the keg to the burner when doing the boil. May get a pump and pump all of my fluid around, so no lifting... Not sure, guess I will see what I figure out. Now its time to brew some beer! I will have to post pics with it in action. Eventually, I will cut the tall part off, and make it a single tier, but I am not quite that far yet. Let me know what you guys think.

Ryan M.

Looks good, but you will need flashing, or some kind of heat shield to protect the wood. It may not burn for the first few batches, but it will. I built a wood stand too, but I have a burner sitting on the top tier. I now have aluminum diamond plate under the top burner.
 
Looks good, but you will need flashing, or some kind of heat shield to protect the wood. It may not burn for the first few batches, but it will. I built a wood stand too, but I have a burner sitting on the top tier. I now have aluminum diamond plate under the top burner.

Only thing I can think of is to purchase some roof flashing, and wrap it around the 2x4s, encasing the top, burner side, and bottoms. Only the ones that are close to the actual burner itself. I am assuming that will be sufficient in protecting the wood pieces? I don't see it becoming an issue after that, and figured someone would chime in and confirm my idea that it may be a little extra protection. The stand is certainly not finished, I have some more work to do yet, and will look into metal of some kind to shield the 2x4's.

Anyone have any other ideas besides roof flashing for relatively inexpensive?

Thanks,
Ryan M.
 
If you do use flashing, I'd suggest putting a couple washers under it wherever you attach it to the wood. That'll prevent the metal conducting the heat right onto the wood, except for the attachment points. I used the diamond plate because I had it. I've found that the aluminum is cool to the touch right under the burner, so it's dissipating the heat very well.
 
I was thinking of screwing it down so that there was a little space between the wood and the flashing itself, so I think I am on the right track. Washers are a great idea. Just have to find something suitable. Gotta stop by the box store sometime this week and check it out.

Thanks for your help!

Ryan M.
 
Hate to sound like a noob, I have nearly 30 all grain batches under my belt, but I really am not understanding the need for 3 pumps. I see that a lot of these really badass rigs do in fact, have three pumps. Can someone please tell me why...thanks...wnc

Ps- I am not trying to detract from or disparage any of you three pump guys...just curious
 
I think just because it's cool or just because you can, something along those lines. Why buy a Ferrari?

Hate to sound like a noob, I have nearly 30 all grain batches under my belt, but I really am not understanding the need for 3 pumps. I see that a lot of these really badass rigs do in fact, have three pumps. Can someone please tell me why...thanks...wnc

Ps- I am not trying to detract from or disparage any of you three pump guys...just curious
 
image-2134528235.jpg

So this is my Brutus build. Actually have another keggle that eventually will become my boil pot, but until I start making 10 gallon batches I've just stayed with this one.
 
wncbrewer said:
Hate to sound like a noob, I have nearly 30 all grain batches under my belt, but I really am not understanding the need for 3 pumps. I see that a lot of these really badass rigs do in fact, have three pumps. Can someone please tell me why...thanks...wnc

Ps- I am not trying to detract from or disparage any of you three pump guys...just curious

1 for mash recirculation, 1 for hlt recirculation (reduces stratification) and on for the BK to whirlpool and chill. Overkill, maybe.... but SWEET
 
McCuckerson said:
1 for mash recirculation, 1 for hlt recirculation (reduces stratification) and on for the BK to whirlpool and chill. Overkill, maybe.... but SWEET

Oh yes, definitely sweet. Thanks for clearing that up for me
 
Hate to sound like a noob, I have nearly 30 all grain batches under my belt, but I really am not understanding the need for 3 pumps. I see that a lot of these really badass rigs do in fact, have three pumps. Can someone please tell me why...thanks...wnc

Ps- I am not trying to detract from or disparage any of you three pump guys...just curious

Here are the reasons I built mine:

1. No hose changes. No Hose changes. No hose changes. At the end of the brew day my floor is dry.
2. I can do back to back batches and recirculate the MT the whole time while chilling the BK.....and again, no hose changes.
3. It takes away the guessing work in regards to the configuration.
4. Although this is not a major issue, it's backup incase one of the pumps fail.....hate to lose a batch because of equipment failure.

You can build the same system with 2 pumps (a no hose change system), but the number of valves and piping configurations become very complex.....3 pump systems make everything more minimalist in the setup and in the way it runs.

Does it cost a bit more.....yea...$100 plus a couple fittings.....not the end of the world when you look at the total cost of a well built system.

Is it overkill? Depends what you are looking for....If you are brewing in a pot with a plastic bucket, then yup this is overkill for sure ;)
If you have a 2 pump system....then it's a small investment to simplify your current layout and clean up your brew day process.

I like being able to flip a switch and a valve to change the process. There are lots of ways to skin a cat.....in the end I chose this one to fit my brewing style and needs.

I love mine....I wouldn't want to go back to 2.....can you tell?

Here is my system
 
pilzner said:
Here are the reasons I built mine:

1. No hose changes. No Hose changes. No hose changes. At the end of the brew day my floor is dry.
2. I can do back to back batches and recirculate the MT the whole time while chilling the BK.....and again, no hose changes.
3. It takes away the guessing work in regards to the configuration.
4. Although this is not a major issue, it's backup incase one of the pumps fail.....hate to lose a batch because of equipment failure.

You can build the same system with 2 pumps (a no hose change system), but the number of valves and piping configurations become very complex.....3 pump systems make everything more minimalist in the setup and in the way it runs.

Does it cost a bit more.....yea...$100 plus a couple fittings.....not the end of the world when you look at the total cost of a well built system.

Is it overkill? Depends what you are looking for....If you are brewing in a pot with a plastic bucket, then yup this is overkill for sure ;)
If you have a 2 pump system....then it's a small investment to simplify your current layout and clean up your brew day process.

I like being able to flip a switch and a valve to change the process. There are lots of ways to skin a cat.....in the end I chose this one to fit my brewing style and needs.

I love mine....I wouldn't want to go back to 2.....can you tell?

Here is my system

Thanks, I hadn't thought about the line changes. That makes perfect sense. I lose a little splash of wort every time I switch, not to mention the mess. Cool system also, love how everything is hard plumbed and clean in place. If you had it to do over, would you still have automated the boil burner?
 
I can see it if you are doing back to back batches and the pumps won't be idle, but I don't think most brew this way. I have a two pump system with solenoid valves to switch the direction of flow. I never have to change hoses either and use a BCS so I can control my valves, burners, and pumps from my phone.
 
If you had it to do over, would you still have automated the boil burner?

I know it's not really necessary, but I like the fact that I turn my burners on and off with a switch. Once pilot lights are on....flip....and they're on.

Again, for me it just organizes the process....burners and pumps are automated by BCS and also by manual switch.
 
Thanks, gonna start piecing together my rig soon, this is a great thread and there are MANY rigs here that I will be taking ideas from.
 
Thanks, I hadn't thought about the line changes. That makes perfect sense. I lose a little splash of wort every time I switch, not to mention the mess. Cool system also, love how everything is hard plumbed and clean in place. If you had it to do over, would you still have automated the boil burner?

Ditto to everything said above. No hose changes is the biggest benefit, but I brew double batches about every 3rd or 4th brew day, so it is often enough that the 3 pump setup is helpful. It really let's you overlap your processes for time savings.

I like having the BK burner automated as I have processes defined that will automatically start the burner 10 minutes into my fly sparge to get the boil moving sooner. I also have a process that automatically stops the burner at the end of the boil timer and does a recirc for whirlpool and chilling. It's just fewer things I need to manage.
 
I couldn't take the cold any longer with the banjo cooker, so I just completed my indoor set-up. Bottom drain on HLK and Brew Keggle. Cut the handle off of a strainer and it fits nice under the element.

20111220_07.jpg


20111220_10.jpg


20111220_08.jpg
 
Almost done. Should have enough in Northern Brewer gift cards after the holidays to snag a second blichmann and a pump. Slow but steady progress. So much inspiration in this thread.

image-2945634752.jpg
 
Is there a build thread for this one?


Unfortunately, no.

We didn't take any pics or document much. When it is all done I'll have a master parts list with dimensioned drawings, a complete O&M manual with MSDS and IIPP information. I'm about half way done with that but a 2 1/2" binder isn't quite big enough.

The guys we brew with (including Builderguy) Think I'm nuts for wasting time on regulatory information on a home brewery, but I think it's fun.

Maybe Builderguy will get off his hump and take some new pictures of the current set up next time we get together for an equipment day or brewday.

The stand is quite different now. We have gate valves for flow control on the pumps and ball valves for shut off (just couldn't get the control we wanted with ball valves) We've also added a built in HERMS/Chilling coil to one of the lids. We move it from HLT to BK depending on what process we are in. We've also got a plate chiller mounted to the side of the stand. We recirc through it during chilling while simultaneously running the coil inside the BK for immersion/plate chilling at once. Works great. Planning a big equipment buy in February to finish off this version of the stand. Will be nice when all the brass parts are swapped for stainless, we have the cam locks on the hoses, and the temperature controls and automated HERMS by-pass are installed and running.

I think I prefer building the equipment to the actual brewing. Guess that's why I'm the facility engineer and he's the brewmaster...


What are you doing to spend your time on after February if the rig is done?....I know our yeast lab needs to be set up!
 
Awesome thread. I think I'm about to lose the next couple of hours working my way backwards...my set-up is much more humble, but winter is here so might as well spend time in the garage...after my keezer build is complete. One piece of advice: be sure that you know exactly what you want and are ready to install the parts when you order them. Also, check the return policy and don't wait too long. Lesson learned!
 
Already brewed on it once. I went from just a burner on the ground to this in eight hours. Had the shelf at work so it didn't cost me much at all. I just have to work out all the little kinks.

image-3575127866.jpg
 
Back
Top