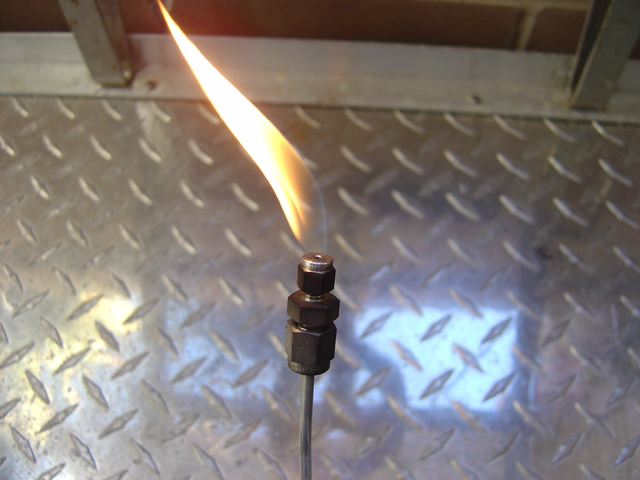
Adding a pilot light

Homebrew Talk - Beer, Wine, Mead, & Cider Brewing Discussion Forum

Help Support Homebrew Talk - Beer, Wine, Mead, & Cider Brewing Discussion Forum:

This site may earn a commission from merchant affiliate links, including eBay, Amazon, and others.

Alemental

Well-Known Member
Joined
Apr 7, 2007
Messages
122
Reaction score
1
Location
Grand Rapids, MI
The recent article in BYO magazine on building a brewery stand (Brutus 10, I think they called it) has me contemplating adding an automated recirculation temp control to a keggle in my system for a mash tun. The author of that article uses a low-pressure propane system, and made a pilot light by just drilling small holes in a block of brass and running propane through it.
Does anybody know if this will work in a high-pressure propane system? (I use Hurricane burners)
Or any tips or links to info on adding a pilot light would be appreciated.
 
Alemental said:
Does anybody know if this will work in a high-pressure propane system?
No reason it wouldn't work. Pay attention to the article - the holes are drilled in a very specific pattern to keep the pilot lit even in a light breeze. Also, start with REALLY small holes (#60 or smaller) since you're using high pressure. A set of drill bits like this might be helpful:

4688-tinydrills.JPG
 
I'm glad that you pointed out the hole pattern. I glossed over the fact that 4 sides would keep at least one side shielded at all times.
I have number drills, I think that the smallest in my set is a #60, but I'll start smaller if I can.
 
Hi Alemental...

You know when I built Brutus 5, I had high pressure burners and a single capillary tube plumbed to the burner with a fitting and a single hole for the pilot. I had it positioned just a bit below the burner because when the burner lit it would snuff the flame out on the pilot. Once I found the right position for the single pilot it worked GREAT with my high pressure burner!

Look at Brutus Ten carefully and you can see that running the pilot is very easy in spite of the fact that I may have talked it up, and it will work for you. You simply need to get a small adjustable flame next to your burner. It may take a little fiddling, but it works… Let me know and I can send you better pics if need be. Maybe one or two of the old Brutus 5!
 
Good, coplink,
If it worked for you, it should work for me. One question: what is a capillary tube? A quick search shows them to be thin glass tubes.
By the way, I just bookmarked your website, and will be listening to your podcasts soon.
Thanks,
Bob.
 
A capillary tube is just a very small gage tube: glass, brass, copper, whatever. Small enough that the tube itself functions as a flow restricter. Back in the days when ballpoint pens had metal refills, I used an empty for a capillary.
 
Reviving old topic - sorry.

I'm building a Brutus Ten also. Does anyone know what orifice size would make a good starting point in a jet burner pilot for low pressure natural gas. My gas pressure is about 7 inches of water column and I'm near enough to sea level as makes no difference.

I haven't found any source for pilot light blanks. My jet burners have a cast iron pilot light boss or tab that looks like it is drilled for 1/8th inch NPT pipe. It's about 3/8ths inch ID between the threads. Would a brass square plug in 1/8th inch NPT work for a pilot? If not, what is a source of square plugs or blanks to make a pilot light?

Lonnie, if you see this, what did you use for the low-pressure propane pilot for your Brutus Ten? Unless I missed it, your source, part number, and orifice size wasn't spelled out in the BYO article.

Thanks!
 
Don't ever apologize for reviving a thread relevent to your post. It's the prefered mode of operation.

I don't think there's any real secret to a pilot orifice. You want to run some thin tubing as the source to restrict the gas flow as much as possible. When you get to your burner, you just need something for which you can drill a tiny hole in to let only the slightest bit of gas out. I can see using thin SS tubing with the end crimped shut and a tiny hole drilled. I wouldn't recommend copper because it might get heat damaged over time. My main point is that I don't think you need a fancy fitting to make it work. You could terminate your tubing at a compression to compression fitting and replace the flame-side ferrule nut with a cap. Then drill that out to the tiny orifice the size of a pin.
 
I simply crimped the end of a 1/4" piece of copper tubing and used some cotton stuffed into the entry end (cold side). Works great, took 3 minutes, and haven't had any problems in over 2 years. I was going to install a needle valve instead of the cotton but, like I said, it's been fine.
 
Bobby_M said:
Was the cotton just to impede the gas flow a bit?

Yeah, basically crimped the tube end to provide a little restriction and a desired flame profile and then added a little cotton to the cold end to fine tune the total flow. A needle valve is probably the best answer but this has worked fine for me... and a cotton ball is pretty inexpensive and very convenient (didn't have a needle valve handy). I was a little concerned about it getting clogged, cotton breaking down, etc but so far it's been rock solid. Plus I have extra tubing so, worst case, it would take about another 5 minutes to replace the whole thing if I ever had to. It was initially just a "make it functional" effort but this kind of falls under the old "if it ain't broke, don't fix it" category.
 
Do you just have a main shutoff valve for the rig that you open up and quickly light all the pilots or do you have valves on the pilot also? I'm thinking of having a single pilot ball valve that will feed a small manifold that goes to all three burner pilots.
 
Bobby_M said:
Do you just have a main shutoff valve for the rig that you open up and quickly light all the pilots or do you have valves on the pilot also? I'm thinking of having a single pilot ball valve that will feed a small manifold that goes to all three burner pilots.

You can kind of see my setup on the link below (brewery page) but basically the flow is propane tank valve > regulator valve > ball valve > Tee fitting which then splits to the solenoid and pilot. I'm only using auto control on the HLT... the other two burners are manual (just ball valves).
 
I didn't see it mentioned here anywhere so if I missed it, my apologies. Most people are well aware of this but normal pilot/burner assemblies have temperature sensors in them that cutoff gas flow in the event of a total flameout. Just a reminder that if you're using something like this in any kind of even partially enclosed environment (bad idea anyhow), it needs to be monitored. It's easy to forget simple things like this sometimes and I wouldn't want to see anyone blow up perfectly good homebrew.
 
That's a great point and I'm glad you brought it up. I don't leave my brewing area for more than 3 minutes while my main NG supply valve is turned on whether I'm flame on or flame off. If you never plan on automating the burner gas, I think a spark based ignition setup is fine since you're already there man-handling the valves anyway.
 
Yeah, I stepped away last weekend for a minute which turned into a few minutes... returned to a flameout and the smell of propane. Sometimes you have so much going on that you forget some of the small but very important things.
 
I checked the place where I bought my burners and they sell a "pilot burner" that I think is the right part. These are the pilots that I think fit these burners. I emailed them to ask.
 
I have friends that do special effects. i called them yesterday when i saw this post, and still have heard back from them. But in there last build they used auto restrike pilots. Nice piece of hardware. They do things like this.

When i finaly hear from them i'll let us guys know what they use. There going to help me make my own burns for my brew stand.
 
Last edited by a moderator:
Back
Top