Please critique my HERMS workflow

Homebrew Talk - Beer, Wine, Mead, & Cider Brewing Discussion Forum

Help Support Homebrew Talk - Beer, Wine, Mead, & Cider Brewing Discussion Forum:

This site may earn a commission from merchant affiliate links, including eBay, Amazon, and others.

A4J

Supporting Member
HBT Supporter
Joined
Mar 2, 2008
Messages
1,334
Reaction score
36
Location
the Desert, CA
I'm planning on moving on to an eHERMS process and I'm starting to put the parts together for a brew rig. Please take a look at my design and if you have any comments, I'd love to hear them.
6799636852_eccc3bec11_b.jpg

Goals
  • minimize the amount of equipment [kettles, valves, plumbing, etc.]
  • as much automation as possible but still be able to switch to manual
  • hard plumbing as much as possible
6799637048_b328e62716_b.jpg

6945746933_57dafac57a_b.jpg

6945895615_4382717e70_b.jpg

6799788430_30b7b3e8f7_b.jpg

6945895817_e23930a7d9_b.jpg

6799788504_f2f36a3be6_b.jpg


Hopefully the images above are self explanatory. If I left something out, please let me know.

Thanks.
 
Your system flow makes sense to me. I've seen some people using the herms coil as a counter flow chiller, passing the beer through the copper while emerged in an ice bath (hlt). This might only make sense if you don't already have a plate chiller...

Nice diagrams!!

Where do you plan to get the solenoid valves??
 
Shouldn't your valve "H" be on the output side of Pump "2" so that it stays primed? Forgive me if I missed something I'm still trying to get my own HERMS figured out.
 
Your system flow makes sense to me. I've seen some people using the herms coil as a counter flow chiller, passing the beer through the copper while emerged in an ice bath (hlt). This might only make sense if you don't already have a plate chiller...
I already have a plate chiller but I still need to pre-chill my water, even in the winter time.

Where do you plan to get the solenoid valves??
from http://www.oscsys.com/ or dudadiesel.com
 
Hopefully you find motorized ball valves, I've only heard bad things about solenoid valves, especially when passing wort through them.

I really like the flow! There's only two things I would probably change if it were my own. I would consider a HERMS bypass, and I would also consider one pump that pumps only water and one pump that pumps only wort. There's no real benefit to that except you'd really only have to clean one pump thoroughly every once in awhile.

I attached an edited version of your flow with the bypass I was talking about. If you hit our target temp you could easily bypass the HEX so you don't overshoot. This can also be used for sparge once you send your sparge through the HEX to flush any remaining wort. Then bypass and your sparge flow will be unrestricted by the coil.

6799636852_eccc3bec11_b.jpg
 
I attached an edited version of your flow with the bypass I was talking about. If you hit our target temp you could easily bypass the HEX so you don't overshoot. This can also be used for sparge once you send your sparge through the HEX to flush any remaining wort. Then bypass and your sparge flow will be unrestricted by the coil.
That's an excellent idea! Thanks.
 
I would add one valve on the other side of the tee where valve H is. This way you can close off the length of pipe running to valve G. I don't know the distance but that is a lot of space that is just filling with wort and not being used. I hope this makes sense.
 
Also why (unless you already have the plate chiller) wouldn't you use your HLT as a chiller?
 

Go with the motorized valved from oscsys.com or from http://www.tfjt.com/en/index.asp which you may find cheaper.

Although solenoids are instant, which is nice, if they get sticky or if anything solid get's in your lines they will jam, which can be hell on brew day. Go with motorized. A word of warning though, they take anywhere from 5 to 13 seconds to completely open or completely close.

http://www.tfjt.com/en/product_x.asp?id=22
 
Your system flow is very similar to mine, I use propane and manual valves but the process is the same for everything except the cool down. My plate chiller works great by itself. I really like the set up and you should too.
About the pump priming. It is a good idea to have a drain valve immediately after the pump so you can prime with a quick open and shut, any time. Getting a stuck prime sucks.
Also consider washout. I use all hard plumbing and one ss braided hose that quick-connects to different parts of the system so I can clean everything out with hot water from the HLT, including back-flushing the chilller. Here's a pic.
Cheers

P2220028resized.jpg
 
I would add one valve on the other side of the tee where valve H is. This way you can close off the length of pipe running to valve G. I don't know the distance but that is a lot of space that is just filling with wort and not being used. I hope this makes sense.
I just drew them far apart for illustration purposes only. I do plan on building those 2 valves really close to each other; there will only be a tee separating them.
 
Go with the motorized valved from oscsys.com or from http://www.tfjt.com/en/index.asp which you may find cheaper.

Although solenoids are instant, which is nice, if they get sticky or if anything solid get's in your lines they will jam, which can be hell on brew day. Go with motorized. A word of warning though, they take anywhere from 5 to 13 seconds to completely open or completely close.

http://www.tfjt.com/en/product_x.asp?id=22
I can't seem to find where to buy those chinese valves directly. Do you have a direct link?
 
Also consider washout. I use all hard plumbing and one ss braided hose that quick-connects to different parts of the system so I can clean everything out with hot water from the HLT, including back-flushing the chilller. Here's a pic.
Cheers
Thanks for the pic. I'm still toying with how to actually implement the hard plumbing. I will most likely use silicone hoses with quick disconnects for easy cleaning. While it isn't "hard plumbing" in the traditional sense, my house is plumbed with silicone hoses so yeah, it's hard plumbing in my book.
 
Go with the motorized valved from oscsys.com or from http://www.tfjt.com/en/index.asp which you may find cheaper.

Although solenoids are instant, which is nice, if they get sticky or if anything solid get's in your lines they will jam, which can be hell on brew day. Go with motorized. A word of warning though, they take anywhere from 5 to 13 seconds to completely open or completely close.

http://www.tfjt.com/en/product_x.asp?id=22

+1, bought from tfjt as well
you can contact their sales support Amy writing to this email: smartvalves [at] yahoo [dot] com


cheers

gm
 
I am resurrecting this thread. I first want to say thanks to @A4J for providing the illustrator drawings. I ended up building my HERMS system as a copy cat, with a couple of changes (one being I am not using electric devices to control temps, instead propane burners and watching the thermometers. Second I dont have the "bypass" of the HERMS circuit, and i think I dont have a flow valve for the input side of the MT from the HERMS out (i just have one ball valve where the diagrams show one on the HERMS out and the MT in, that seemed redundant to me).

okay all that being said I have a question (i have never brewed on my system, just finishing it up this week).
Sparging - I think I am all ready to brew and then I read some more threads and my world gets rocked and I feel I havent read enough. Sparging is the latest to rattle my brain.

As shown in diagram 5, is this type of sparging considered "batch" sparging? I've read to do fly sparging you need two pumps, and this diagram is using both pumps, so maybe this is Fly Sparging? But as I read fly sparging, it sounds like this occurs for a long period of time (45 mins - 1 hr), in the diagram, does one control the flow such that this sparging process should take an hour?

Thanks for any pointers, I am including pictures of my setup
20201003_133756.jpg
Piped up.jpg
20201114_171135.jpg
 
To the last post....

in the original diagram shows first runnings then a sparge in the next diagram. If you’ve made it this far in brewing and are building a system like this—I’m surprised you don’t know what you want your process to be! That said—you rock for building this!

I would fly sparge with your system but you could easily batch sparge if you wanted to
 
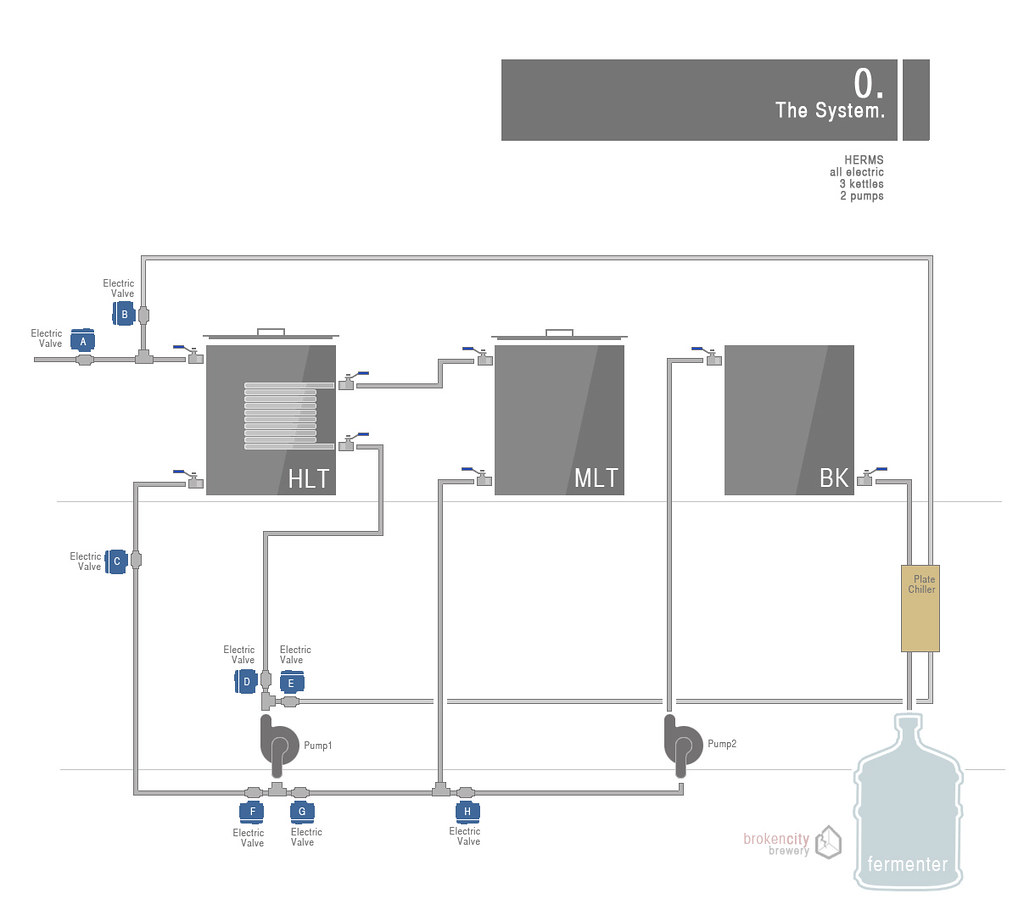
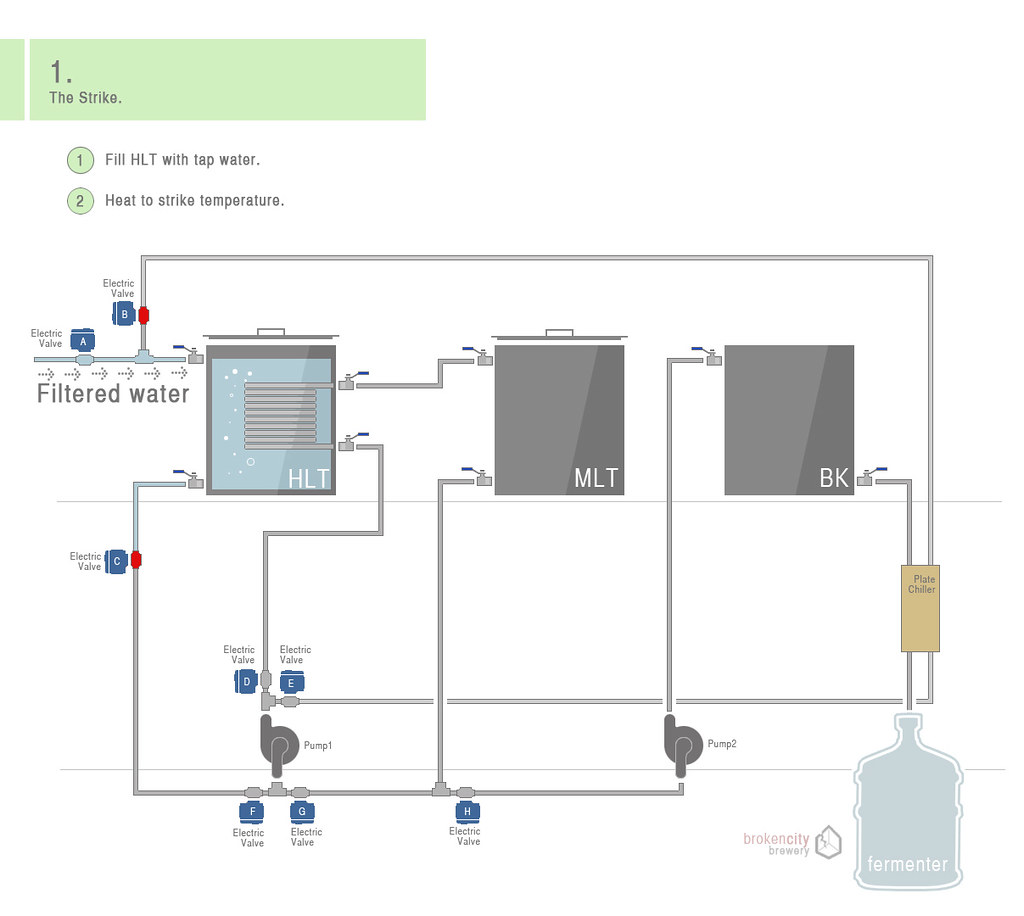
@BigJay13 Hey Jay, thanks for the reply. I am slow responding back (holidays). Yeah...you sort of nailed it on the head "Surprised you dont know what you want your process to be".... The quick back ground is i did several extract brews, enjoyed the process and wanted to go to the next stage. I was living just North of Seattle and had great access to a guy who, for a lack of a better term, stock piles home brew stuff and resells it (as well as customizes it) so I had access to (compared to retail) very inexpensive equipment. I was able to find a brew stand for cheaper than the cost of the steel let alone the time and welding, so it seemed "economical" to go into a single tier system. I read up a fair amount here on HBT and decided I wanted to try and make it a HERMS, but eliminate the complication that came with electronics (electric propane switches....didnt have 220V to do electric elements).
Saw this thread, liked how it was laid out, and thought "I can replicate this with what i have" and thats what i aimed to do. Then after acquiring everything and getting ready to assemble, my wife and I decided we should move back to the east coast closer to family and the brewing effort halted and we focused on prepping the house to put on the market and logistics for a cross country move.
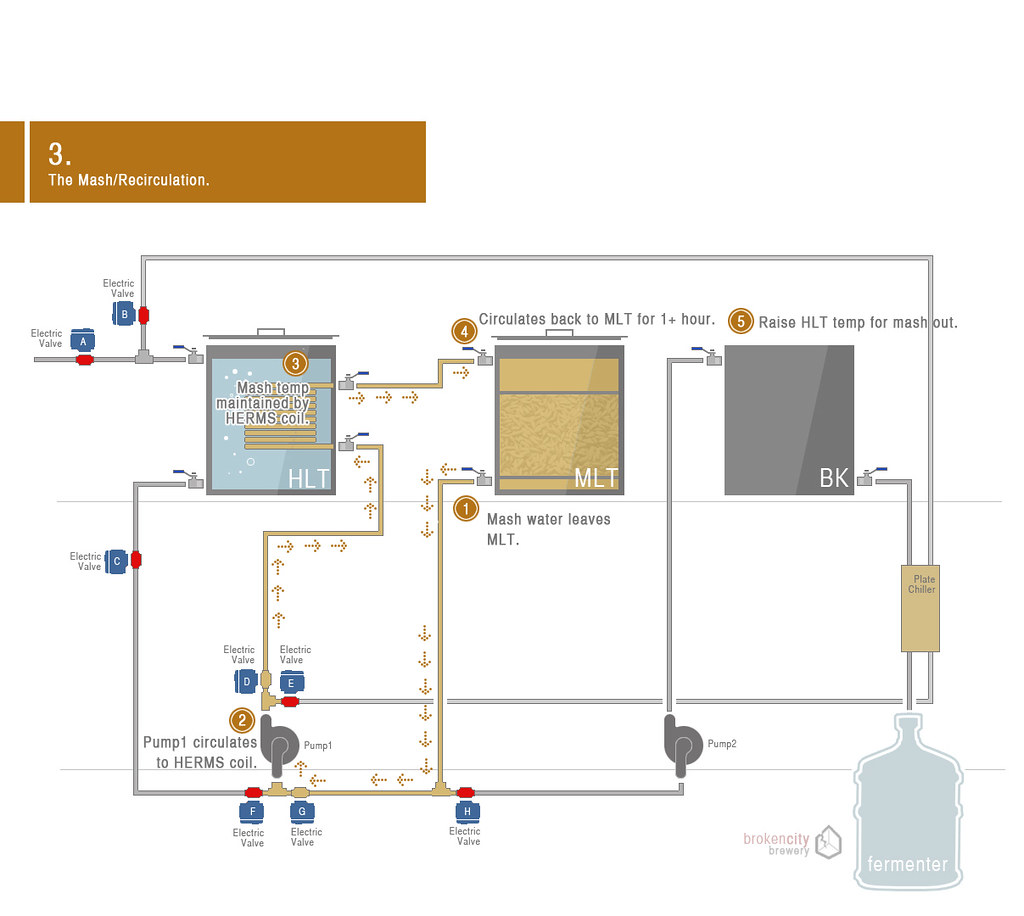
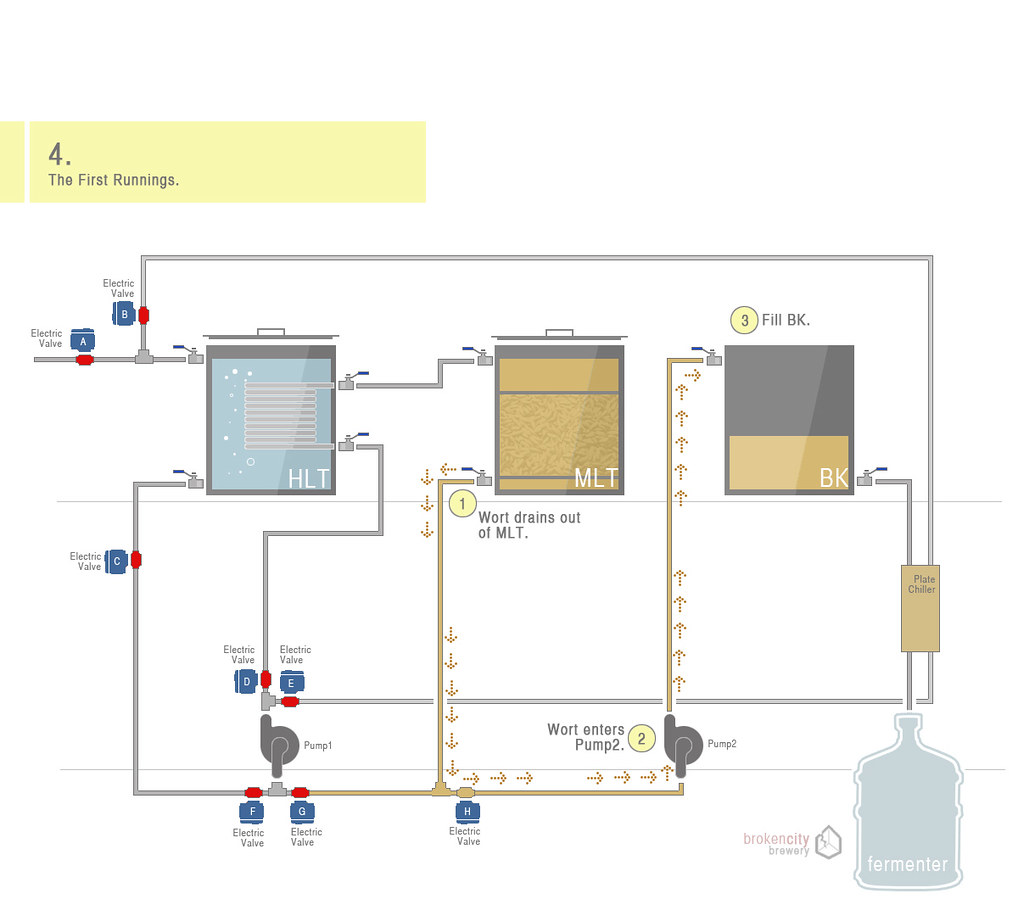
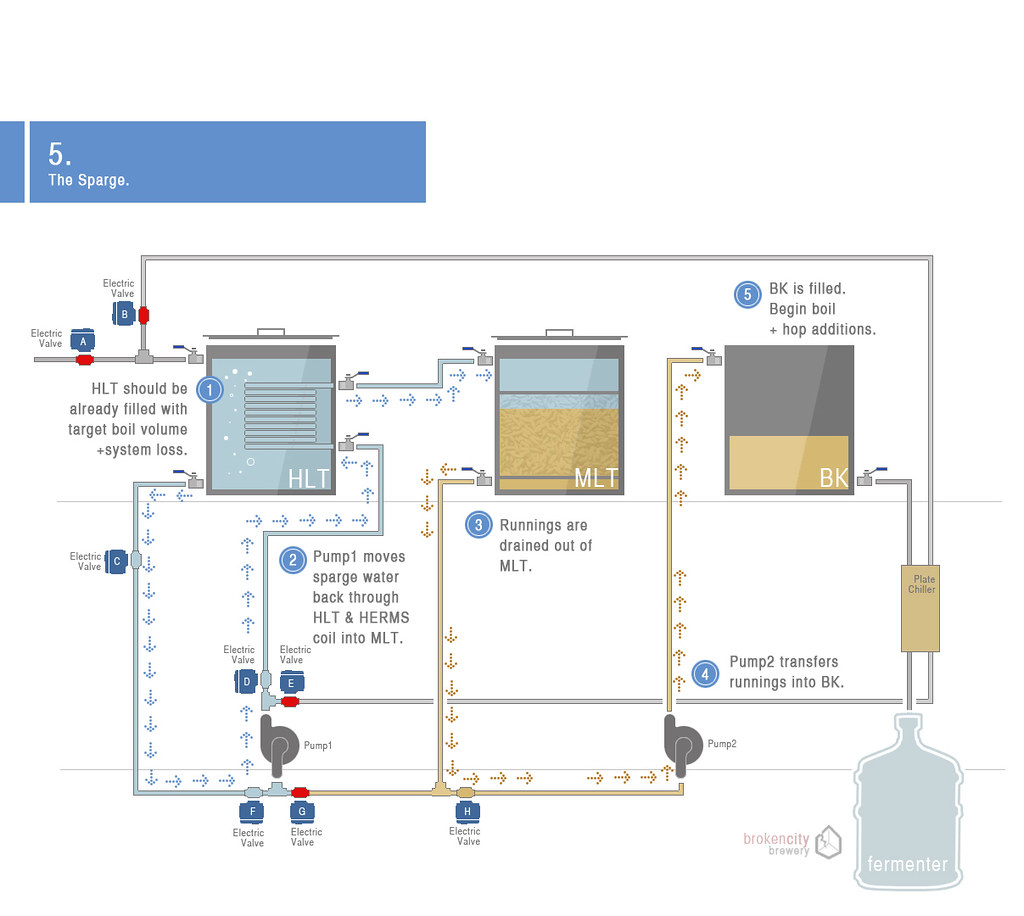
Now I am in the Charlottesville VA area, and I havent connected to the brewing community here yet, but I want to get a brew on this rig! Like I said in the post you replied to, I thought I knew what i was going to do for sparging, but I did some more reading and got myself to the spot where I said "crap, what do I do for sparging - my plan has been to spray/trickle water from above onto the grain as I pumped it out, but that certainly wont take an hour (I dont think)"

so thats where I am at, still havent brewed on it (decided the MT I have shown (far left) only could hold 11 gallons and I didnt think that would be large enough for the grain bill I have, so I got a local brewers keggle and just got it set up the way i wanted. So last step (before brewing) is to mark off my sight glasses and reclean the keggles.

So does fly sparging have to take 45 mins - hour? Cheers and Happy New Years y'all
 
So does fly sparging have to take 45 mins - hour?

The generally recommended runoff rate is 1 quart per minute, so, yeah, easily 45-50 minutes to accumulate a pre-boil volume for a ten gallon batch...

Cheers!
 
Back
Top