Help with converting from propane to electric

Homebrew Talk - Beer, Wine, Mead, & Cider Brewing Discussion Forum

Help Support Homebrew Talk - Beer, Wine, Mead, & Cider Brewing Discussion Forum:

This site may earn a commission from merchant affiliate links, including eBay, Amazon, and others.

ddknight

Supporting Member
HBT Supporter
Joined
Jan 29, 2008
Messages
152
Reaction score
0
Location
Cincinnati, Ohio
I am looking for some input or help possibly converting the system I currently use, which is run off of propane, to an electric system. My main reason for wanting to switch over is simply comfort - I want to brew inside where it's cooler in the summer and warmer in the winter.

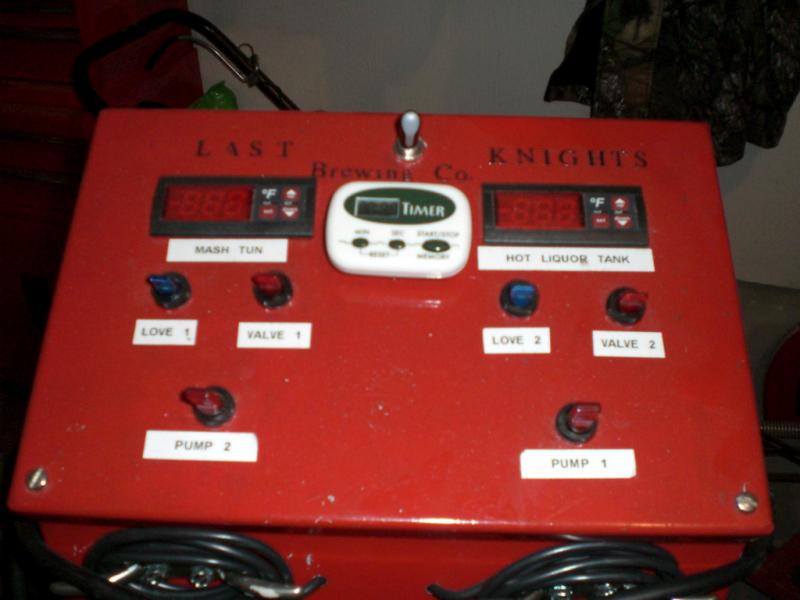
I currently have a brutus single tier set up now that has this control panel:

attachment.php


I also have 3 Blichmann kettles to use and 2 March Pumps. Tubing and QD's are already present as well. I use one Blichmann as the HLT which also contains a HERMS coil for the mash. All will be done on a lab grade stainless steel table I have in my basement.

I am looking to see if the control panel I have currently can somehow be easily reconfigured to control the electric side of things with the elements I will obviously have to install in the BK and HLT. I plan to continue with the HERMS method.

I also have a small window located just above where I will be brewing and will probably need to look at some sort of ventilation from what I've read on here thus far. Ideas on this would also be appreciated.

Please let me know if I there is more information that I could provide to anyone and hopefully I'll be able to start on this project in the near future! Thanks for everyone's input in advance!!

ddknight
 
I currently have a brutus single tier set up now that has this control panel:

attachment.php


ddknight

Pic is a dead link right now. I'd be interested to see the size of your box and what your electric service is like, and whether or not you can modify or add to your service panel.
 
Lets try the picure again here. Sorry for that.

As for the electric availability I had an electrician come out and he said he could run a 220v to my brewing area and get at least a 30amp breaker installed and I'm going to see if he could do 50 instead I think. I have 2 spaces on my panel open I believe he said so I should be able to add enough for this use.

photo.jpg
 
Ten gallon system?

If so, if you go with 30 amp, you will need a DPDT relay (a way to switch on/off both hot legs of 240v, as well as switch the power from one element to another), and an SSR (for your love control) inside your box. If you go with 50 amp (to enable firing 2 elements at once), then you will need 2 DPST relays and 2 SSR's. So make sure you have space in your box for all that stuff. If that doesn't work you can always add a box for the extra relays.
I'd be glad to clarify anything or try to answer any other questions.
 
The system I currently have is for 10 gallons although it's not very often that I make ten gallons at a time but is nice to have on those occasions.

I will probably want to have the option to run both elements at once so that I can start the boil while I'm finishing sparging in order to move things along. I had thought about an option of using a simple heatstick off of a 120v outlet to keep the temps okay in the HLT at the end of the mash while I use the 240v new outlet to start heating the BK after sparging begins which may save on complications with the control box.

Of note, I did also build the control panel that Jkarp built for his countertop Brutus which is how I was introduced to ebrewing. I am using that now for small batches/test batches of beer inside. I could utilize that as well if that would work.

I guess that I do have the option of just building a new control box if it makes things easier. I'm trying to get things done as easily as possible but done correctly the first time so there's no problems down the road.

Since I have the expensive kettles, pumps, chiller, etc already I do have a little extra money in my budget to probably put into the control panel but am not sure how much that would actually cost. I've seen ranges from about 100 to over 600 dollars on here I think.

Any suggestions or advice for going forward would be great. Sorry if I'm writing a lot but just want to provide as much info as possible.
 
Well, you have several options, really. You've identified the first decision, heat sticks vs. mounting elements in kettles. Heat sticks are simple to make, flexible, and effective. I do ten gallon batches and two 2000 watt heat sticks are plenty. All you need are a couple of 20amp gfci outlets and you're good to go.

Mounting in the kettles is another very good option. Again, 220v isn't required as you could just mount 2 120v 2000w elements.

Unless you have a strong feeling for your final system configuration I see no reason not to start with a few heat sticks and see how you like things. A bit more start up cost than mounting in the kettle, but they are wonderful, flexible devices.

The other thing to consider is what your electrical situation is in your brewing area. Do you have some 20amp lines you can dedicate to brewing? Do you have space in your panel to add circuits? This is really where the costs start to add up.

As for ventilation, there are many solutions. I went with an inline fan and some ducting thru rigid foam board in the window. I spent less than $100 on my setup and it's likely way more than I need, but at least there's no problem with steam.

For a control panel, I'm curious to hear opinions. I didn't build one until I went RIMS. I'm sure you'll enjoy electric brewing.
 
Thanks for the replies thus far. I've done a ton of reading here in the forum now am going to start making some layout plans.

I really like the look and build of Tiber Brew's electrical rig and that may be the way I'm headed. I looked through several other builds such as Kal's, Ohio Ed's and Gabrews and think a slight combo of those would do me very well for the long term.

I think my biggest thing is to start putting together and drawing out the specs for my control panel. I'm learning a lot here every day and am starting to feel more comfortable with the components used and after building a countertop Brutus last fall feel a little more comfortable with the wiring. That's where I'm sure I'll have questions to post!

I'll try documenting things as I go as well to get input and advice. It's been great to study the schematics that have been posted for the control box by P-J so that will be used as my guide I think.

Any advice on buying a control box? Would a plastic box work or should it be metal? Looks like on size about 12x12x10 or 8 would work okay for most designs. I also need to start searching through for parts lists to start ordering some materials.

I have an entire single tier Brutus propane setup now that I will end up putting up for sale this week and hopefully that will offset costs if I can sell it! Thanks again for the input so far guys.
 
Any advice on buying a control box? Would a plastic box work or should it be metal? Looks like on size about 12x12x10 or 8 would work okay for most designs.

I would strongly recommend a plastic box, NEMA4x. I just built one all hard wired for my pub with a new JIC plastic box. SOOO much easier than working with SS. I've done enclosures with both. This one is very sturdy, its what I used, but you can buy smaller.
I'm also glad I decided to hard-wire (no plugs) using liquid-tight conduit. Dealing with and paying for all the plugs and nonsense are kind of unnecessary, depending. If you can deal with things attached to each other, do it that way and save yourself alot of trouble.
 
Thanks for the control box suggestion. I looked around and found this one: http://www.automationdirect.com/adc...in._X_6_in._to_16_in._X_14_in.)/HW-141208CHSC

I would think it would do. I thought it may be easier for me to use since it's a little deeper and not quite as big as the one you provided me with. Any thoughts?

Also, you don't happen to have pics of the way you hard-wired things do you? I looked at the pics of your system on your profile and looks like you do a HERMS. Do you also chill the wort after boil with the HERMS coil? How well does that work if you do? I am thinking of doing the same thing that's why I ask.

Thanks again for the info so I can get started!
 
The hard wired system is not yet complete, and no pics yet though I can try to take some tomorrow. It's a 1.5 bbl RIMS, without HLT.
The HERMS system in my pics uses the coil in the boil kettle for chilling, and occasionally the coil in the HLT as well. I get very good chilling times with it, but its inconvenient to bother with the amount of ice it can consume.

I recirculate and hop the wort while chilling with ice water which I load into the HLT and run through the BK's coil. Looking back, my chilling bottleneck is the speed of the pump moving the icewater. Mine is a march pump.

Sometimes I'll simultaneously run the wort through the HLT coil during the last 10-15 degrees of the chilling. This is usually not worth the effort and sanitizing though

Doing this again I would make a way to use tap water at a good pressure to chill, and maybe use the HLT coil as a prechiller. or just leave out the BK coil, whirlpool hot, and run through a plate chiller, which is what I'm doing now.
 
I have to offer a differing opinion. I just finished building out my control panel, and my experience working with a plastic enclosure was awful. I really wish I had gone metal. If you have an angle grinder, drill, dremel, and some patience you can cut anything you want into metal quite easily I think. You can also use the punches to cut perfect 22mm holes for switches and lights. The plastic that I used tended to melt rather than cut unless I used a very aggressive wheel or saw at very low speeds, but this left a nasty looking cut. I ended up spending a lot of time with an exacto knife shaving plastic a bit at a time. Another thing, plastic will eventually get dulled up by use, and it scratches easily. Metal can always be repainted or polished to get back that good as new look.

The size depends on what you want to put inside it. I got a 7" deep box and it took some creative organization to get everything to fit since I used Auber PIDs and 5 large relays. If you get a 16x16x8 you'll be able to fit everything reasonable and there will be a lot more space to wire it, making that part quite a bit easier. On the other hand, I went with a 16x12x7 and 3 pids a timer and the relays alone were tough to fit, let alone wire everything up. One final consideration, all of these control panels, 12x12x7 or 16x16x8 are big and heavy when they're complete. I would gladly have traded the negligibly reduced footprint for more space in mine.
 
The more I think about it the more I think I may go with a metal box in the end. I remember when I made the box for my Countertop Brutus the plastic box did melt a bit when I was using the dremmel. I guess to front the money for a nice box would be worth it in the long run so I don't have to redo anything. I really like the look of Kal's control box, even though it's way over the top. I may try to do something like that as well.

Not sure I want to hardwire things just for the ease of moving should that happen. So many things to think about I guess. I didn't realize how freakin expensive the hole punches are either! Hopefully I sell my current single tier Brutus soon and will have a good positive cash flow to fund this project easily!
 
yea, the punches are $$$, but you might be able to find some used ones on ebay for less. Another route is to use the next size down hole saw and then very carefully grind out the hole with a dremel. This is how I put the holes in my plastic box. I got impatient with one of the 240 V receptacles and made the hole about 1/8" too big, but lesson learned. I took my time on the rest of them and they came out fine. Would have been a lot faster and easier with metal, though. Another option is to just run a 22mm hole saw for the buttons/switches/lights in a drill press. The hole will wind up slightly larger than 22mm because the hole saws aren't super precise, but it'll still be smaller than the collar on the device, and the set screws will hold it tight, so once you're done nobody will notice. You can buy all the hole saws you'll need for less than the cost of a single punch, but the holes won't be perfect... Your choice.
 
... I really like the look and build of Tiber Brew's electrical rig and that may be the way I'm headed. ... It's been great to study the schematics that have been posted for the control box by P-J so that will be used as my guide I think. ...
When you do your plan and want to make changes before you start your build, I'd be pleased to modify the diagram to fit your needs. I'm more than sure that Tiber_Brew will help in any way possible as well.

Keep us posted.
 
As P-J noted, I would be more than happy to help.

In fact, I have a spare 10 x 12 x 6 steel enclosure. If you think that size would work for you, I could sell it to you for cheap (I got a good deal on it myself). I also have a 22mm knockout punch that you can borrow if you pay shipping both ways.

Of course, I'd also certainly be willing to answer any questions you may have.

Cheers,
TB
 
Thanks for the feedback P-J and Tiber_Brew. I already found a nice steel enclosure that I'll be using for the project on Ebay pretty cheap so at least that's done. It's 16x16x8 which is what I think the Kal used also and was able to find one for about $60.

I am in the process of selling my Brutus propane stand now and that money will pay for this entire project I think. I went through Kals entire writeup and basically wrote down the parts he used and now I'm going through both of your sites as well to see what will work best for me in the end.

My thought is that if I'm going to do this I want to do it right and do it well so I only have to do it once. To keep things simple I will probably choose one of the pre-made diagrams already drawn up and basically copy that to suit me so that things don't too complicated or over my head.

I'll have a pretty good budget so that's not going to deter me at this point - especially since I already have the Blichmann kettles and pumps and chiller.
 
Any thoughts on a rough estimate of how much it should cost to run a new 240v line to my brewing area? I'm planning on running the wire about 65-70 feet from my breaker box to my brewing area. The installation would include rearranging my breaker box to accommodate the 240v, running the wire through an outside wall and then back in through an open area above the finished ceiling and then hooking up the outlet box.

The estimate I have right now is about $150.00.

Is that the estimate from the electrician?
 
yeah, it is from an electrician.

I had some work done outside this summer and this was the company that installed all the electrical components. I've explained what I'm doing and why I need the setup so he's been pretty good to me so far with some other work.
 
Any thoughts on a rough estimate of how much it should cost to run a new 240v line to my brewing area? I'm planning on running the wire about 65-70 feet from my breaker box to my brewing area. The installation would include rearranging my breaker box to accommodate the 240v, running the wire through an outside wall and then back in through an open area above the finished ceiling and then hooking up the outlet box.

The estimate I have right now is about $150.00.
$150.00? I don't think that will even cover the cost of the wire and boxes. Also, with a run through an outside wall and then back in will require conduit in most cases (with very few exceptions). Now if you could do it yourself??

Hmmm.. Rearranging your breaker box? Seems odd. How about a picture of your mains box. Also what power are you planning on using? 240V - 30A or 240V - 50A?

Edit: Just re-read the thread. I'd suggest 50A 240V. It'll make your brew rig much easier to manage in the long run.
 
Yeah, I did all my wiring myself, and the 50A GFCI breaker alone cost me $82. I paid about $60 for the 30+ ft of wire and $15 for the outlet and box.

$150 for all that you describe sounds like a steal, but I doubt that's how much it would actually cost.

TB
 
I am working tonight so cannot take a picture. The only adjusting he said he would have to do was move up the other breakers on the side he's installing the new circuit on so that there is enough room for the new breaker. I have one in the middle of that side not being used but not two spaces together unless you move some up a space - if that makes sense.

I originally planned on a 30a 240v addition but will check on doing a 50a 240v instead. Not sure if that requires something different or more complicated but will find out. Also, I had originally planned on using the same extension cord with built in GFCI on it as Kal describes in his build, rather than building one into the box. That may be another cost reduction piece.

He's coming over tomorrow to look at a couple of other projects I need him to do so I can run these questions down with him and see what he thinks.
 
Still looking around at some extra parts I have around that people have given me or I've bought cheap from others and I have 2 5500w heating elements that are still in the package. My question is I'm planning on using two elements to brew and have 15g Blichmann's now. Usually do 5-10 gal batches. Is that too big of an element to use in my system or does it matter since it will all be controlled through the PID anyways?
 

Latest posts

Back
Top