You are using an out of date browser. It may not display this or other websites correctly.
You should upgrade or use an alternative browser.
You should upgrade or use an alternative browser.
ebay aquarium temp controller build
- Thread starter android
- Start date

Help Support Homebrew Talk - Beer, Wine, Mead, & Cider Brewing Discussion Forum:
This site may earn a commission from merchant affiliate
links, including eBay, Amazon, and others.
johnlvs2run
Well-Known Member
It turns out my chest box is 1.5 amps, so it probably wouldn't even turn on a solid state relay.
Thanks much for your reply. If I'm reading it right, the sampling cycle of the tm7100rac85dc260v PID is 4 times a second, compared to the STC-1000 of 1 time a minute. That seems like quite a delay for sampling. My understanding is that a PID is more accurate and responsive, which perhaps doesn't make much of a difference for just a few degrees - unless it would cause the controller to work more than it should, more on/off cycles, more heat, more watts, shorter life (hassle of changing) etc. I like the lower price of the STC-1000. Could you elaborate on the differences?For a ferm cabinet, keezer, etc., the simple on/off of the STC-1000 is just as good as a PID. For other applications like controlling a RIMS or HERMS, the PID offers some advantages.
JuanMoore
Getting the banned back together
It turns out my chest box is 1.5 amps, so it probably wouldn't even turn on a solid state relay.
Thanks much for your reply. If I'm reading it right, the sampling cycle of the tm7100rac85dc260v PID is 4 times a second, compared to the STC-1000 of 1 time a minute. That seems like quite a delay for sampling. My understanding is that a PID is more accurate and responsive, which perhaps doesn't make much of a difference for just a few degrees - unless it would cause the controller to work more than it should, more on/off cycles, more heat, more watts, shorter life (hassle of changing) etc. I like the lower price of the STC-1000. Could you elaborate on the differences?
In either case, on/off controller or PID, you'll want to set the temp differential to several degrees F and secure the temp probe to something with some thermal mass (I tape mine to the fermentor with the most recently brewed beer in it) to prevent the compressor from turning on and off constantly. This is known as short cycling, and can kill a fridge or freezer in no time. Many temperature controllers (STC-1000 included) have a "compressor delay" feature that you can program, which will stop the compressor from turning on if it has been running recently, which is meant to be an added layer of built in protection against short cycling. I have my compressor delay set to the max of 10 min.
Even if you wanted to use the smallest allowable temp differential on the STC-1000 (0.3C), we're dealing with a large volume of liquid with a very large thermal mass. How much do you think the temp is going to change in a second, or a minute, or even an hour? Certainly less than your temp differential. And FWIW the sampling on the STC-1000 is way faster than once a minute, but for the application of a keezer or ferm cabinet I wouldn't really care even if it were, because an extra min of the fridge or heater being on (or not on) isn't going to significantly change the temp of the 20-40 gal of beer I have fermenting at any given time.
A PID is more complicated than a simple on/off switch, and by recycling the results back into the input, it can be "tuned" to shut off at just the right moment before the target temp is reached so that there's no overshoot. This is really only useful in fast changing systems, which doesn't include keezer or ferm chamber temperatures.
For those mounting, what size nut do you use on the back of the wall jack? It's the only thing stopping my cooling-only build of the STC-1000.
I'm not quite sure what you're asking. You said earlier you're mounting it in the collar right? Are you asking about mounting the controller or the outlet box? I didn't use any nuts for mounting mine in the collar of my keezer, but maybe I'm not understanding what you're trying to do.
For those mounting, what size nut do you use on the back of the wall jack? It's the only thing stopping my cooling-only build of the STC-1000.
If you are looking for the size of the machine screws on either end of the outlet
i believe they are #6 / 32
If you are looking for the size of the machine screws on either end of the outlet
i believe they are #6 / 32
This. Thanks!
I got a project box in the interim (or perhaps permanently) because I don't want bare terminals hanging around for kids to play with... I'll post pics later tonight.
14AWG, on the other hand, I would say is a must.
And with regards to both the use of 14AWG and a fuse, I should add that you just NEVER know what some idiot might randomly decide to plug into the box. It probably won't happen, but since it's even possible, they are smart steps to take. And if for some reason you need to use smaller gauge wire, a fuse absolutely becomes a MUST in order to make sure the wire isn't overloaded.
I just don't understand the mindset of completly overbuilding something. I am using 16GA wire with no problems. The Extension cord a salvaged the wire from is rated @ 13 amps ..and thats at 25'. I mean the minimum safety reqs are there for a reason. You don't think they pad the number a little bit to account for someone over loading?
Here's my build.
I used a single outlet, which fit perfectly into one of my hole saws (1.5" I think).
If I keep it in the box, I'd like to change the probe hole to a mono jack. I also need to clamp down the power cable.
Overall it's not bad and it's pretty safe (at least it will be once I lock down the power jack's screws). (Also planning to flip the jack so the ground is at the back).
.jpg")
.jpg")
I used a single outlet, which fit perfectly into one of my hole saws (1.5" I think).
If I keep it in the box, I'd like to change the probe hole to a mono jack. I also need to clamp down the power cable.
Overall it's not bad and it's pretty safe (at least it will be once I lock down the power jack's screws). (Also planning to flip the jack so the ground is at the back).
kennywd
Well-Known Member
f0xtr0t said:I just don't understand the mindset of completly overbuilding something. I am using 16GA wire with no problems. The Extension cord a salvaged the wire from is rated @ 13 amps ..and thats at 25'. I mean the minimum safety reqs are there for a reason. You don't think they pad the number a little bit to account for someone over loading?
I disagree, they have the safety regulations for a reason. Electricity is dangerous! The wire generate heat as more power flows though them. More amps more heat, smaller wire will cause Tito heat too fast. All that heat soon burns your house down. I use the 14 gauge wire, with a fuse. Which prevents me from ever getting close to overloading.
Recommended:
Refrigerator - 110 - 120 volt, 60 hertz, properly grounded circuit protected by a 15 amp circuit breaker or fuse. #14 gauge house wire minimum, #12 is preferred. A separate (dedicated ) circuit serving this appliance is recommended
Although electrical wiring is designed to carry current at much higher than its rated capacity, increasing current above this rated capacity causes the wire to generate excess heat. This is not a problem as long as the heat can be dissipated from the wire. However, if the wire is enclosed within a small insulated space the heat in these areas may not be able to dissipate as quickly as it is being generated
Giving someone bad information when dealing with electricity could ruin someone's life or worst. Not everyone here works as an electrician.
Ok but recommended by who? The 16/3 wire I have is rated at 13 amps. Whats the max amps the freezer pulls 6? and 1.5 when its running. Plus that is rated at 25' not the 10' you will probably cut it at. What I am saying is 16 ga wire is within specs to run the equipment there is no need to waste money and buy a larger gauge cord just because your scared of burning your house down. If the cord is rated at a spec it is perfectly safe to use it within the specified uses of the wire.
I made the comment about the wire being over rated by the manufacturer because that is essentially what your suggesting to do. The wire is already over speced by the manufacturer to protect them and you are suggesting to go further. Which to me is pointless and a waste of money. ...Although If it helps you sleep at night. I guess you can buy peace of mind.
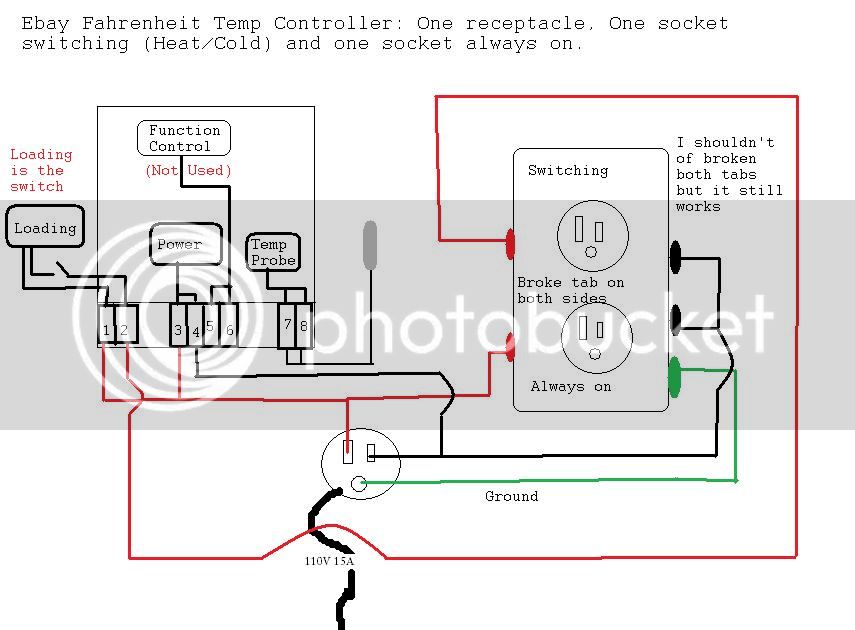
Alas, I am trying to wire up one for a friend and I'm having some problems. I can't get the switched outlet to work. I waited for the delay and I can hear the relay kick on but I get no voltage when I test at the back of the controller. Here is my wiring diagram.
 Also I have no idea what the loading is for. This isn't the STC-1000 this is the Fahrenheit model. I also tried to wire up every leg of of the neutral and that didn't work eitherhttp://www.ebay.com/itm/16074099555...X:IT&_trksid=p3984.m1439.l2649#ht_3944wt_1396 (Also I understand its AC current but the red/black is just for effect)
JuanMoore
Getting the banned back together
f0xtr0t said:Alas, I am trying to wire up one for a friend and I'm having some problems. I can't get the switched outlet to work. I waited for the delay and I can hear the relay kick on but I get no voltage when I test at the back of the controller. Here is my wiring diagram.
Also I have no idea what the loading is for. This isn't the STC-1000 this is the Fahrenheit model. http://www.ebay.com/itm/160740995557?ssPageName=STRK:MEWNX:IT&_trksid=p3984.m1439.l2649#ht_3944wt_1396 (Also I understand its AC current but the red/black is just for effect)
The "loading" terminals are the relay. Don't use the "function control" terminals at all. Shorting them simply locks the programming in place so it can't be changed. If you go back just a few pages in this thread you'll find where someone posted my wiring diagram for that unit.
Edit: You also need to use the relay to switch one leg of the power to the outlet, the controller doesn't supply the power.
Edit#2: Here's the diagram-

Ahh this one is a little different then the one I got first. OK well I back to the work bench to try it out.
Well No dice. I still get no power. I thought I checked with my multimeter at the loading terminals. I guess this unit was defective. The worst part is I can hear the relay kick on and off.
Ok I just read your edit. I think I got it now. Ill rewire in the morning after waffle breakfast with the kids")
[update]
You were right. I was thinking that the 1/2 terminal supplied power instead of a switch. Here I fixed it I tested it on my Keezer and it's working fine. I also fixed the diagram.
Well No dice. I still get no power. I thought I checked with my multimeter at the loading terminals. I guess this unit was defective. The worst part is I can hear the relay kick on and off.
Ok I just read your edit. I think I got it now. Ill rewire in the morning after waffle breakfast with the kids
[update]
You were right. I was thinking that the 1/2 terminal supplied power instead of a switch. Here I fixed it I tested it on my Keezer and it's working fine. I also fixed the diagram.
kennywd
Well-Known Member
f0xtr0t said:Ok but recommended by who? The 16/3 wire I have is rated at 13 amps. Whats the max amps the freezer pulls 6? and 1.5 when its running. Plus that is rated at 25' not the 10' you will probably cut it at. What I am saying is 16 ga wire is within specs to run the equipment there is no need to waste money and buy a larger gauge cord just because your scared of burning your house down. If the cord is rated at a spec it is perfectly safe to use it within the specified uses of the wire.
I made the comment about the wire being over rated by the manufacturer because that is essentially what your suggesting to do. The wire is already over speced by the manufacturer to protect them and you are suggesting to go further. Which to me is pointless and a waste of money. ...Although If it helps you sleep at night. I guess you can buy peace of mind.
Your also assuming everyone is using the same type fridge, larger capacity fridges will pull more amps, also the reason they also use the larger amperage is because of starting load watts/amps can hit the amperage ratting of 16 gauge wires. Some fridges starting amps can hit 13-14 amps 1-3 secs, if the fridge is in perfect working condition that it may never get close. And 14/3 is not that much more expensive that 16/3 gauge when your normally talking about 2-3 feet.
I am just trying to be informative about the safety of things... Now if you have a tester that can tell you what your starting amps are you can defiantly determine what gauge you can use. But. Unless you have that tool you should just use what is recommended by pretty much every electrician to every non-electrician. Also i think a kill-o-watt meter will not be able to give you an accurate read of the surge power, it is made to test a running wattage.
This is an estimate I found, by no means will it always be accurate to your device...
Multiply: WATTS X 2 = Starting Load
This formula yields a close approximation of the starting load of the appliance, though some may require an even greater starting load. NOTE: Induction motors such as air conditioners, refrigerators, freezers and pumps may have a start up surge of 3 to 7 times the continuous rating.
I disagree, they have the safety regulations for a reason. Electricity is dangerous! The wire generate heat as more power flows though them. More amps more heat, smaller wire will cause Tito heat too fast. All that heat soon burns your house down. I use the 14 gauge wire, with a fuse. Which prevents me from ever getting close to overloading.
Recommended:
Refrigerator - 110 - 120 volt, 60 hertz, properly grounded circuit protected by a 15 amp circuit breaker or fuse. #14 gauge house wire minimum, #12 is preferred. A separate (dedicated ) circuit serving this appliance is recommended
Although electrical wiring is designed to carry current at much higher than its rated capacity, increasing current above this rated capacity causes the wire to generate excess heat. This is not a problem as long as the heat can be dissipated from the wire. However, if the wire is enclosed within a small insulated space the heat in these areas may not be able to dissipate as quickly as it is being generated
Giving someone bad information when dealing with electricity could ruin someone's life or worst. Not everyone here works as an electrician.
Yup, I completely agree. I'm a cheap skate but even I opted for the 14 gauge wire. I'd rather be safe than sorry especially when it concerns electrical projects and the potential for fire.
kennywd, since I'm certainly no electrician, how could I go about wiring a fuse into this setup? I copied everything in the original post and have the STC-1000 model.
They make in-line fuses at radio shack. You just put it inline in-between the wall the stc-1000.
And the point I was making is 16/3 is rated at 13 amps. My keezer is 5 amps at startup and 1.5 while running. Which is well within spec for the cable. So check your freezer and determine the correct cable size for your particular application.
And the point I was making is 16/3 is rated at 13 amps. My keezer is 5 amps at startup and 1.5 while running. Which is well within spec for the cable. So check your freezer and determine the correct cable size for your particular application.
kennywd
Well-Known Member
f0xtr0t said:They make in-line fuses at radio shack. You just put it inline in-between the wall the stc-1000.
And the point I was making is 16/3 is rated at 13 amps. My keezer is 5 amps at startup and 1.5 while running. Which is well within spec for the cable. So check your freezer and determine the correct cable size for your particular application.
Which is good, I am sorry if I seemed heated, my family owns an electrician company here. I grew up being over careful when it comes to electricity. I have known ppl who have gotten hurt by not following codes.
drocu said:Yup, I completely agree. I'm a cheap skate but even I opted for the 14 gauge wire. I'd rather be safe than sorry especially when it concerns electrical projects and the potential for fire.
kennywd, since I'm certainly no electrician, how could I go about wiring a fuse into this setup? I copied everything in the original post and have the STC-1000 model.
Foxtrot is right they do make an inline fuse at radio shack. I picked up one up that screws into the side of my project box and you just solder the wire on ... Mine is rated for 10 amps.. I live in Texas, and as soon as the heat kicked up I blew the fuse. That has been once in the 7 months I have used it. Even though your fridge probably won't hit 10 amps normally like foxtrot has said, there are rare occasions when you can.. I have no idea what the peak amps where that blew the fuse. Now radio shack where I live didn't have a 15 amp fuse, but I would have rather picked that up, since the wire is rated for 15amps.
You can see my fuse at the bottom of the box right next to the wire coming out.. If the fuse blows it just shuts my fridge down.

I thought I'd share a bit of info. I will admit I didn't read all 254 pages of this thread but I've done searches for this and didn't come up with anything on this board.
I was looking to create an additional probe for my STC-1000. Not originally understanding the difference between K-Type and NTC probes I wrongly assumed I could get a SS K-Type probe and cut the wires and connect it. This failed miserably so I looked around these boards and others to figure out how the probe worked and if I could find a replacement.
To summarize my findings the probe is a NTC thermistor. To replace a NTC thermistor you have to know its Resistance at 25C and its Beta curve. According to a thread on TheHomeBrewForum.co.uk Thread link the probe is the same as a probe for another temp controller called a "ATC-800+" which has a known resistance of 10K at 25C and a Beta curve of 3435K between 25/85C.
All that being said Digi-Key has said NTC Thermistors for less then a dollar a piece Part link. I ordered 5 and I'm testing one now side by side with the original probe with good results, I'm getting a consistent temperature within .3C (1F) of the original probe at temps between 32.2C (90F) and -19C (-2.2F).
So I plan to take a SS probe I have sitting around (cheap digital oven probe) cut the end off and pull the K-Type probe out then insert my NTC Thermistor and seal it up. This way I can have a SS probe use switch out and use my temp controller for a Sous vide cooker via my slow cooker. I don't trust the original probe sitting in a hot water bath.
I got mine wired in yesterday. Works awesome! I used the wiring diagrams on this thread.
Thanks for this info, could be very useful in the future
I thought I'd share a bit of info. I will admit I didn't read all 254 pages of this thread but I've done searches for this and didn't come up with anything on this board.
I was looking to create an additional probe for my STC-1000. Not originally understanding the difference between K-Type and NTC probes I wrongly assumed I could get a SS K-Type probe and cut the wires and connect it. This failed miserably so I looked around these boards and others to figure out how the probe worked and if I could find a replacement.
To summarize my findings the probe is a NTC thermistor. To replace a NTC thermistor you have to know its Resistance at 25C and its Beta curve. According to a thread on TheHomeBrewForum.co.uk Thread link the probe is the same as a probe for another temp controller called a "ATC-800+" which has a known resistance of 10K at 25C and a Beta curve of 3435K between 25/85C.
All that being said Digi-Key has said NTC Thermistors for less then a dollar a piece Part link. I ordered 5 and I'm testing one now side by side with the original probe with good results, I'm getting a consistent temperature within .3C (1F) of the original probe at temps between 32.2C (90F) and -19C (-2.2F).
So I plan to take a SS probe I have sitting around (cheap digital oven probe) cut the end off and pull the K-Type probe out then insert my NTC Thermistor and seal it up. This way I can have a SS probe use switch out and use my temp controller for a Sous vide cooker via my slow cooker. I don't trust the original probe sitting in a hot water bath.
Thanks for this info, could be very useful in the future
Ditto!
Put mine together this weekend. Modified a True GDM-12 cu ft "merchandiser" refrigerator and am using a small ceramic space heater. Mounted the NTC temperature sensor in a small tube with thermal gel (freezer gel). I'll post pics later. Still calibrating, but am surprised at the temperature swing during the heating/cooling cycles. Previously used PID type controllers for heating applications and they are incredibly precise (very small temperature swings) by comparison. While I am collecting data, could any of the rest of you post your typical temperature swings (considering ambient temperature, wattage of heat source, compressor delay, temperature differential, etc...).
Thanks!
Thanks!
Schumed
Well-Known Member
finally got mine built. followed the original instructions worked perfect. Easiest DIY build yet. Thanks homebrewtalk!

BNBMan
Member
Does anyone know what page of the thread or date that I need to look for to find out how to properly program this unit to hold a specific temperature? Thank you
barryfine
Well-Known Member
Does anyone know what page of the thread or date that I need to look for to find out how to properly program this unit to hold a specific temperature? Thank you
Here you go:
The controller is pretty simple to program but the instructions are written like a typical chinese manual so it can confusing at first.
Press and hold the "S" button for 3 seconds.
Press the "Down Arrow" until F1 displays.
F1 is the setting for the maximum temperature that you want. Press and hold the "S" key and at the same time use the up and down arrows to adjust the setting.
Press the "Power" key to save the setting. If you do not press the power key, the setting will not be recorded.
Repeat steps 1-4 for "F2". This is the difference value. Default is 0.5C. If you max temp is set to 18C and your difference is set to 0.5C then the heater will turn off when the wine hits 18C and the cooler with turn on. When the wine temp drops to 17.5C the heater turns back on and the cooler turns off. You can set this value down to 0.1C but I suggest keeping it at at least 0.5C so that there is a little hysteresis in the system, especially if you are using a fridge or freezer which needs time for the compressor to kick in.
Repeat steps 1-4 for "F3". This is the compressor delay time. Default is 3 minutes. This setting provides a delay to switch on/off the cooling unit so to avoid damage to the compressor.
Repeat steps 1-4 for "F4". This is the temperature calibration setting. If you find that the sensor temp does not match, you can set in an adjustment value here.
barryfine
Well-Known Member
I just finished my 3 section fermentation chamber. I built it on top of a 5 cubic feet chest freezer. The freezer section will be kegs and then the other two chambers will be for fermentation. I just put my first beer in 2 days ago.
Lots more pics here:
https://www.homebrewtalk.com/f51/3-section-fermentation-chamber-ebay-temp-controller-320746/
Lots more pics here:
https://www.homebrewtalk.com/f51/3-section-fermentation-chamber-ebay-temp-controller-320746/
Mine. I decided to double up on outlets, in case I want to add fans later. So, we have two outlets for heat on one side and two outlets for cool on the other. Otherwise, this is pretty much identical to the OP build. Only took me a week to receive my order. Gotta wait till next weekend for the fridge, but it's tested and working smooth! Cheers!

GrantH
Well-Known Member
Here's to hoping I bought the correct one....
http://www.ebay.com/itm/110V-All-pu...s=63&clkid=7747912314726561147#ht_4040wt_1037
http://www.ebay.com/itm/110V-All-pu...s=63&clkid=7747912314726561147#ht_4040wt_1037
barryfine
Well-Known Member
Here's to hoping I bought the correct one....
http://www.ebay.com/itm/110V-All-pu...s=63&clkid=7747912314726561147#ht_4040wt_1037
That's the one!
Mine. I decided to double up on outlets, in case I want to add fans later. So, we have two outlets for heat on one side and two outlets for cool on the other. Otherwise, this is pretty much identical to the OP build. Only took me a week to receive my order. Gotta wait till next weekend for the fridge, but it's tested and working smooth! Cheers!
Now I wish I had thought of this. Great idea.
mjmac85 said:Now I wish I had thought of this. Great idea.
Can't say I thought of it first. Pretty sure I saw it done SOMEwhere in this thread. I think just about EVERY possible variation's been done by now
Question to those that have been using these for a while: what settings do you recommend for F2 and F3?
This will be my first ferm chamber, so I have zero experience. It'll be controlling a medium size fridge with a ceramic heater/fan for heating.
Thanks.
This will be my first ferm chamber, so I have zero experience. It'll be controlling a medium size fridge with a ceramic heater/fan for heating.
Thanks.
JuanMoore
Getting the banned back together
Repeat steps 1-4 for "F2". This is the difference value. Default is 0.5C. If you max temp is set to 18C and your difference is set to 0.5C then the heater will turn off when the wine hits 18C and the cooler with turn on. When the wine temp drops to 17.5C the heater turns back on and the cooler turns off..
Not quite. F1 is a set temp, not a max temp. The activation temps are the set temp plus or minus the differential. If you have F1 set to 18.0C and F2 set to 0.5C, nothing will happen as long as the temp stays between 17.5C and 18.5C. If the temp warms to 18.5C the cooling relay will turn on and stay on until the temp reaches 18.0C. Similarly, if the temp cools to 17.5C, the heating relay will come on, and stay on until the temp reaches 18.0C.
Question to those that have been using these for a while: what settings do you recommend for F2 and F3?
This will be my first ferm chamber, so I have zero experience. It'll be controlling a medium size fridge with a ceramic heater/fan for heating.
Thanks.
I'd go with at least 0.5 for F2, and max out F3 (10 min IIRC).
barryfine
Well-Known Member
Not quite. F1 is a set temp, not a max temp. The activation temps are the set temp plus or minus the differential. If you have F1 set to 18.0C and F2 set to 0.5C, nothing will happen as long as the temp stays between 17.5C and 18.5C. If the temp warms to 18.5C the cooling relay will turn on and stay on until the temp reaches 18.0C. Similarly, if the temp cools to 17.5C, the heating relay will come on, and stay on until the temp reaches 18.0C.
I'd go with at least 0.5 for F2, and max out F3 (10 min IIRC).
Thanks for the clarification. I just copy/pasted that from elsewhere. What you said is consistent with how mine is working as well.
FirstStateBrewer
Well-Known Member
I got my controller built this weekend. I plugged it in and tested it with the default settings. It's working perfectly! However, it was late and my brain wasn't working. I wasn't able to easily figure out how to change the settings. Can anyone give me a quick tutorial on what you press on the panel to make changes? Thanks!

Received my controller Saturday, went and got the components, installed everything and was testing it out on my small chest freezer. I used a 60w light for the heat source. It is holding the temp within 2 degrees. I have the F2 set at .5 and F3 at 7.
I put my California Common lagering at 36f. Will keep it there for 3-4 weeks. It was perfect timing. I was dreading having to use ice in the freezer until the controller came in.
JuanMoore
Getting the banned back together
I got my controller built this weekend. I plugged it in and tested it with the default settings. It's working perfectly! However, it was late and my brain wasn't working. I wasn't able to easily figure out how to change the settings. Can anyone give me a quick tutorial on what you press on the panel to make changes? Thanks!
Go back 11 posts from yours.
FirstStateBrewer
Well-Known Member
Thank you! Thank you! Thank you!Go back 11 posts from yours.
Similar threads
- Replies
- 14
- Views
- 1K
