DIY Picnic "Stout" tap - concept

Homebrew Talk - Beer, Wine, Mead, & Cider Brewing Discussion Forum

Help Support Homebrew Talk - Beer, Wine, Mead, & Cider Brewing Discussion Forum:

This site may earn a commission from merchant affiliate links, including eBay, Amazon, and others.

mattd2

Well-Known Member
Joined
Sep 23, 2009
Messages
3,843
Reaction score
387
Location
NZ
Just in the “concept/ideas” phase at the moment (would also need to brew a stout to really test anyway) ;)
So at the moment my keezer is leaving a lot to be desired, as it is still just an old chest freezer. This build will be a slow and steady one; temp control first w/ picnic taps, then build a collar (no taps though), then finally finished it off with some nice taps (Perlicks of coarse).

So the first stage is closing in and I was thinking about trying to make a cheap DIY picnic stout tap. Basically want some info about the normal stout taps/systems so I can go from there.
As I have read the “stout” pour is achieved from;
Low carb level in the beer (what volume are we talking about, 1.5-2? Is the style guidelines correct for poured through a stout faucet?),
and pouring it through a stout faucet which has a restrictor plate (basically a small hole – diameter please?).
With the restrictor plate generally means a big pressure drop through the tap, i.e. need to run the keg at 25-35 psi and therefore needing beer gas to avoid overcarbing. A question is, are people also running the usual 5-10’ of 3/16” line to there faucets (with the associated approx pressure drop of 12 psi)?

Ok now those questions are out of the way, the concept.
QD -> picnic tap with as short a length of ¼” hose as practical = approx 0 psi drop.
Run the keezer a bit warmer than normal = higher psi for given volumes + closer to normal stout serving temp (without being to high for the other styles in the keezer)
Now the actual tap - A short 2” section of bottling wand, plug the end somehow (epoxy?) then drill through the right diameter restrictor hole, Push this (restrictor first) into the end of a picnic tap = DIY picnic “stout” tap. The reason for the 2” piece would be to allow the stout to “stay together” after the restrictor instead of just spraying all over the place.
If I get time tonight I might try something out (with a light bodied ale which might not go down so well but at least it will be something)

Any ideas/thoughts/suggestions/links to someone who has already done this are, as always, very much appreciated.

Cheers :mug:
 
so 233 views and no replies...
I have read a bit more, found a few threads with a simular idea but noone actually tried. And the method of cranking up the CO2 PSI for the pour and then bleeding back down.
What info I did find was someone was using beer gas with 15' of 3/16" line, don't know if that is the correct way to set up a stout faucet but gives me hopes that the 1' of 1/4" might get me in the range of carbing with just CO2.
Really want to know the orifice diameter, but if knowone has that info I'll just start at something like 1mm and go up in 0.5mm steps till it seems right (or someone tells me better;))
Cheers for reading my ramblings at least :mug:
 
Somebody has to be first. That automatically makes you the expert
...
assuming it works out.

If it doesn't, then you can tell people it's a bad idea.

Keep us posted.
 
I don't know what the right diameter would be for this setup, but the restrictor plate on my stout faucet has 5 holes that are less than 1mm. They are like little pin holes.
 
I don't know what the right diameter would be for this setup, but the restrictor plate on my stout faucet has 5 holes that are less than 1mm. They are like little pin holes.

Thanks, that is exactly the info I need!
Yeah I hope this doesn't end in a spectacular failure - although it would still be fun!
Cheers :mug:
 
So, I gave something a shot.
Short bit of 3/16" (about 6") to a picnic tap. A short bit of 8(?)mm hose (2") on the spout. Then I just cracked the picnic tap to "imitate" the stout tap restritor plate. The result was actually quite good, enough that I am pretty confident that this very well could work :D
 
Another option here would be to snip the pin in the keg disconnect a bit shorter. Doing so will make the outlet in the keg smaller, and when using high pressure, it will be mimicking a stout faucet.

I found this out by accident, after one of my disconnects had a bent pin when I bought it. Over time, it broke off, and the rest is history.

Nice find, did you keep the line length the same as usual?
I was testing this out on a SMaSH of pale and sticklebract and even though the serving style didn't match the beer style at all it was still very enjoyable (mostly because of the proof of concept ;)). Can't wait to have an actual stout/porter through the next prototype. So much so I might buy a Coopers prehopped "stout" extract to speed things up getting one on tap :eek:
 
I didn't play with different line lengths, but that surely doesn't mean I won't try it in the future, now.
 
So I was cruising google pricing stout faucets when I came across this

http://www.kegworks.com/product.php?productid=16406&source=base

Not sure if you can maybe cut off the tip of the picnic tap and then glue that back between them. Just an idea.

cheers for the link, I think you would need a bit more than the picnic tap tip to "straighten" out the flow after the restrictor though.
Hozelock_Micro_Irrigation_13mm_Straight_Connector_2768_Large.gif

I picked up a 13 mm home irrigation hose joiner (about $1) and I am going to fill one end with expoxy, 1-3 mm thick, and then drill holes in there to act as the restrictor. I'm thinking of starting with just one 1 - 1.5 mm central hole as this will be easiest. The hose will be joined to the picnic tap tip with a short section of 8(?)mm tube, if I can get it to stretch over the joiner ;)
I'll try a few diferent verieties of hole layouts as time goes on to see what works best.
 
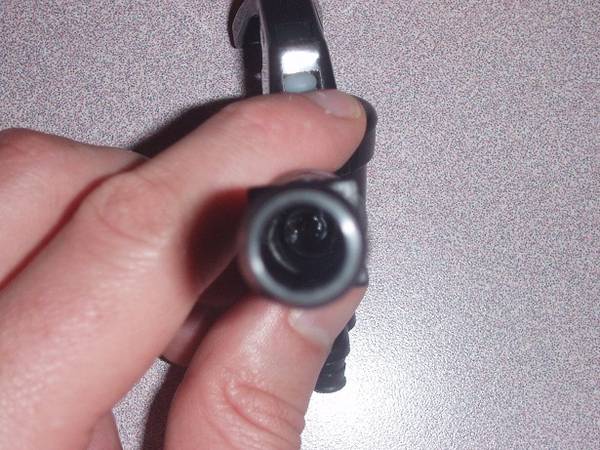
OK just finished the DIY picnic stout tap. I ended up just melting one end of the joiner (with a lighter till it was soft ), then rolling it to close up the end, then pressing in into a M16 washer to get a nice round end on it. The heated up a small tack/nail and pushed it through. The keg of coopers stout is carbing naturaly now, the keezer will be underway in about 2 weeks after my b'day and then the trial will begin!
I'll try get some pics of the tap up soon.
 
Photo update:
DIY_Stout_Tap_2.JPG

DIY_Stout_Tap_1.JPG

Also did a quick trial on it with some gingerbeer and I think it needs more than the one hole, will get that done and trial it on the stout very soon!

Edit: Ok so I'm too impatient for my own good. I put another 3 holes in the joiner and hooked it up to the keg that is carbing at room temp. It is at ~18 PSI and when I open the tap beer hit the bottom of the glass and bounce right back! managed to pour a half glass and it had the cascade and settle in a super nice creamy head (and this was with a kit and kilo stout remember!).
I am like a kid on christmas eve now, come on keg carb faster!
 
I simply wedged one of those red racking cane filter-caps to a short section of racking cane and jammed it into the picnic tap. It kind of resembles a sparkler on English beer engines (hand pulls).

I leave stouts on very little pressure (8 psi) until I serve, then I bump it to 20 psi. This works well for "cask-style" English ales, too.

I found that thinning out stouts with distilled water when transferring to the keg will help you achieve that Guinness-like cascade. I don't go below 3.8% abv, or a final gravity of 1.006 on the final product though, it gets too watery...and if you serve/store too cold you still get a glass full of head.
 
This is a delicate balance. I've done a lot of stouts, both high and low gravity, through stout faucets and with blended gas. I just bought a sixtel of Old Rasputin, which is designed to be served with the stout faucet.
On a stout faucet there is a restrictor plate but also a flow straightener after the plate. Without the nozzle, restrictor, etc, beer sprays out of the faucet really bad, so there must be some restriction there too. If you're willing to fiddle with pressures, etc, I'm sure you will get some results like you want, but I like it to be more predictable so as to not waste much precious beer.
http://www.micromatic.com/draft-keg-beer/taps-faucets-pid-JESF-4.html
check this diagram out when you click on replacement parts.
 
I just keep the keg about 3psi at 34*, then pour my pint about 3/4 of the way up or so, maybe 2/3. I dunno something like that. Then I turn the regulator up to 20psi and just barely squeeze the picnic tap, creating a spray across the top of my pint. Fill her up the rest of the way with the spray, let her settle, turn the regulator back to 3psi, bleed of the excess and top her proud if you need to. Done.

image.jpg
 
Back
Top