My Stirplate... Cheap and Easy Build...

Homebrew Talk - Beer, Wine, Mead, & Cider Brewing Discussion Forum

Help Support Homebrew Talk - Beer, Wine, Mead, & Cider Brewing Discussion Forum:

This site may earn a commission from merchant affiliate links, including eBay, Amazon, and others.
Glad to hear it worked out for you. Magnets are always going to be a matter of availability and power, which is why I use a steel washer to fine tune the plate before gluing permanently. Thanks for the kudos!
 
The above build in action in 1400 ml of water at about 75% power.

Stirrer_In_Action.JPG

Does that illuminated rocker switch actually illuminate? I have one for my second stir plate (gave the first to my FIL), but I can't get the LED to turn on. It turns the fan on just fine, but the light doesn't work.

Do you, or anyone else, have a diagram on how to properly wire a spst LED rocker switch? Mine has three connections; 1,2, 3+-

Thanks,
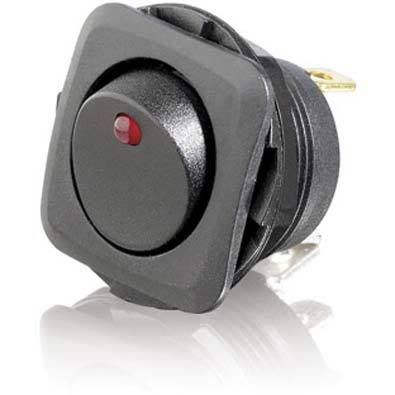
 
It should have 3 pins. They are labeled "Source" "Load" and "Earth"

The positive side of your power supply connects to the "Source" pin on the switch. The "Load" Pin goes to the Positive wire on your Fan. The "Earth" Pin should be attached to the ground of the fan and the ground of the power supply. That should illuminate your switch.
 
Does that illuminated rocker switch actually illuminate? I have one for my second stir plate (gave the first to my FIL), but I can't get the LED to turn on. It turns the fan on just fine, but the light doesn't work.

Do you, or anyone else, have a diagram on how to properly wire a spst LED rocker switch? Mine has three connections; 1,2, 3+-

Thanks,

Yes, but I used the exact parts and instructions Tony prescribed so it was a no brainer.
 
pRS1C-4788629_rshalt1_dt.jpg


The switch I have is a different one, its not labeled as you stated Anthony. It has two silver collored pins, 1 and 2; and a gold colored pin 3+- (or something, I don't have it in front of me); you can kind of see this in the picture.

I'll have to check when I get home, but it might be rated for more than 12vdc, which might mean the light will not work on the lower voltage for this project. (side note - I did learn that running a 12v fan on a 14.5v adapter will melt a fan in about 10 minutes :eek: )

I tried a few ways of connecting it, but I was just guessing from other projects/experience. I got a spark on the ground wire from one arrangement and stopped messing around before I ruined something else.

I'll look and see if your labels make sense with my switch, and then try to rewire it. The switch works, but I would like the light to work as well, just the nerd side I guess.

Thanks,
 
That's where I got mine, didn't ever think to look if it was a 12v.....that's why I am thinking its 120v.

Is that gonna make the LED un-usable?
 
I've tried building this with limited success so far...

I'm using the 8x6x3 project box from radio shack, a 12v pc fan that is around 3.25", screws in the project box that are 2" (leaving an inch before the top of the encolsure). I've tried using both a 12v and a 5v adapter. With the 12v, my 1.5" stirbar gets immediately thrown off center in my 200mL flask filled with 650mL of harvested yeast (test run). The 5v power source appears to not turn the magnet. I'm using two hard drive magnets, mounted on a large metal washer. I'm thinking of giving up and just buying some magnets from McMaster (anyone got a part #? - there is a bunch of rare earth magnets).

Anyone got a helpful trick or tip for me? Thanks in advance!!

Edit: Didn't mention that I'm using this basic design with the rheostat.
 
If your immediately throwing your stir bar your magnets probably just need to be repositioned.
 
Because they are not centered?

Well, using two magnets I don't think its quite that easy, especially with odd shaped HD magnets. What your shooting for is the magnetic field produced by the pair of magnets to be such that it holds the stir bar in the center. It could be that the neg or the positive is giving a stronger pull and is grabbing the stir bar towards one side or the other.
 
That is exactly one reason I think I'm going to get some new magnets from McMaster. I'll give it one more shot before I do that though :)
 
Well, using two magnets I don't think its quite that easy, especially with odd shaped HD magnets. What your shooting for is the magnetic field produced by the pair of magnets to be such that it holds the stir bar in the center. It could be that the neg or the positive is giving a stronger pull and is grabbing the stir bar towards one side or the other.

Worked fine for me, but I did not use Hard Drive magnets. They are nearly perfectly rectangular and click together end to end in a symetrical fashion.

Also, the distance between my magnets and the top can be measured in 32nds, sounds like he has too much air space on top and is losing pull. I have no problem at all spinning a two inch stir bar in my 2L flask.

Interesting... Maybe I'll source some longer machine bolts and give it a try...
 
Ok, I used bolts that allow me to position the flask almost directly upon the magnet. Now the resistance from the stirbar/liquid isn't allowing the fan to spin (or is allowing it to spin very slowly). I think I need to get stronger magnets and try again...
 
Ok, I used bolts that allow me to position the flask almost directly upon the magnet. Now the resistance from the stirbar/liquid isn't allowing the fan to spin (or is allowing it to spin very slowly). I think I need to get stronger magnets and try again...

How wide is your magnet? If I used a 3/4 wide magnet (it's 3/8 tall), I have the same problem. Mine are only 3/8 wide.
 
When I wire the fan red wire to the inside terminal of the potentiometer, and the input hot wire from the power supply to one of the outside terminals, the fan never turns comptetely off. I can adjust the speed, but it never gets below a certain rpm. However, if I wire the negative power supply wire and the ground wire for the fan to the other outside terminal, it turns off, but the potentiometer gets extremely hot. What's going on? Any guesses?
 
When I wire the fan red wire to the inside terminal of the potentiometer, and the input hot wire from the power supply to one of the outside terminals, the fan never turns comptetely off. I can adjust the speed, but it never gets below a certain rpm. However, if I wire the negative power supply wire and the ground wire for the fan to the other outside terminal, it turns off, but the potentiometer gets extremely hot. What's going on? Any guesses?

Yeah, if I understand what your doing correctly.

Wired power supply to the input (one side) of the potentiometer, and the fan red wire to the output (center) then ground of power supply to ground of the fan is the correct wiring. You won't be able to turn off the fan using the pot, that is why you need to also include a switch.

What your doing the other way, if you were wiring red wire to the inside terminal and having grounds go to the other outside terminal is using the pot as a direct short to ground of your power supply, effectively making it a zero voltage at the fan, shutting the fan off. That is why the pot got so hot...bad idea.
 
When I wire the fan red wire to the inside terminal of the potentiometer, and the input hot wire from the power supply to one of the outside terminals, the fan never turns comptetely off. I can adjust the speed, but it never gets below a certain rpm. However, if I wire the negative power supply wire and the ground wire for the fan to the other outside terminal, it turns off, but the potentiometer gets extremely hot. What's going on? Any guesses?

This is the reason I chose a 12VDC switch that was labeled for this build. It takes all the guess work out of wiring this beast. The inside terminal should ALWAYS be the "load" of the switch. The outside terminals are going to be your "supply" and your "earth (ground)".
 
Just an update -

I got the LED working last night. I don't know why it's working now, because the configuration is the one that sparked. No sparks this time, and everything runs fine.


The potentiometer won't turn the supply all the way off. If you want a slower speed, you could piggy back a second behind it.

Later,
 
I would not suggest doing ANY wiring while your power supply is plugged in.

I'll have to add a disclaimer to the beginning of the thread.

As for the potentiometer, it will NEVER turn the power all the way off. Regardless of the type of potentiometer, you will only get a voltage DROP by using any type of resistor. The potentiometer is meant only to allow you to control the speed of the fan, which in part allows you to control the speed of your stir bar and the size of your vortex.
 
Great instructions, got my prototype working last night. Need to do some soldering this weekend. Big Thanks.

One question, i see you soldered your Pot, but you used the connectors on your power switch, should you not solder a power switch? Will the heat burn it out?

Thanks!

Radio shack should send you a free project box for all the buisness you send them :)
 
Hehe... thanks. I soldered my pot because I knew that I wasn't really going to be moving it around. I used the female connectors on the switch only because it was easier. Normally I would always solder and shrink wrap an electrical connection.
 
Hehe... thanks. I soldered my pot because I knew that I wasn't really going to be moving it around. I used the female connectors on the switch only because it was easier. Normally I would always solder and shrink wrap an electrical connection.

+1 to solder and heat-shrink. Another +1 to your earlier post stating to only work on wiring with no power supply plugged in!

I drool a little each time I come to this thread. :D I'm itching to build this but I just have too much on the proverbial plate to build the stir-plate. Can't wait though!

-Tripod

+2, I used clips as well on the on/off switch for the same reason as Tony, but my soldering skills have deteriorated to the point where I couldn't get the heat shrink tubing over the big a$$ glob I created. I either need to improve my skills or buy larger tubing.
 
+2, I used clips as well on the on/off switch for the same reason as Tony, but my soldering skills have deteriorated to the point where I couldn't get the heat shrink tubing over the big a$$ glob I created. I either need to improve my skills or buy larger tubing.

That's easy enough to fix if you want to, just grab a little bit of solder wick and pull off about half the solder you put on. You should still be able to see the outline of the wire with the right amount of solder.
 
Got it all put together. It is not spinning as good as it was before I assembled everything. Not sure what is going on, maybe I need a stronger fan. I tried the adding the second hard drive magnet, no luck. I cut out the switch and the pot and wired the fan right to the power, same result. in my 1 L flask, filled with 900ml of water, I am only getting a small cone. been playing with the spacing, it has improved. What it looks like is that my homemade stir bar(~1") is slowing the fan down. I wonder if breaking off the fan blades would improve anything. I order a variety pack of stir bars, so I probably should wait for them before I start replacing the fan.

any other thoughts would be greatly appreciated
 
ignore my previous post, think I got it figured out. I changed to the aluminum top and adjusted the distance, and I got the same result as my prototype. Still does not pull the vortex to the bottom of my 1 l flask, but it goes about 3/4's of the way. good enough for me.

I ended up mounting my fan in the project box to a piece of 3/4 plywood. I counter sunk the screw and used #8 1.5" screws. These came from the bottom up. I used nuts on the screws and rested the fan on it. This way I could adjust the height of the fan with the spin of a few nuts. I will add pics if any one wants them
 
Here are three images of the stirrer built. I am flying to Cali for the week. When I get back, I will take pics of the guts. I am using a pin from a ceiling fan that I cut and wrapped in teflon tape for a stirrer. I am hoping to get better results with the stir bars I ordered.

P1010904_comp.jpg


P1010905_comp.jpg


P1010906_comp.jpg
 
You gotta get that vortex to the bottom, mayne. Increases dissolved oxygen markedly. For me, it was as simple as 2 HD magnets and a 12 volt power supply. Take a look at the pics on page six.

One thing that strikes me is your base plate, it's metal. That will reflect magnetism, especially if it's aluminum.
 
@ Pelikan

I tried two HD magnets, I did not see a difference. I also tried a plastic cover and did not see much difference. I am waiting for my stir bars before I make any more changes. I wanted the vortex to go all the way down, but I ran out of time.

Did you stack the two HD magnets on top of theirselves? I am using a 12 volt adapter. Can you post pics of the inside or you fan?
 
I used the plastic cover over the aluminum cover in this build without any issues at all. Also, it looks like you mounted your fan opposite the way I set mine up. To each his own... With the same build that I originally posted using a 12VDC power supply and the same potentiometer, you should be getting a HUGE vortex with the potentiometer all the way up.

watch my video at the beginning of this thread. It starts with the potentiometer at it's highest resistance. You can see the vortex speed up and the dissolved O2 increase as I adjust the pot.
 
could be my stirbar. Hopefully I get better results with a real stirbar. My fan was from a old PII, I wonder if the fan is just old and is not strong enough
 
well, never make a judgement on someones design if you don't follow it... If you aren't using a stirbar, you aren't going to get the same effects as everyone else. You should be able to find 12VDC fans from a number of online companies for around 2-3 dollars if you can't find one from a more recent computer.
 
Back
Top