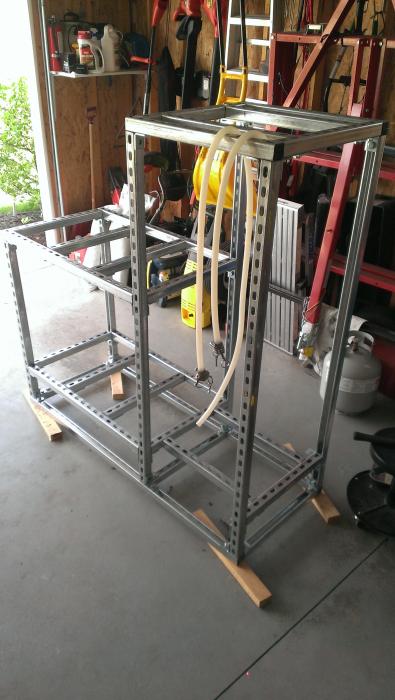
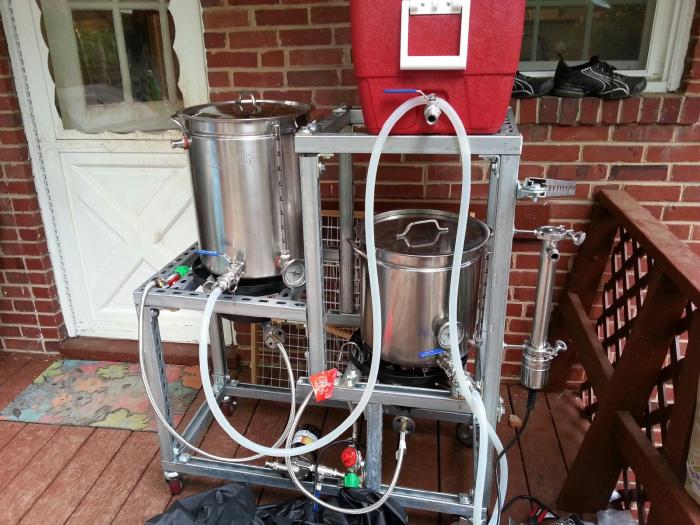
My Weldless Build Using Strut

Homebrew Talk - Beer, Wine, Mead, & Cider Brewing Discussion Forum

Help Support Homebrew Talk - Beer, Wine, Mead, & Cider Brewing Discussion Forum:

This site may earn a commission from merchant affiliate links, including eBay, Amazon, and others.
what others have said... center support suggested/recommended.

Yes, I definitely will. And this is not to argue with the wisdom/necessity that I do add them, but I still have to emphasize how damn solid this thing is even in its current form. It's a testament to how sturdy these materials are.

Gifty, I spent some time analyzing my placement of the brackets, and I'm seeing now how I could put it together a bit better. I honestly was frustated how the width of the fittings themselves in between the pieces of strut were throwing off some of my measurements. But your point about using the underside will allow me to remove the fittings from many of the places were they are in between strut. Should make it all fit together a bit better. I'll post more pics as I progress.

Thanks all.
 
I honestly was frustated how the width of the fittings themselves in between the pieces of strut were throwing off some of my measurements. But your point about using the underside will allow me to remove the fittings from many of the places were they are in between strut. Should make it all fit together a bit better.

Using the tracks and flat washers pretty much gives you infinite adjustability.

You might want to look at ordering some specialty brackets from http://www.strutchannelfittings.com/ if you're having problems sourcing the strut locally. I gave up on finding it locally. Things like corner brackets were just not available. No one had anything in stock around here.

strutchannelfittings.com are great to deal with and the prices were better than I could get locally. They ship for free too.
 
Fellas, I'm excited to report that I wrote a DIY article on using strut for a stand build that is going to be published in next month's BYO (Brew Your Own magazine). It has some pictures, etc, and should be a half page. I had to keep it to 400 words which was a pretty big challenge given all that I could've said. So, I decided to start a website to expand on the usage of this material for brewing stand builds, and included that at the end of the article. I'd like to include a lot of you guys' stand build pictures in a separate page on the site. If you give me permission to use your pictures, please just send them to my email at [email protected]. If you send along a brief description of what your goal was with the stand, and how it's working out, overall impression, etc, I'll try to include a bit of that too.

Also, I thought that there could possibly be a market to sell some of the basic stand designs as kits, that I would cut, and ship out. There have been some hurdles in putting together a mini plan, but I figured I would put it out there on the site to see if there are some (which I can't imagine there won't be at least a few) that would rather not hassle sourcing all of the materials, fittings, etc, and would just rather order something that would show up on their doorstep ready to put together with just a 1/2" wrench or socket. So anyway, a portion of the site is going to be for people if they want to order a ready-to-assemble kit. We'll see how that goes.
 
Using the tracks and flat washers pretty much gives you infinite adjustability.

You might want to look at ordering some specialty brackets from http://www.strutchannelfittings.com/ if you're having problems sourcing the strut locally. I gave up on finding it locally. Things like corner brackets were just not available. No one had anything in stock around here.

strutchannelfittings.com are great to deal with and the prices were better than I could get locally. They ship for free too.

Agreed, ordered all the struts, brackets and hardware here from strutchannelfittings.com.
I'm only about 30 miles away from one of their locations so shipping on the strut was next day. Highly recommended

2013-05-21 12.24.17.jpg
 
gifty74 said:
Fellas, I'm excited to report that I wrote a DIY article on using strut for a stand build that is going to be published in next month's BYO (Brew Your Own magazine). It has some pictures, etc, and should be a half page. I had to keep it to 400 words which was a pretty big challenge given all that I could've said. So, I decided to start a website to expand on the usage of this material for brewing stand builds, and included that at the end of the article. I'd like to include a lot of you guys' stand build pictures in a separate page on the site. If you give me permission to use your pictures, please just send them to my email at [email protected]. If you send along a brief description of what your goal was with the stand, and how it's working out, overall impression, etc, I'll try to include a bit of that too.

Also, I thought that there could possibly be a market to sell some of the basic stand designs as kits, that I would cut, and ship out. There have been some hurdles in putting together a mini plan, but I figured I would put it out there on the site to see if there are some (which I can't imagine there won't be at least a few) that would rather not hassle sourcing all of the materials, fittings, etc, and would just rather order something that would show up on their doorstep ready to put together with just a 1/2" wrench or socket. So anyway, a portion of the site is going to be for people if they want to order a ready-to-assemble kit. We'll see how that goes.

Congrats!! Did you see the article in the past Zymergy? I think you can and will improve upon that explanation. In any event, I know I need to make improvements to my build, but when were you hoping to get the pics? I'm confident that my designs is different from any of the others in the thread and hope shortly to get is presentable. Either way, congrats again. You help lots of folks get brew stands to enjoy safely at a significantly reduced cost!
 
I did not get Zymurgy so I didn't get to see the article. I looked online and it looks like it might be similar, with buying most of the stuff from HD maybe?? Like I said, it was tough keeping the wording down, so I struggled trying to explain it in with also a little story behind it. I wasn't able to put the actual website in the article for the fittings so I just put "online source" which if anyone does some looking around they'll find the site most of us have used. Pretty cheap stuff. The next BYO ships June 3rd, so I'd like to have everything the a day or two before. I'm trying to get the website finalized this week, and then just plug in any of the pics I receive from your builds. There will probably be quite a few visitors seeing your stands as BYO has a pretty good reader base. I'd like to see yours if it is a little different. I'm going to put all the information in the DIY section on how to build from scratch.
 
I've gone through a couple versions of my strut stand. The first one I posted earlier in this thread. I was using a cooler mash tun and the stand was 5'6" long to minimize the heat on the plastic. It worked great but I had a keg tun coming my way soon. A great thing about the strut is the ability to adjust it as your system or methods change. Now I've got my keg tun so I cut the stand down to 4'6" and added another burner.

Pretty simple an easy to use.

stand-60124.jpg


stand-and-kegs-60123.jpg


burner-60122.jpg
 
cracked1 said:
I've gone through a couple versions of my strut stand. The first one I posted earlier in this thread. I was using a cooler mash tun and the stand was 5'6" long to minimize the heat on the plastic. It worked great but I had a keg tun coming my way soon. A great thing about the strut is the ability to adjust it as your system or methods change. Now I've got my keg tun so I cut the stand down to 4'6" and added another burner.

Pretty simple an easy to use.

Cracked, are the threads on your casters 1/2"? If so, what tool did you use to tighten down the nut? Nothing I have is small enough to get in there
 
reuliss said:
Cracked, are the threads on your casters 1/2"? If so, what tool did you use to tighten down the nut? Nothing I have is small enough to get in there

Yup... I attached the casters to the brackets first and then bolted the brackets to the frame. The small casters on the side are bolted on using the strut nuts. If your casters can be tightened from the outside then you can use some of the strut nuts. They'll wedge themselves in there.
 
This thread rocks...I've been looking at weldless stands for awhile and this looks like a winner.....I have the hardware on order and will get the uni strut at Lowes....My question is heat!! How hot does the stand get during a hour long boil? If I have a silicone hose that makes contact with the stand will I run the risk of burning it? This metal is all interconnected so just wondering.
Thanks.

The Uni Strut will get hot enough -- especially around the burners -- to burn you. I know. However, you should not have any problem with silicon hoses melting. They do make baking dishes out of silicon and they go in a hotter oven.

Mark
 
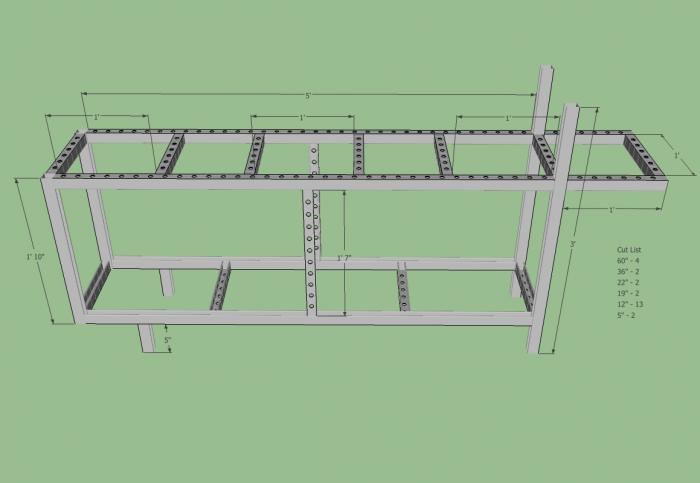
Here's the stand I've designed in SketchUp using a "strut" component. The plan is to build this out in the next month or so.

I plan on adding casters near the end of the lower rails ala Ruby Street Brewing so the stand is not on wheels while brewing, but can be wheeled around by the table off the right end and stood up on the left end for a small foot print. I also plan on adding gas lines 2-3 pumps, water filter and chiller (CFC or Plate, undecided).

Where are you guys getting your gas lines and regulators for splitting your connection from your LP tank?

Any recommendations on where I can get a heat shield for banjo burners?

-Jason

StrutStand-1tier.jpg
 
Da_Jakthund said:
Here's the stand I've designed in SketchUp using a "strut" component. The plan is to build this out in the next month or so.

I plan on adding casters near the end of the lower rails ala Ruby Street Brewing so the stand is not on wheels while brewing, but can be wheeled around by the table off the right end and stood up on the left end for a small foot print. I also plan on adding gas lines 2-3 pumps, water filter and chiller (CFC or Plate, undecided).

Where are you guys getting your gas lines and regulators for splitting your connection from your LP tank?

Any recommendations on where I can get a heat shield for banjo burners?

-Jason

I used some sheet steel from homedepot. It's in the chimney/furnace aisle meant for make your down chimney, think it was about 6-7 bucks for a 36in piece. Worked great.
 
This thread rocks...I've been looking at weldless stands for awhile and this looks like a winner.....I have the hardware on order and will get the uni strut at Lowes....My question is heat!! How hot does the stand get during a hour long boil? If I have a silicone hose that makes contact with the stand will I run the risk of burning it? This metal is all interconnected so just wondering.
Thanks.

My stand gets hot within about 8 inches of the pot. Farther than that it is safe to touch. I was surprised how quickly the heat dissipates.
 
When building your stand, did you guys use fittings with 2 holes per side or just one? Would you do it differently?

Brewski- I didn't realize how liberally I borrowed from your design, I may do a little more yet! Nice work.

Where have you guys been sourcing your LP gas hardware, like tank connectors, needle valves and the flex hosing to connect to the burners?

Thanks.

-Jason

I used 2-hole fittings. Honestly, the one hole fittings would probably be more than sufficient. I generally over-engineer everything. If it needs one nail - I use ten.
 
Da_Jakthund said:
When building your stand, did you guys use fittings with 2 holes per side or just one? Would you do it differently?

Brewski- I didn't realize how liberally I borrowed from your design, I may do a little more yet! Nice work.

Where have you guys been sourcing your LP gas hardware, like tank connectors, needle valves and the flex hosing to connect to the burners?

Thanks.

-Jason

I mostly used the one hole per side brackets/connectors. If you look at the spec sheets even those have way more strength than what we really need.

I've seen some of the best prices on the LP accessories at Amazon. You can find regulators, needle valves, burners, etc there. I picked up this regulator and hose - http://www.amazon.com/dp/B007PS0938/?tag=skimlinks_replacement-20

My LHBS carries the needle valves too so that's where I got mine. My burners came from my old turkey fryers which I attacked with an angle grinder so I was able to use the windscreens from them too. The flex lines I got from Lowes and then found a shorter version at a small mom and pop plumbing shop. The flex line packages have adapters to go from 1/2" pipe to 3/8" flare so I used one of those to attach the regulator line to the black pipe.
 
Last edited by a moderator:
I mostly used the one hole per side brackets/connectors. If you look at the spec sheets even those have way more strength than what we really need.

I've seen some of the best prices on the LP accessories at Amazon. You can find regulators, needle valves, burners, etc there. I picked up this regulator and hose - http://www.amazon.com/dp/B007PS0938/?tag=skimlinks_replacement-20

My LHBS carries the needle valves too so that's where I got mine. My burners came from my old turkey fryers which I attacked with an angle grinder so I was able to use the windscreens from them too. The flex lines I got from Lowes and then found a shorter version at a small mom and pop plumbing shop. The flex line packages have adapters to go from 1/2" pipe to 3/8" flare so I used one of those to attach the regulator line to the black pipe.

With the 1 hole fittings, any issues with horizontal(side to side) sway? Any thoughts of needing cross beam supports?

What is the black pipe you used? 1/2 inch threaded steel pipe and brass fittings? I think I found the gas appliance install kit on Lowes website, is this what you used? - http://www.lowes.com/ProductDisplay?partNumber=134133-72906-PSC1081&langId=-1&storeId=10151&productId=3130337&catalogId=10051&cmRelshp=req&rel=nofollow&cId=PDIO1
 
Last edited by a moderator:
Damn you guys, just ordered up my materials. 6 sticks from Lowes (it'll be just barely enough), 105 lbs in connectors and hardware from strut channel fittings, casters from ebay, and a $40 chop saw off Craigslist. Super over-engineered but whatever, it'll work. And all that pales in comparison to the remainder of the electrical brewery on my credit card.

For those buying from strut channel fittings, coupon code SAVE will get you 10% off. Saved me $20 or so.
 
Thanks for the Coupon Code!... I was hinting to them that it would be nice to have something since there are sooo many people being supportive of the website and spreading the good word about their service. Maybe I wasn't clear enough in my suggestions, but I was trying to be discrete and not come off as a cheap ass!
I might have some more pieces to pick up over time so it will help.

I've just made a habit of searching the store name followed by the word coupon in google, comes up with something about half the time. As a matter of fact, that code came from this very thread, all the way back on page 18.
 
marshallbeer said:
This is what mine looks like. I used 5' lengths for the length, 14" for the width, and 16" lengths for the height. I mounted my counterflow chiller on a hinge so I can move it out of the way when it's not being used. Both pumps are now mounted under the center section.

This is exactly what I would like to build. Do you happen to have plans that you followed? I am thinking of following this but yours is a little longer. I will be using a cooler MLT for awhile in the middle and want to make sure it doesn't melt.
 
herc1354 said:
Thought I'd post up what I've been working on

Is this a good height for your burners? I have a Bayou classic banjo burner that I run a Keggle on. I found by raising it all the way up as close as possible to the keggle I get the best use of the heat. I barely have to have it on to get a quick boil. Your banjo burners look pretty far away from the keggle, just wondering if you have experimented with the distance and tried to move them very close?
 
With the 1 hole fittings, any issues with horizontal(side to side) sway? Any thoughts of needing cross beam supports?

What is the black pipe you used? 1/2 inch threaded steel pipe and brass fittings? I think I found the gas appliance install kit on Lowes website, is this what you used? - http://www.lowes.com/ProductDisplay?partNumber=134133-72906-PSC1081&langId=-1&storeId=10151&productId=3130337&catalogId=10051&cmRelshp=req&rel=nofollow&cId=PDIO1

No, no worries about any sway. Using these -> http://www.strutchannelfittings.com/THK-233-ANGLE-BKT--4-HOLES-_p_73.html brackets for the 8 corners make it solid as a rock. I am not kidding when I say I could park a car on this stand.

The gas manifold is standard 1/2" black pipe reduced to 1/4" to attach the needle valves. Then a 1/4"mpt x 3/8" flare brass adaptor to connect the flex line. The flex lines I originally used were similar to the link you provided except the lines were 36" with 3/8" flare ends. I found shorter ones though elsewhere. They are for connecting fireplace gas log sets.
 
The flex lines I originally used were similar to the link you provided except the lines were 36" with 3/8" flare ends. I found shorter ones though elsewhere. They are for connecting fireplace gas log sets.
these are the hoses i used - pretty cheap: http://www.rvsupplyparts.com/index.php?l=product_detail&p=7067

they come in different length, search for "propane hoses" (use the plural, for some reason you get better results)

got this info from stonebrewer, the godfather of my stand :mug:
 
So, Ive got my single tier stand built and I've mounted my pump vertically on a verticle strut....now I need to wire it to a switch with some sort of GFI / liquid proof box. Can you guys post some pictures or ideas with needed parts? currently I have just been plugging my pump into an ext cord when I run it and unplugging when I'm done, but having a great new stand I want to clean that up and make it a simpe flip of the switch....Thanks
 
First off, this threat is amazing. Thanks all for your input and inspiration. I currently have a wood brew sculpture that I built about 2 years ago, and this weekend it started smoking, so I'm taking that as a sign from the beer gods that I need to build a single tier strut stand.

I'm not sure if you were aware, but the strut channel fittings folks now have almost perfect precut lengths available, 5', 2', and 12" or 18" precut lengths. I was able to essentially buy everything precut. Since I do not have a garage, or any real metal working tools, or experience, this is a huge bonus for me. Also, the fact that these folks ship for ~130lbs of parts and pieces for free, and have everything on sale, and give a 10% discount on top of that is just insane.

Once everything gets in and I get it all assembled, I'll post pics. Thanks again for one of the best threads on HBT. :mug:
 
I can't say enough great things about Struchannelfittings...I live in Oregon and they have a dist center in Las Vegas, they ship 3 day UPS ground for free which is amazing considering some of the weight of the shipments. If you order in the moring it will probably ship that day, and they are very prompt about getting tracking info to you.
 
I can't say enough great things about Struchannelfittings...I live in Oregon and they have a dist center in Las Vegas, they ship 3 day UPS ground for free which is amazing considering some of the weight of the shipments. If you order in the moring it will probably ship that day, and they are very prompt about getting tracking info to you.

+1, 110 lbs of fittings to my door in Idaho in 3 business days.
 
Hey, kjdoyle, did you build your own gas manifold, or did you have one made locally? I'm in PDX, too and I'm still debating making vs buying.
 
So you guys are running low pressure? Why is that? Why not run high pressure banjos on a 0-30psi regulator? Am I thinking wrong that this will work just as well? I ordered my burners from agrisupply and they are labeled as high pressure.
 
So you guys are running low pressure? Why is that? Why not run high pressure banjos on a 0-30psi regulator? Am I thinking wrong that this will work just as well? I ordered my burners from agrisupply and they are labeled as high pressure.

Cant speak for everyone, but I switched mine to low pressure for the purpose of automation. I needed low pressure in order to run furnace valves. They work great on low pressure with just an orifice change.
 
I've got 2 of the KAB4 cookers that I'm going to scavenge the burners out of, and the high pressure regulator, so I'm planning to run 30PSI to the manifold. It will be simple enough to switch out the regulator and orifices if I get to the point where I'm going to automate. Once I have the manifold, I'll get the 3rd burner bare, and orifice and hook it up.

Unless the other folks on the forum have a compelling reason to run 10 PSI, that is. :D

Anything above 1 psi is considered high pressure, so 10 psi or 30 psi is still high pressure. Use the pressure that the burner orifice is designed for unless you are automating using furnace control valves. The Honeywell valves, to the best of my knowledge, are low pressure, ~ 11 " water column.
 
No, I just have 2 propane tanks, I didn't make a manifold, but I think Gifty74 did and it's explained in here somewhere. He did say it was an easier part of the build.
 
I've seen gifty's post, and am leaning toward a similar solution. I was just curious what you had done. Thanks for the reply.

Are you talking about the support beam? You'll see them on the bottom toward the right supporting the lowest level, which adds support to the entire rig. Very, very sturdy.
 

Latest posts

Back
Top