
Sawdustguy
Well-Known Member
Well Kladue has inspired me to look into automation and I have decided to do just that. The project will bring automation to my existing Natural Gas Fired E-RIMS Brewery. I have been looking at alot of the arduino hardware out there and have decided not to reinvent the wheel, so I will go with a Brewtroller (http://www.brewtroller.com). I have started collecting hardware to get this thing going and I will start with the Control Panel which will be the heart of the new automated brewery.
I have the design of the control panel pretty much set in concrete and I will post the drawings below. I will start with the control panel metal work next week. A neighbor of mine owns a machine shop and has agreed to let me use one of his Bridgeports of Saturdays for some Home Brew. I have done this in the past when building my audio equipment so it should work out fine.
The project will not happen over night. I do not want to take the brewery out of commission for the upgrade until I have everything all set to go, to minimize downtime. I will be able to build and test the control panel over the winter and plumb in the necessary sensors and valves in early spring. If I can scrounge up some extra scratch, I will re-plumb the brewery in stainless steel tube. We will see how it goes. I will update this thread from time to time as I progress. I welcome any questions or comments.
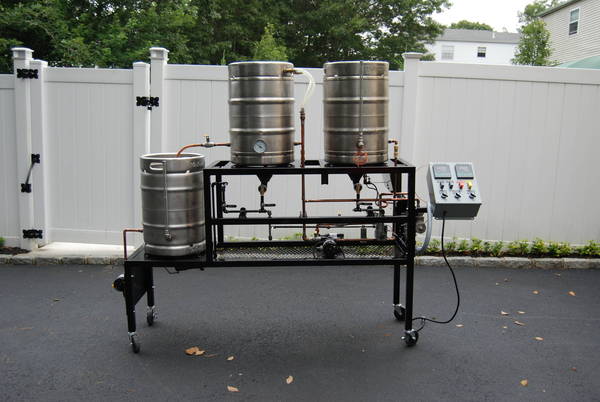
This is the brewery as it stands today utilizing simple automation via PID's
Here are the Plans and Drawings to upgrade the Brewery to near Full Automation (you will still have to add grain and hops manually when prompted by the automation for now)
Brew Stand Plumbing Schematic (.pdf file)
Brew Stand Plumbing Schematic
Gas Control Schematic (for both HLT and BK) (.pdf file)
Gas Control Schematic
E-RIMS Schematic (.pdf file)
E-RIMS Schematic
Control Panel Overall Schematic (.pdf file)
Control Panel Schematic
Relay Boards Schematic (.pdf file) *(Note: U1 has been replaced by a DIP Switch so the Brewtroller can control the relays directly)
Relay Board Schematic
USB-BUB Schematic (.pdf file)
USB-BUB Schematic
Power Sopply Data Sheet (.pdf file)
Power Supply Data Sheet
Control Panel Electronics Deck Layout (.pdf file)
Control Panel Electronics Deck Layout
Control Panel Electronics Deck Mechanical Drawing (.pdf file)
Control Panel Electronics Deck
Control Panel Front Cover Labeling Diagram (.pdf file)
Control Panel Front Cover Labeling Diagram
Control Panel Front Cover Mechanical Drawing (.pdf file)
Control Panel Front Cover
Control Panel Top Side Labeling Diagram (.pdf file)
Control Panel Top Side Labeling Diagram
Control Panel Top Side Mechanical Drawing (.pdf file)
Control Panel Top Side Mechanical Drawing
Control Panel Bottom Side Mechanical Drawing(.pdf file)
Control Panel Bottom Side Mechanical Drawing
Control Panel Left Side Mechanical Drawing (.pdf file)
Control Panel Left Side Mechanical Drawing
Control Panel Right Side Labeling Diagram (.pdf file)
Control Panel Right Side Labeling Diagram
Control Panel Right Side Mechanical Drawing (.pdf file)
Control Panel Right Side Mechanical Drawing
Control Panel SSR Heatsink Mechanical Drawing (.pdf file)
Control Panel SSR Heatsink Mechanical Drawing
I have the design of the control panel pretty much set in concrete and I will post the drawings below. I will start with the control panel metal work next week. A neighbor of mine owns a machine shop and has agreed to let me use one of his Bridgeports of Saturdays for some Home Brew. I have done this in the past when building my audio equipment so it should work out fine.
The project will not happen over night. I do not want to take the brewery out of commission for the upgrade until I have everything all set to go, to minimize downtime. I will be able to build and test the control panel over the winter and plumb in the necessary sensors and valves in early spring. If I can scrounge up some extra scratch, I will re-plumb the brewery in stainless steel tube. We will see how it goes. I will update this thread from time to time as I progress. I welcome any questions or comments.
This is the brewery as it stands today utilizing simple automation via PID's
Here are the Plans and Drawings to upgrade the Brewery to near Full Automation (you will still have to add grain and hops manually when prompted by the automation for now)
Brew Stand Plumbing Schematic (.pdf file)
Brew Stand Plumbing Schematic
Gas Control Schematic (for both HLT and BK) (.pdf file)
Gas Control Schematic
E-RIMS Schematic (.pdf file)
E-RIMS Schematic
Control Panel Overall Schematic (.pdf file)
Control Panel Schematic
Relay Boards Schematic (.pdf file) *(Note: U1 has been replaced by a DIP Switch so the Brewtroller can control the relays directly)
Relay Board Schematic
USB-BUB Schematic (.pdf file)
USB-BUB Schematic
Power Sopply Data Sheet (.pdf file)
Power Supply Data Sheet
Control Panel Electronics Deck Layout (.pdf file)
Control Panel Electronics Deck Layout
Control Panel Electronics Deck Mechanical Drawing (.pdf file)
Control Panel Electronics Deck
Control Panel Front Cover Labeling Diagram (.pdf file)
Control Panel Front Cover Labeling Diagram
Control Panel Front Cover Mechanical Drawing (.pdf file)
Control Panel Front Cover
Control Panel Top Side Labeling Diagram (.pdf file)
Control Panel Top Side Labeling Diagram
Control Panel Top Side Mechanical Drawing (.pdf file)
Control Panel Top Side Mechanical Drawing
Control Panel Bottom Side Mechanical Drawing(.pdf file)
Control Panel Bottom Side Mechanical Drawing
Control Panel Left Side Mechanical Drawing (.pdf file)
Control Panel Left Side Mechanical Drawing
Control Panel Right Side Labeling Diagram (.pdf file)
Control Panel Right Side Labeling Diagram
Control Panel Right Side Mechanical Drawing (.pdf file)
Control Panel Right Side Mechanical Drawing
Control Panel SSR Heatsink Mechanical Drawing (.pdf file)
Control Panel SSR Heatsink Mechanical Drawing
 I doubt I will ever top the turntable. There was a lot of physics involved in the turntable design. Writing the G-Code for CNC Machining the platter and bearing was fun having never done it before. Is was a fun project.


