Heatstick = awesome!

Homebrew Talk - Beer, Wine, Mead, & Cider Brewing Discussion Forum

Help Support Homebrew Talk - Beer, Wine, Mead, & Cider Brewing Discussion Forum:

This site may earn a commission from merchant affiliate links, including eBay, Amazon, and others.
I put a switch inline on both of mine. I just used a standard on/off light switch in a box. It was pretty simple and keeps me from having to fight with a plug if I need to turn them off quickly.
 
I put a switch inline on both of mine. I just used a standard on/off light switch in a box. It was pretty simple and keeps me from having to fight with a plug if I need to turn them off quickly.
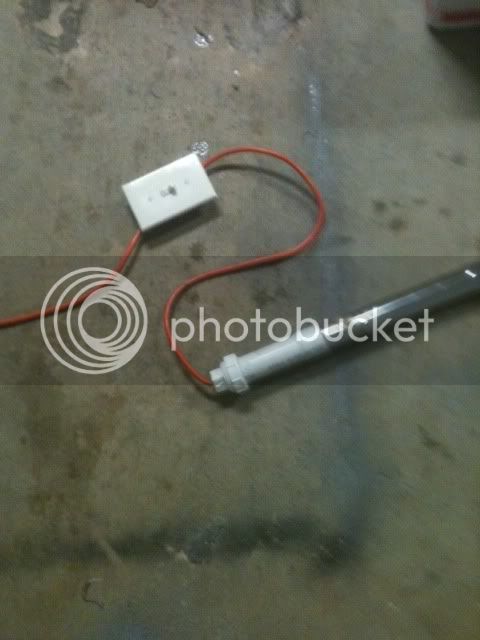
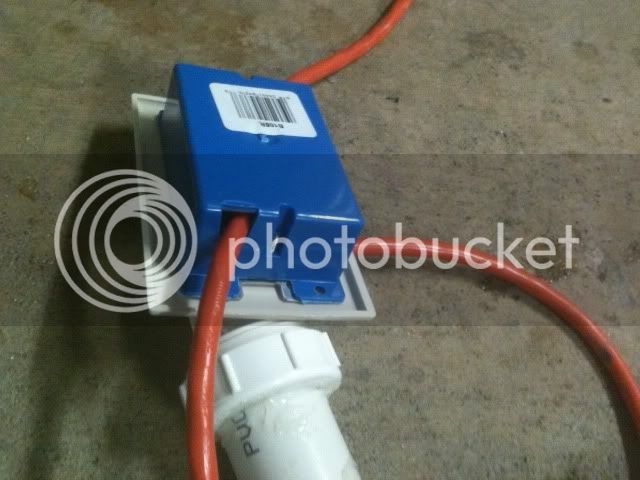
Awesome! Do you happen to have a picture of how you wired it up? Did you use just a regular junction box? And did you also add another gfci outlet that is powered by the switch?

Thanks!
 
I don't have a picture but all I did was run my wire through the box, cut back the insulation so I could get to the black wire. I then cut it and attached it to the switch so that that the on/off breaks the circuit. I put a cover plate over the switch. I have a switch in a box hanging from my wire about two feet from where the wire goes into the heatstick

The outlets that I plug each of my heatsticks to are GFI and separate circuits. I wired my ground wires to the metal drain pipe like the build thread shows.

photo-2.jpg


photo-1.jpg
 
Well I finished my heatstick today, but.....it tripped the GFCI after about 30 mins.

I thinned the JB weld using lacquer thinner per the instructions and even used two applications by pouring it inside.

I followed http://www.3d0g.net/brewing/heatstick those instructions.

I did a test in cold water and didn't see any bubbles or anything, but after it plugged it in and it got going I started to notice some bubbles coming up around the 1 1/2" to 1 1/4" chrome slip reducer where it screws onto the pipe. Should I just apply some JB weld to the outside of that area or am I totally screwed and need to build a brand new one from scratch :( ?

To make things worse, I'm brewing tomorrow!
 
It sounds like there are more and more people posting that their thinned JB Weld heatsticks are tripping the GFI shortly after being tested. I believe I read a few posts which mentioned that they thinned the JB Weld with acetone/thinner and took apart their ruined heatstick to find that the JB Weld had not set and was still liquid in the middle.

I know that's what JB Weld recommended people to use, so maybe people are thinning the JB Weld too much and it's not setting somehow? Or it's too deep and the middle's not exposed to enough air?

FWIW, I used the potting method like others in this thread, where I wrapped tape (instead of pvc or cardboard) around the base of the element and poured a regular mixture of JB Weld in and let that set... Then, used silicone (actually used blue RTV per the Cedar Creek instructions) and put that around the threads of the 1 1/2 to 1 1/4 slip reducer to help seal that when I finally screwed everything together. I haven't had any problem with mine in two years..

The JB Weld sets hard, the tape is easy to peel off, and even if the RTV or silicone or whatever you use doesn't seal the reducer to the end of the pipe, I'm confident that the wires to the element are secure and sealed.

I'm sure many people have used the thinning method with success, so just offering my own thoughts. No offense to anyone who's done differently.
 
Dry the unit thoroughly and apply JB Weld to the threaded area.
Use a hair dryer to thin the epoxy so it seeps into the joint.
BTW, epoxy thins way down under a little heat.
 
It sounds like there are more and more people posting that their thinned JB Weld heatsticks are tripping the GFI shortly after being tested. I believe I read a few posts which mentioned that they thinned the JB Weld with acetone/thinner and took apart their ruined heatstick to find that the JB Weld had not set and was still liquid in the middle.

I know that's what JB Weld recommended people to use, so maybe people are thinning the JB Weld too much and it's not setting somehow? Or it's too deep and the middle's not exposed to enough air?

FWIW, I used the potting method like others in this thread, where I wrapped tape (instead of pvc or cardboard) around the base of the element and poured a regular mixture of JB Weld in and let that set... Then, used silicone (actually used blue RTV per the Cedar Creek instructions) and put that around the threads of the 1 1/2 to 1 1/4 slip reducer to help seal that when I finally screwed everything together. I haven't had any problem with mine in two years..

The JB Weld sets hard, the tape is easy to peel off, and even if the RTV or silicone or whatever you use doesn't seal the reducer to the end of the pipe, I'm confident that the wires to the element are secure and sealed.

I'm sure many people have used the thinning method with success, so just offering my own thoughts. No offense to anyone who's done differently.

If I can get this one to last for me during the day tomorrow I'll be happy. I didn't put anything on the threads because I thought the thinned JB would seal them up.

I did purchase some silicone (food safe) and applied some around the threads on the pipe AND on the element. If that gets me thru tomorrow then I"ll build another one using the "potting" method with unthinned JB weld followed by silicone on all the threads.

Do you happen to have a picture of how you poured your JB?

Dry the unit thoroughly and apply JB Weld to the threaded area.
Use a hair dryer to thin the epoxy so it seeps into the joint.
BTW, epoxy thins way down under a little heat.

I tried to dry it out, but no water came out. I applied some food safe silicone around the threads on the pipe and on the element, so hopefully it will last me tomorrow.

Thanks!

P.S. It just gets so damn frustrating thinking you've done a good job on something only to find out you failed. :eek:
 
I've made three heat sticks and never had to thin out the JB. I saw that on some directions, but since I've worked with JB before, I didn't think I needed it. If you give it some time, gravity gets it in all the needed places before it hardens.

The first one I made did blow the cfi because I didn't get the JB everywhere (this was before I knew about using the reducer). So what I did was use a heat gun to get the liquid out, and then I put more JB on it.

So the moral of my longer story is maybe try a heat gun on it. They get tons hotter that a blow dryer.
 
You applied silicon after the JB weld? If so the silicon may be drying first, and not allowing the JB weld to cure properly? Just a thought
 
I made both of mine with only silicon-no JB weld at all. I've used them about about a half dozen times. So far so good...
 
It sounds like there are more and more people posting that their thinned JB Weld heatsticks are tripping the GFI shortly after being tested. I believe I read a few posts which mentioned that they thinned the JB Weld with acetone/thinner and took apart their ruined heatstick to find that the JB Weld had not set and was still liquid in the middle.

I know that's what JB Weld recommended people to use, so maybe people are thinning the JB Weld too much and it's not setting somehow? Or it's too deep and the middle's not exposed to enough air?

Epoxy doesn't need air to cure but it is very temperature sensitive. Thinning JB Weld also significantly increases the curing time. I'd give new sticks a solid week to cure, just to be safe.
 
but I wonder if the acetone used to thin JB needs air to dry. I have no clue, but my experience says thinning it is not needed.
 
but I wonder if the acetone used to thin JB needs air to dry. I have no clue, but my experience says thinning it is not needed.

Use a heat source to thin down the JB Weld if necessary. It will get runny fast and it will harden quicker if it's warm.
 
This is a noob question, but how do I figure out what ampage my circuits are? I know very little about electrical engineering. There's an outlet near my stove I use for small appliances and I would plug a heatstick there to supplement my gas stove. How do I figure out the max wattage I can get from that outlet for the heatstick?
 
D-Hutt said:
This is a noob question, but how do I figure out what ampage my circuits are? I know very little about electrical engineering. There's an outlet near my stove I use for small appliances and I would plug a heatstick there to supplement my gas stove. How do I figure out the max wattage I can get from that outlet for the heatstick?

Well, basic Ohms law states that current x voltage = wattage. But it's the current that the element will be drawing based on your supply voltage that matters most. Maybe choose an element you would like to use and rework the same formula, divide the element wattage by the metered voltage in your house and see if the number you come up with is lower than 15 amps. (assuming you are using a 15amp GFCI in your kitchen).

Make sure the grounding in your house and the over-current protection devices are up to code.

Oh, and look in the breaker box, the breaker for the circuit you plan on using will have a rating. (not to mention the design of the outlet can be an indication of current capabilities).
 
The GFCI I have is a 15A/125V. I'm assuming the outlet voltage is the normal 120. I don't know what to look for on the breaker, so here's some pics, lol.

i-wVzQTvV-M.jpg


i-f6GNBHX-L.jpg


and the GFCI

i-HDPRzJB-L.jpg
 
So I should get a higher rated GFCI then, yes? That way I can use a 1500w, 120v heating element.

Or does the 15A GFCI just mean that it'll trip if it gets above 15A?
 
D-Hutt said:
So I should get a higher rated GFCI then, yes? That way I can use a 1500w, 120v heating element.

Or does the 15A GFCI just mean that it'll trip if it gets above 15A?

No, don't get a different gfci. And the gfci portion of it is not for current draw over 15 amps, that what the breaker is for. The gfci is for current flow from the hot leg to ground.
 
Gotcha. So, I'm good with a 1500w heating element, yes? Will one of those be strong enough to supplement my 14000 BTU stove? I'm currently getting 6 gallons of water up to 205*F and need to push it over the edge.

Hopefully Lowes has what I need tomorrow. Ghetto Brooklyn Lowes ftl.
 
The 1500W heat stick will push you over the top and you will have to turn down the stove temp for the duration of the boil.

I use a combo of 1500W heat stick plus propane to boil 6.5G. I get a a very rigorous boil with propane turned down pretty low.
 
Got all the stuff for the cedar creek version of the heatstick. Question on connecting the wires to the heating element - does it matter which wire goes on which screw? Green is obv. the ground wire, but I don't see how the other two go.
 
Nop. OPTIONAL: If you have clamp on terminals for the wire connections that would be nice, or twist the wire together and make a hook around one of the screws. Remove the screw and flow solder onto the wire. I like to make sure all the strands are connected the element.
 
Done. JB Weld is in there, but some is dripping down the heating element. Any way to get it off when it dries? Or should I try to get it off now?
 
Interesting, thought all outlet bodies were the same size. From the description of the surface mount outlet, it should be fine.
 
If someone started making these and selling them, they could make a lot of money! (be sure to let me know if you do) :)
 
You applied silicon after the JB weld? If so the silicon may be drying first, and not allowing the JB weld to cure properly? Just a thought

I let the JB weld dry for about 4 days, tested it only to find it tripping the GFCI, and then added aquarium silicone around the threads on the reducer AND at the heating element.

I brewed with it on Saturday and it worked OK. No tripping of the GFCI and it brought my mash and sparge water up to the temp. I wanted.

I did see some bubbles come up around the threads where the reducer attaches to the pipe so maybe I"ll apply a tad more silicone to be safe.

Thanks for the help guys!
 
I built a 2000 watt heatstick a couple months ago. I did a 90 degree stick with a "U" on the top to hang over the top of my kettle. I put a 20 amp plug on the heatsick, which I plug into a waterproof switch box that has a 20 amp GFCI outlet and switch. This has a regular 15 amp plug on it that I only plug into circuits that I know are rated for 20 amps. I have only used it once so far, but it worked like a charm. Once I got to a boil I could dial back the stove burner to Med Lo and had a very nice boil.
I wasn't real crazy about the way the nut held the element in the tube, so I found a stainless steel machine bushing of the approximate size. I had to enlarge the buching a bit to fit over the threads of the element and grind it down a bit to fit inside the nut but I feel the element is a lot more secure. It didn't take too much JB Weld to seal it up. I let it cure for about a week and then put it in a pail of water for a couple days. No leaking so I figured I was good to go.
It makes brewing in the winter a lot more user friendly than standing outside in a cold garage over a propane burner.
 
Just plugged mine in to test - we have heat! 3 seconds plugged in and out of water is apparently enough to almost burn you, lol. Didn't expect it to hear up so fast.
 
Just plugged mine in to test - we have heat! 3 seconds plugged in and out of water is apparently enough to almost burn you, lol. Didn't expect it to hear up so fast.

Not only will it heat up fast...it will burn, glow, and then go snap crackle pop bang, and never heat up again...never, never plug in dry!
 
Yeah but it didn't do that because I unplugged it after a couple seconds.

I'm a brewing noob but I'm not a moron.
 
Just plugged mine in to test - we have heat! 3 seconds plugged in and out of water is apparently enough to almost burn you, lol. Didn't expect it to hear up so fast.

Yeah but it didn't do that because I unplugged it after a couple seconds.

I'm a brewing noob but I'm not a moron.

Really?

jk
 
I've learned that most NEVER EVER DO THIS rules aren't actually never do this rules. They're just good guidelines. I don't mind bending guidelines when I know the risks, i.e. plugging in a heatstick for 3 seconds to test the connections before I seal it all up.
 
Back
Top