You are using an out of date browser. It may not display this or other websites correctly.
You should upgrade or use an alternative browser.
You should upgrade or use an alternative browser.
My Stirplate... Cheap and Easy Build...
- Thread starter Anthony_Lopez
- Start date

Help Support Homebrew Talk - Beer, Wine, Mead, & Cider Brewing Discussion Forum:
This site may earn a commission from merchant affiliate
links, including eBay, Amazon, and others.
coypoo
Well-Known Member
Happy to report mine is working well. When I actually had a starter going the 9V wall wart actually worked better. With the increased resistance the did not get thrown and I was able to get a good vortex
I think de-polarize is a bad term. The magnets strong field can possibly interfere with the operation of the motor.
Something I have noticed with PC fans. If the fan blades get pulled up, away from the motor, they start to run rough, or bind. The magnets could be pulling up on the fan rotor, screwing with the shaft/bushing operation. I had a PC fan (on a PC, not a stir plate) that this was a problem with. popping the fan back down in place cured the issue.
On fans like that I chop the blades off then glue an extra washer on. The metal of the washer you glue the magnet to will actually help to shield the motor and prevent any issues from them. Plus an extra thickness or two of washers can position the magnets further up depending on how your box mounting is set up.
56Firedome
Member
So, Thanks for your input but I finally solved it. As I thought all along, the problem was the Fan Motor Magnets.
The Hobby Lobby Magnets were strong enough, when stacked, to scramble the North/South Poles of the Motor Magnets causing the Motor to just twitch when power was applied.
The RS Guy tried it out on the counter with his 12V PS & his conclusion, Bad Motor. I didn't mention what I was doing with the Fan, only that it didn't work.
The next battle related to the Wiring Diagram.
The Potentiometer to Fan is on the Left, Not the Right, Connection & the Black/White Wire from the Power Supply went to the Right (non LED Side) not the Left, the Black Wire from the Power Supply & the Black Fan Wire went to the Left (LED Side) of the Power Switch.
Finally it ran. Then came the Fan Magnet height adjustment. I just cranked it up until it dragged inside the Box & then lowered it until it cleared. Approx 1/16” clearance.
I was running the 12VDC Power Supply & noticed I had No Speed Adjustment until about 2/3 of Potentiometer. I remembered that many folks on the Thread were having a problem with Speed Control & went to lower Voltage Power Supplies.
I cut the PS wire & tried 9 V. Better Speed Control but no control below ½. Then I tried the 6 V PS & had much better Control. Speed Control from 0 to Max. Slower than the 12 V or 9 V but it worked.
I tried out the Stir Bar on the Lid of the Box. The 12 V wouldn’t Spin it at all, with the 9 V it would turn about 4 times then jump off. Then I tried the 6 V & the 2” Bar spun perfectly.
Since I don’t have the 2L Flask yet I tried out a Flower Vase. At 12, 9 & 6 V the 2” Stir Bar jumped around & wouldn’t stay connected to the Fan Magnets. I noticed the bottom of the Flower Vase was Convex, domed up. Since the Bar spun fine on the Box Lid, flat, I looked around for a Flower Vase with a Flat Bottom.
I found 1 on a shelf in the Basement with a thick coat of dust. I tried it out dry & SCOOOORE! It spun like a champ. The key appears to be Flat Bottom on the Flask & the ability to accelerate the Spin Up from 0 to 100%, smoothly. The 9 & 12 V had nothing until ½ or 2/3 & then 100%. Finally, I tried it with 6 V & Water in the Vase with the 2” Stir Bar.
Holy Crap! I pulled a Vortex to the bottom of the Vase & cavitated the Stir Bar. It flew off right after that. I can run it at 75% & pull a Vortex to ¾ of the depth of the 10” tall Vase. Plenty for what’s needed for a Starter. I let it run for 12 Hrs without a problem.
Now the question is, Will it have enough power to stir when the Yeast is thick & the viscosity is high? We won’t know the answer until Monday/Tuesday. My LHBS was out of 2L Flasks & will get the next shipment then. The Vase works pretty well & holds 1L just fine. It has a wide neck which should allow O2 to get to the surface. But there’s little room if the Yeast develops a Krussen (foamy cap).
My next question has to do with the thickness of the Starter & the Neck of the Flask. So, how thick is the Starter after 2 days of stirring?
The flasks I’m looking at have a fairly small Neck. I’m wondering if the Starter would clog it up as I’m trying to pour it into the Fermenter. It would seem that NOT decanting the Starter would reduce that problem, or not. I'm figuring to Slosh it about to thin the settled slurry before pouring it into the Fermenter. I can't see how that would hurt anything. Any comments?
So, all seems to be working as advertised. I ended up swapping the Bad Fan for a New one rather than a refund, oh well, Parts for the next Stir Plate, I suppose.
coypoo
Well-Known Member
It seems that since you are pulling such a large vortex in the water that you'll be able to get one in a starter as well. You just might have to go higher on the rheostat.
As for the thickness of the starter, I seriously doubt any neck would be too small to pour liquid yeast through so you don't have to worry about that
As for the thickness of the starter, I seriously doubt any neck would be too small to pour liquid yeast through so you don't have to worry about that
Good grief do you have to tell your entire life story?
It's "krausen".
Have you ever made a starter before? It's not any thicker than that. It's thicker than water but it's not like you're stirring porridge.
You should decant your starter after cold crashing unless you like the flavor of ass in your beer. Starters, especially stirred starters, taste terrible.
Now the question is, Will it have enough power to stir when the Yeast is thick & the viscosity is high? We wont know the answer until Monday/Tuesday. My LHBS was out of 2L Flasks & will get the next shipment then. The Vase works pretty well & holds 1L just fine. It has a wide neck which should allow O2 to get to the surface. But theres little room if the Yeast develops a Krussen (foamy cap).
It's "krausen".
My next question has to do with the thickness of the Starter & the Neck of the Flask. So, how thick is the Starter after 2 days of stirring?
Have you ever made a starter before? It's not any thicker than that. It's thicker than water but it's not like you're stirring porridge.
The flasks Im looking at have a fairly small Neck. Im wondering if the Starter would clog it up as Im trying to pour it into the Fermenter. It would seem that NOT decanting the Starter would reduce that problem, or not. I'm figuring to Slosh it about to thin the settled slurry before pouring it into the Fermenter. I can't see how that would hurt anything. Any comments?
You should decant your starter after cold crashing unless you like the flavor of ass in your beer. Starters, especially stirred starters, taste terrible.
Mikespunchlist
Well-Known Member
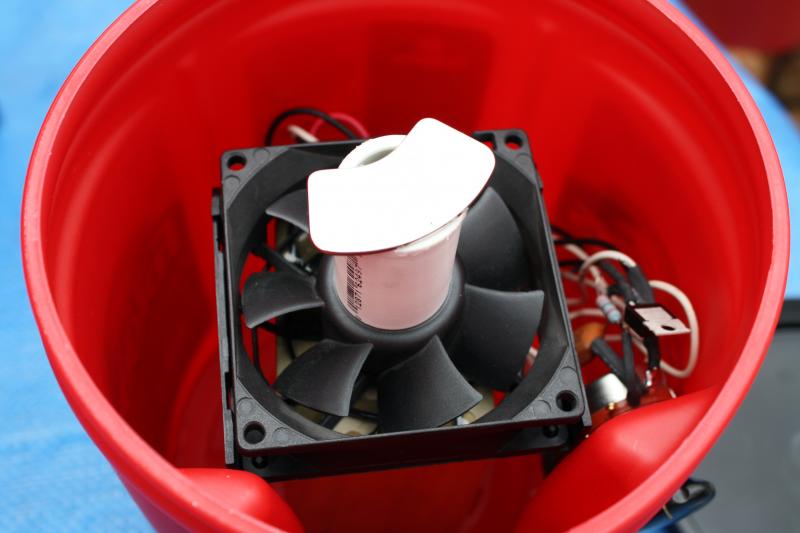
My stirrer is speed controlled with the LM317 voltage regulator. Everything stores within itself when done. The coffee container top was a little springy so I added a piece of clear acrylic on top to accommodate heavier payloads. My flask is on order so I borrowed a glass from the kitchen for testing. It should be even better with the thinner flask bottom.




56Firedome
Member
Good grief do you have to tell your entire life story?
It's "krausen".
Have you ever made a starter before? It's not any thicker than that. It's thicker than water but it's not like you're stirring porridge.
You should decant your starter after cold crashing unless you like the flavor of ass in your beer. Starters, especially stirred starters, taste terrible.
Life Story? Not so much. But since you didn't read ANY of the descriptions of the Problem, I thought a Retelling of the issues was in order.
Oh, & thanks for the Spelling Lesson.
No, I have never made a Starter before, That was the purpose of this Project.
THanks for you input Coypoo It was helpful & not derogatory or condesending.
Later.
My stirrer is speed controlled with the LM317 voltage regulator. Everything stores within itself when done. The coffee container top was a little springy so I added a piece of clear acrylic on top to accommodate heavier payloads. My flask is on order so I borrowed a glass from the kitchen for testing. It should be even better with the thinner flask bottom.
that is legit! my only worry would be if the whole thing is not balanced enough it does not have much base to prevent the whole thing from toppling.
Life Story? Not so much. But since you didn't read ANY of the descriptions of the Problem, I thought a Retelling of the issues was in order.
Oh, & thanks for the Spelling Lesson.
No, I have never made a Starter before, That was the purpose of this Project.
THanks for you input Coypoo It was helpful & not derogatory or condesending.
Later.
Sorry man, i didn't mean to be derogatory or condescending.
Huaco
Well-Known Member
The OP said he used a "4 inch" fan. I found a great deal on 80mm fans at Newegg and wonder if these will work. 80mm is just a hair over 3 inches. Anyone else have luck using 80mm fans?
The OP said he used a "4 inch" fan. I found a great deal on 80mm fans at Newegg and wonder if these will work. 80mm is just a hair over 3 inches. Anyone else have luck using 80mm fans?
Yes, a >1.57 Watt, 12VDC case fan of 80mm should be strong enough to turn a couple hard drive magnets without any trouble from a 12 VDC power source.
Huaco
Well-Known Member
Yes, a >1.57 Watt, 12VDC case fan of 80mm should be strong enough to turn a couple hard drive magnets without any trouble from a 12 VDC power source.
I have (2) 3/4"x 1/4" RE magnets. (YES, they are awesome... they automatically orient themselves to NORTH when stood up on their sieds!!!!!!) I plan to "chair" up the magnets an inch or so with a non ferrous material to keep the magnets from harming the operation of the fan motor. Similar to the "Folders can" did with the PVC
I have (2) 3/4"x 1/4" RE magnets. (YES, they are awesome... they automatically orient themselves to NORTH when stood up on their sieds!!!!!!) I plan to "chair" up the magnets an inch or so with a non ferrous material to keep the magnets from harming the operation of the fan motor. Similar to the "Folders can" did with the PVC
Ah ok, good idea. Those are probably a bit strong for your puny little fan. :rockin:
Mikespunchlist
Well-Known Member
that is legit! my only worry would be if the whole thing is not balanced enough it does not have much base to prevent the whole thing from toppling.
I thought about that too. I spent a lot of time making sure everything is a balanced as I could, breaking glue loose and shifting until I was happy with it. It is probably as centered as possible and actually it shakes very little. I am a little concerned that its so tall stuff will have farther to fall. If I have any problem at all with it I'll first fill the bottom of the box with rocks or weights and if it still gives problems I've decided a piece of 4" PVC coupling will be it's new home.
Anyone looking to source parts, Dan over at stirstarters.com sold me a DC power jack, fan and power supply for a nominal amount of money. He normally sells complete stir plates but says he's willing to help out anyone seeking to take on a DIY project.
He doesn't have an ad budget so I thought I'd say a few kind words regarding someone who was very helpful to me.
He doesn't have an ad budget so I thought I'd say a few kind words regarding someone who was very helpful to me.
Andynewbom
Member
building one today hopefully. Of course living in El Salvador we do not have Radio Shack or any easy way to get most things....
-TH-
Well-Known Member
building one today hopefully. Of course living in El Salvador we do not have Radio Shack or any easy way to get most things....
Cool - will it be belt driven by the rear wheel of an old pickup truck?
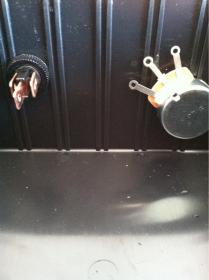
Hey guys, can someone help me out? I was following Tony, but got lost. I know next to nothing about wiring and thought I was getting it, but alas....I'm stuck...
I will upload where I am at via my phone.
I will upload where I am at via my phone.
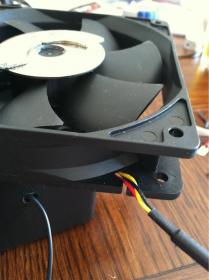
As you can see I have attached the black fan wire to the black power supply wire. I have a white power supply wire I dont know what to do with. The blacks are on a female disconnect. The red fan wire is female disconnect. I am not sure where to go from here.

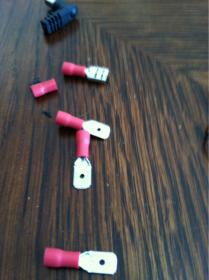
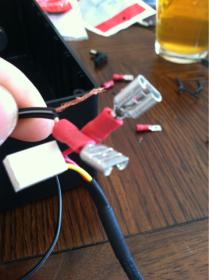


HenryVance3
Well-Known Member
Run your hot and ground to your switch first earth will be your ground. Then run your supply off the middle of the switch to potEntionmeter meter then run your fan power off the other potEntionmeter leg and connect the ground to earth on the switch. ( this is from memory so it is not gospel but it should get you spinning).
Dealing with a newb here. Which part of the switch is ground and which one is power? Same with rheostat.... Left middle Right?
I know what the Black and Yellow wires are for on the fan, but not the red.
I know what the Black and Yellow wires are for on the fan, but not the red.
Kayos
Well-Known Member
I guess I am not understanding your question. On page one of this thread, it shows exactly the wiring pics. Where are you lost?
Kayos
Well-Known Member
"Get your Black and Red computer fan wires stripped. If you aren't soldering, put a female quick disconnect onto the Red wire.
Next, cut off the power supply “phone” side and try to keep the power cord going to the wall socket as long as possible. This just makes things easy if you make a mistake. Some phone chargers will have two wires, while others I've found have a “braid” going around another insulated wire. The “braid” is our ground or negative and the inner cable is your power side. For the chargers with 2 single wires inside, black is your ground.
Strip about 1/4” of the insulation off your wires. Take the black cable of your computer fan and the black cable of your power supply and twist the exposed wire together and insert them into one of the female quick disconnects. Make sure that you have already put your power supply cable through the hole you drilled in your enclosure before making this crimp or you won't be able to close your enclosure when you are done. Connect these two wires to the “Earth” male connector on your power supply.
Now, take your Red cable from your power supply and add a female disconnect onto this cable and attach it to the “male” terminal on your power switch labeled “Supply”
We are ALMOST done with all the wiring. The only male terminal left on our power switch is the one labeled “Load”. Take some of the spare wire, about 4-5 inches, and strip off the insulation from each end. Attach a female disconnect to each end. Now, attach one side of the wire onto the “Load” terminal on your power switch, and the other to the center pin of the potentiometer.
The last step is to take the “Power” cable (red) from your computer fan and attach another female disconnect. Attach this disconnect onto the right side pin on the potentiometer. "
I have black and black connected to Earth (left side of switch).
I have white wire from power supply hooked to Supply (right side switch).
I have extra wire from Load to middle prong on Pot.
Red wire from fan on far right prong of Pot.
Still have a yellow wire from fan.
I have white wire from power supply hooked to Supply (right side switch).
I have extra wire from Load to middle prong on Pot.
Red wire from fan on far right prong of Pot.
Still have a yellow wire from fan.
3PegBrew said:I have black and black connected to Earth (left side of switch).
I have white wire from power supply hooked to Supply (right side switch).
I have extra wire from Load to middle prong on Pot.
Red wire from fan on far right prong of Pot.
Still have a yellow wire from fan.
I am really not trying to be stupid. I just am a person who has to "see it done". a picture of this stuff without labels doesnt work very well.
I had to google the switch to find out the terms for each prong.
I consulted a buddy who used to do geek squad for best buy.
I feel like a lost cause.
3PegBrew said:I have black and black connected to Earth (left side of switch).
I have white wire from power supply hooked to Supply (right side switch).
I have extra wire from Load to middle prong on Pot.
Red wire from fan on far right prong of Pot.
Still have a yellow wire from fan.
yellow wire doesn't have any use here. Trim it if you want, but you don't need to connect it to anything.
yellow wire doesn't have any use here. Trim it if you want, but you don't need to connect it to anything.
K the yellow is trimmed. I will never wire another thing the rest of my life if I can get this damn fan to spin.
Kayos
Well-Known Member
There are a couple of ways to wire the thing. Maybe this pic will help you. I can't see where you put the red on the switch because of the short stripping from your power supply. Maybe this pic will spur inspiration.
I had a couple of issues when I made mine, too. Remember, the pot is for making adjustments to the speed and the switch is for turning on and off. I know obv. right? Well when I made the power connect directly to the fan and at least it moved, it made me think it's at least possible. Try that and make sure all is kosher.
I had a couple of issues when I made mine, too. Remember, the pot is for making adjustments to the speed and the switch is for turning on and off. I know obv. right? Well when I made the power connect directly to the fan and at least it moved, it made me think it's at least possible. Try that and make sure all is kosher.
Kayos
Well-Known Member
If the fan runs, I'll tear mine apart to show you the guts. I was as frustrated as you at one point then realized I had the switch in a different position that the OP before I figured it out 5 hours later
Kayos
Well-Known Member
NICE! Good job
56Firedome said:Since I don’t have the 2L Flask yet I tried out a Flower Vase.
My next question has to do with the thickness of the Starter & the Neck of the Flask. So, how thick is the Starter after 2 days of stirring?
The flasks I’m looking at have a fairly small Neck.
If you have an old 1.75L Schmirnoff <sp?> vodka bottle they work great if your magnet is strong enough.
Starters are thick enough to make it more difficult to maintain the strong vortex but no thicker than a glass of milk.
Kayos
Well-Known Member
I actually used a 12v power and ran it through water but could not get the vortex off the bottom so I replaced it with a 9v source. When I went to a starter I had to change back to a 12v because of the thickness. I think milk would be a better choice for the test.
Would you guys recommend using a 2 inch stir bar in the 2K mL flask?
By the way I got the wiring figured out. The pot. now works correctly. My problem was I had the power directly to the switch. I took the power source to the pot and used an extra wire to connect the middle prong of the pot to the right prong of the switch which also had the red wire from the fan.
By the way I got the wiring figured out. The pot. now works correctly. My problem was I had the power directly to the switch. I took the power source to the pot and used an extra wire to connect the middle prong of the pot to the right prong of the switch which also had the red wire from the fan.
HenryVance3
Well-Known Member
I have used a 1" and got plenty of spin so it is dealers preference
Kayos
Well-Known Member
+1 1"
Diaperload
Well-Known Member
I've been toying with my DIY stir plate for the past few days.
Here's some parts that I found or picked up at Radio Shack:
25ohm rheostat
(2) 80mm pc cooling fans
a couple DC switches. 1 is illuminated and 1 is not
3 magnets from old hard drives
a couple 1" stir bars
(1) 2" stir bar
2L Erlenmeyer flask
project box
(1) AC -> DC converter 6v
I can get the fan to spin without the magnet glued to it but once I glue the magnet the fan won't spin when I turn it on. However if I give it a little nudge after I turn it on it will spin. How can I resolve this?
On one of the fans I cut all the fins off to reduce mass. This helped a bit. Now the 'fan' will spin when I turn it on. It will also spin when I turn it on (with hd magnet glued to it). However, it won't spin when I turn it on and have the flask with spin bar in position. Sometimes I can turn it on and THEN place the flask on in. Takes about 20 tries to get the bar to spin though.
Has anybody else had these issues? What did you do to resolve this?
I have some ideas but they are just wild guesses.
Stronger fan with more torque?
Use a 9v converter?
play with spacing (add some rubber stoppers to the top of my stir plate)?
While it's fun trying to get this to work, it is getting very annoying.
I'm not an electrical engineer by any means, so if anybody has advice, please use language that would be understood by a 4 year old! Thanks.
Similar threads
- Replies
- 9
- Views
- 2K
- Replies
- 2
- Views
- 2K
- Replies
- 0
- Views
- 1K

