Simple electric boiling question

Homebrew Talk - Beer, Wine, Mead, & Cider Brewing Discussion Forum

Help Support Homebrew Talk - Beer, Wine, Mead, & Cider Brewing Discussion Forum:

This site may earn a commission from merchant affiliate links, including eBay, Amazon, and others.

Britinusa

Well-Known Member
Joined
Dec 23, 2012
Messages
370
Reaction score
49
I have been reading threads on electric brewing and I want to set up an electric kettle I will be setting uo in the laundry room so I can unplug the dryer and use that outlet.
I did want a very basic box that i can set up the temp and use the kettle for mash, sparge and boiling.
I dont want to spend lots of money on it.
Any thoughts on what I will need? I already have a 7 gallon kettle with a ball valve.
I brew 5 gallon batches.
 
I have no problem drilling the pot, I want something that will be installed on the pot.
 
The system you refer to seems to be for controlling mash since you don't need a PID for boiling water. Also, it's $495.

They have a boil controller here for $295.00 that should work fine for boiling your wurt:
http://www.highgravitybrew.com/productcart/pc/EBC-II-with-Infinite-Power-Control-306p3073.htm

Kegkits has their version for $164.95 but theirs does not include a power switch for a pump. For $130 difference I think I can plug my pump into a AC outlet.
http://www.kegkits.com/Merchant2/me...de=W&Product_Code=EB-240V&Category_Code=EBREW
 
Im not sure I even want a control box, im thinking of just a cable to plug into an element in the brew pot.
or maybe 2 elements, one to get it to mash temp and run both to boil.
If I ran 2 cables from separate circuits in the house and put together a box with 2 single GFCI outlets that I could put switches on, maybe that will work?
But what elements are best to boil 7 gallons?

I boil 6 gallons with a 1650 watt element + my stove top. I run both full on until I reach boil then I turn the stove eye down to 2 or 3 to maintain a good rolling boil. I tried turning the stove eye off to see what happens and my batch drops down to a slow boil, probably still more than fast enough but I like a full rolling boil.

So, in your case you might want to install two 2000 watt elements to be safe. But if I were going to go all 120V electric & not convert to 240V electric I would go with two 1650 watt elements, one plugged straight into the wall and the other through some sort of controller. This would give me maximum control over my boil.
 
Im not sure I even want a control box, im thinking of just a cable to plug into an element in the brew pot.
or maybe 2 elements, one to get it to mash temp and run both to boil.
If I ran 2 cables from separate circuits in the house and put together a box with 2 single GFCI outlets that I could put switches on, maybe that will work?
But what elements are best to boil 7 gallons?

If you have the option to brew in your kitchen, there is very likely more than one GFCI protected circuit there already.
 
My brew pot will not fit on stove top, I am thinking of the DIY controller, I guess without the control there is a risk of scorching the wort?
 
The risk is more so overly-agressive boils. If you use a ULWD element, I wouldn't be too concerned about scorching the wort, but you don't need to run your element at 100% full power to maintain boil - you'll end up with excessive boiloff and screwed up hop utilization. The ability to dial down the element to maintain a boil is the advantage.
 
Before the modifications, you might consider upgrading your kettle.
The Winware 10 gal AL kettle is <$40 shipped from amazon. AL is easy to modify for the ball valve, element, etc.

I use the phase angle SSR and it works well for boil control. My 4500W element is at 60-70% power for a rolling boil w/ 6+ gallons.
 
Thanks for the replies guys, I think im going to get the DIY kit, Where is the best place to get the element?
 
Thanks for the replies guys, I think im going to get the DIY kit, Where is the best place to get the element?

You can get the LWD version at from your local Home Depot or the ULWD version from Amazon.com.
 
That the brand I used from Home Depot. Price was very similar too. People typically worry about the watt density but my standard hot water heaters get black but have never given me any taste issues. I make light pales in both extract and AG so I think I would have noticed. I used two 2200 watt elements but if I redid this I would probably step down to your 1500s or so. I run 120 so it was a but more work with breaker sizing and wire/ extension cord sizing. Hard to buy extension cords in that gauge so they do get warm.
Not sure where you are at but you could always run cords tight out your dryer vent and brew outside. Mu setup has a window and vent in the basement or else the wife would kill me because of the smell.
 
My wife hates the smell too, but as im now going 110v I can just brew on the deck and run from my outside outlets.
 
What's the power requirement to keep water boiling? Will two 1500W be able to get your 6-7gal wort to a boil? Just concerned that you may put everything together and barely get a boil going.

On that note, how much does it take to get 12gal to a boil? That seems like an awful lot of power.
 
I have seen 2000w elements on Amazon think ill get 2 of those.
 
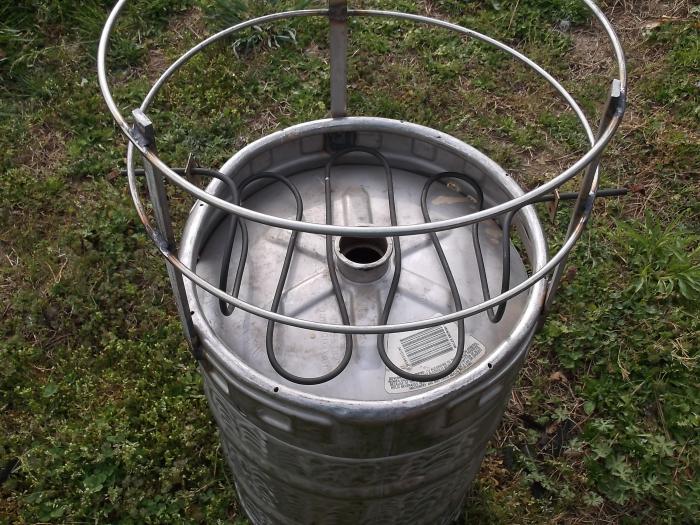
Hi. What I have done on a "extreme low budget",I bet I got near $75 in the cooker now.. that carboy cost me $45, so I am pretty satisfied with that.. of course I have a stainless-tig welder here, plasma cutter, and hillbilly engineering. I'm a 56 year old electrician-instrument tech. (disclaimer) What works in industry will work in a home-brewery. People here on the forum have helped me (why I am here), shared information with me and I do appreciate it. My way is not always the right way, or the only way, it is just how I did it.

I am against a immersion element, well, heat transfer, there immediately at the element you have a "hotter" temp and cooked on "caramels" and other things that will not clean as easily, discoloration.. and normaly the elements are aluminum encased(my stepmom died with alztimers?) Yeah, I know.. ALL the brew experts recommend them. They are quick and easy to utilize. (and expensive) ANYTHING in the pot you can not scrub is dirty.. threads, elements, pump hoses.. etc..

A $7 220 volt oven element can be reshaped before it is heated. I did that, a PID control off ebay with SSR, and thermocouple can be as cheap as $35. Since you are using a plug disconnect, a power relay like I put into mine is not needed. Put it under the pot, close it in with insulation, heat rises into the kettle. If I do it again? I'll have a cooking area I can swap for a smaller stock pot also, and the pressure cooker for jelly, and (heating and shaping hdpe) and...

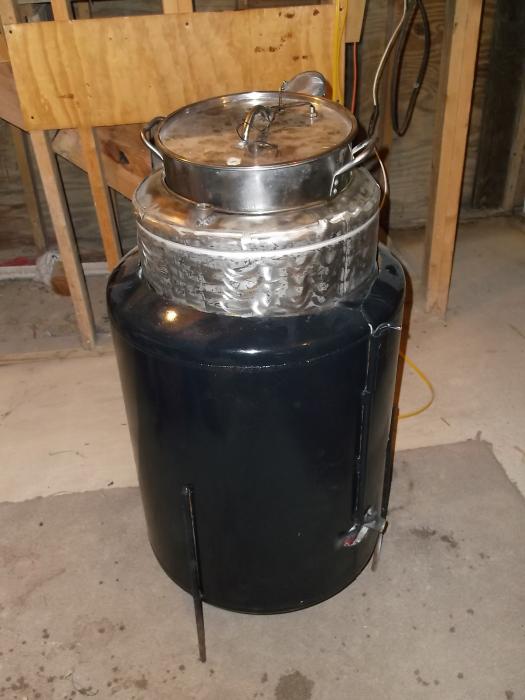
Insulation, well.. keeping the heat "where you want it" is just good common sense (economy and room cooling-house comfort). you can aluminum flashing-metal wrap the cerwool-mineral wool or do a hard cover like I did with a old tank. Recently I took the lid off mine during the chill-out (steam rolling out) and the upstairs temps went to 76 immediately.. My wife opened the basement door and hollered at me. (she lives up there and I was in the dungeon-brewery) Another option would be to hook up with my insulator buddy and have him sew you a high temp insulated blanket to velcro around it. He does that for companies all over the USA, he is a biker, a drinker, and one of us.. Has a sewing machine, a roll of temp matt, and bales of mineral wool there in his workshop, he wraps boilers and chemical plant piping all the time, he can cut out and sew faster than I can draw on paper.

Keg-stock pot.. well.. I had one gave to me, plasma cut the top, welded a ring on for a lid (could have cut it that size) but then I'd scrape my arm reaching into it on the edge cleaning.. welded a drain spickot 1/2" stainless into the bunghole for drain.. with the "channels" it has made into that end of the keg every drop comes out the bottom. Threads hold funk and "bacteria".. so I tried to run the temp sensor from the top.. going to put a nut on the side to hold it against the tank, under the insulation and read it there.. thou... Not the best, a immersion probe is better. After thought, I raised my cooker drain up to 20" off the floor to drain into the carboy. Did that yesterday by welding on angle iron legs.

Getting the "juice" wort out of a grain? Right now I am using brew in a bag, it works.. but I dislike the bags. well how about a double boiler?? I'm still looking for a pump, bought one off ebay I thought was the size of a tea kettle, it fits into my pocket. THE stainless stock pot drops into the top of the keg, has a coffee filter made into the bottom in the home made drain system. There will be two temp sensors, one in mash stock pot, one in kettle a switch to choose.

Ventilation, well.. making jelly, making beer, the steam off it is "sticky" and over a period of time you'll get attacked by vermin of all types, bugs, rats, mice hunting grain and sweetness.. I'm working on that here, a old range hood I have stuck back with a vent fan. That should help with the steam problem also. (I have had my beard "crusty" from standing stirring home made jelly, 55 gallons of free apples)

I'm still learning the process, and working the kinks out of my system here. I have a old 1990s automation set that can run it all by laptop, or upstairs computer.. if I decide to go that way, Manually works, I spent most the brew time on the couch Saturday, the PID electrically keeping the temp "EXACT" so I didn't have to stand there and fiddle. (brew schedule, After wort in a bag, do this 60 minutes, do this 30 minutes, do this 15, chill.. )

My Saturday batch in the carboy now.

You really want to go "Cheap redneck"?? get you a old kitchen stove, take the cooking top off it, cut a hole in the top of the oven to fit your pot so the bottom will drop into it, fab a stand inside the oven for the stock pot to sit on, there you are.. instant heat source, heat control is a knob- remote bulb inside the oven, 4500 lower watt element in place, cooking vessel in place, insulated, ready to go. Discard the left over pieces. I've had several kitchen ovens gave to me over the years.. can't get much cheaper than that. If you fab a trap door to go on top? well now.. you could bake biscuits and dinner rolls too. Post pictures please. (I baked some home made bread last week with HOMEBREW)

All this typing, I got to get the old Harley out and go for a ride in between thunderstorms. Cheers, good luck.

Stainless cooker 001.jpg


Stainless cooker 012.jpg


Beer 041.jpg
 
Last edited by a moderator:
Hi. What I have done on a "extreme low budget",I bet I got near $75 in the cooker now.. that carboy cost me $45, so I am pretty satisfied with that.. of course I have a stainless-tig welder here, plasma cutter, and hillbilly engineering. I'm a 56 year old electrician-instrument tech. (disclaimer) What works in industry will work in a home-brewery. People here on the forum have helped me (why I am here), shared information with me and I do appreciate it. My way is not always the right way, or the only way, it is just how I did it.

I am against a immersion element, well, heat transfer, there immediately at the element you have a "hotter" temp and cooked on "caramels" and other things that will not clean as easily, discoloration.. and normaly the elements are aluminum encased(my stepmom died with alztimers?) Yeah, I know.. ALL the brew experts recommend them. They are quick and easy to utilize. (and expensive) ANYTHING in the pot you can not scrub is dirty.. threads, elements, pump hoses.. etc..

A $7 220 volt oven element can be reshaped before it is heated. I did that, a PID control off ebay with SSR, and thermocouple can be as cheap as $35. Since you are using a plug disconnect, a power relay like I put into mine is not needed. Put it under the pot, close it in with insulation, heat rises into the kettle. If I do it again? I'll have a cooking area I can swap for a smaller stock pot also, and the pressure cooker for jelly, and (heating and shaping hdpe) and...

Insulation, well.. keeping the heat "where you want it" is just good common sense (economy and room cooling-house comfort). you can aluminum flashing-metal wrap the cerwool-mineral wool or do a hard cover like I did with a old tank. Recently I took the lid off mine during the chill-out (steam rolling out) and the upstairs temps went to 76 immediately.. My wife opened the basement door and hollered at me. (she lives up there and I was in the dungeon-brewery) Another option would be to hook up with my insulator buddy and have him sew you a high temp insulated blanket to velcro around it. He does that for companies all over the USA, he is a biker, a drinker, and one of us.. Has a sewing machine, a roll of temp matt, and bales of mineral wool there in his workshop, he wraps boilers and chemical plant piping all the time, he can cut out and sew faster than I can draw on paper.

Keg-stock pot.. well.. I had one gave to me, plasma cut the top, welded a ring on for a lid (could have cut it that size) but then I'd scrape my arm reaching into it on the edge cleaning.. welded a drain spickot 1/2" stainless into the bunghole for drain.. with the "channels" it has made into that end of the keg every drop comes out the bottom. Threads hold funk and "bacteria".. so I tried to run the temp sensor from the top.. going to put a nut on the side to hold it against the tank, under the insulation and read it there.. thou... Not the best, a immersion probe is better. After thought, I raised my cooker drain up to 20" off the floor to drain into the carboy. Did that yesterday by welding on angle iron legs.

Getting the "juice" wort out of a grain? Right now I am using brew in a bag, it works.. but I dislike the bags. well how about a double boiler?? I'm still looking for a pump, bought one off ebay I thought was the size of a tea kettle, it fits into my pocket. THE stainless stock pot drops into the top of the keg, has a coffee filter made into the bottom in the home made drain system. There will be two temp sensors, one in mash stock pot, one in kettle a switch to choose.

Ventilation, well.. making jelly, making beer, the steam off it is "sticky" and over a period of time you'll get attacked by vermin of all types, bugs, rats, mice hunting grain and sweetness.. I'm working on that here, a old range hood I have stuck back with a vent fan. That should help with the steam problem also. (I have had my beard "crusty" from standing stirring home made jelly, 55 gallons of free apples)

I'm still learning the process, and working the kinks out of my system here. I have a old 1990s automation set that can run it all by laptop, or upstairs computer.. if I decide to go that way, Manually works, I spent most the brew time on the couch Saturday, the PID electrically keeping the temp "EXACT" so I didn't have to stand there and fiddle. (brew schedule, After wort in a bag, do this 60 minutes, do this 30 minutes, do this 15, chill.. )

Video Link: http://www.youtube.com/watch?v=6sxrC9PxXAM My Saturday batch in the carboy now.

You really want to go "Cheap redneck"?? get you a old kitchen stove, take the cooking top off it, cut a hole in the top of the oven to fit your pot so the bottom will drop into it, fab a stand inside the oven for the stock pot to sit on, there you are.. instant heat source, heat control is a knob- remote bulb inside the oven, 4500 lower watt element in place, cooking vessel in place, insulated, ready to go. Discard the left over pieces. I've had several kitchen ovens gave to me over the years.. can't get much cheaper than that. If you fab a trap door to go on top? well now.. you could bake biscuits and dinner rolls too. Post pictures please. (I baked some home made bread last week with HOMEBREW)

All this typing, I got to get the old Harley out and go for a ride in between thunderstorms. Cheers, good luck.

Incredible post.
Thank you!
 
Well plus one for the "extreme low budget", "hillbilly engineering" oven brew kettle...I like it!

I guess you put enough watts under the kettle with some insulation...sumpin good gonna happen.

Stolen from Lagunitas Lil Sumpin Sumpin....cheers!
 
I saw some mention of High Gravity website prior. If you're looking to buy already assembled items to build an electric boil kettle, I'd strongly directly you to them. If you are going the DIY route and you have some basic electrician skills, I'm sure building your own control box would be fun. A word of caution...if you do purchase a pre-made control box or build one, you should really think about what you want to do long term. So, if you have plans to upgrade to larger kettles/larger system, save the money and build/purchase the control box that you'll use forever.

I have a Kal clone setup and I purchased the EBC III control box from High Gravity, which works great. So I can speak to the High Gravity products being quality. I really wanted to build something like Kal's control box but the kit for the parts was still very expensive (aside from the pre-made one being VERY expensive). Long term, I can use the guts of the EBC III to build my own...but now that I'm using it, I don't really see any added benefit of adding more bells or whistles. I purchased my heating element kits from the www.electricbrewery.com website. I know High Gravity makes heating element kits, but I really liked the engineering of the one from Kal's website. Kal's build comes with more of a price tag, but I just felt like it was a better quality build (I could certainly be wrong. I purchased my control box from High Gravity and it works great and would recommend it to anyone.) http://www.highgravitybrew.com/productcart/pc/EBC-III-with-Infinite-Power-Control-269p3858.htm

If you purchase from High Gravity, you will need a knock-out hole punch or know someone with welding skills to get the heating element installed. The knock-out punch pieces are super expensive, so unless you plan to punch a bunch of holes in your kettles, I'd just get someone with welding experience to attach the heating element. Here's all you need:
http://www.highgravitybrew.com/prod...ent-5500-Watt-SS-Twist-lock-Plug-306p3860.htm
http://www.highgravitybrew.com/productcart/pc/Electric-Kettle-Controller-306p3084.htm

Best of luck.
 
I think I did note in this thread that you were against immersing elements in the wort. But if you do reconsider this route, all you would need to do for the boil is size the wattage correctly for your batches. For a long time I used two 2000w elements to boil 10 gallon batches. It was about the perfect amount of power. I just plugged them in to separate circuits with gfci outlets and a switch to turn them on and off. Doesn't get much cheaper.

I can't speak to the aluminum risk of boiling with an element, but in terms of carmelization, I don't have any issues and I've done lagers with my system. There is some some protein that collects on the element, but a quick scrub after boiling takes it right off.

Most people who are using a PID, infinite switch or other type of controller with the boil are using 5500 watt elements to reach a boil faster. If you want to go into this cheaply, sizing the wattage properly and using gfci outlets and switches are about as cheap as you can get.

That said, I went from five gallons to ten, from one vessel to two, added pumps, ventilation, etc. and before long I had like ten switches and six circuits. Added a RIMS tube and made a control box with a PID, then eventually went to a control panel.

So you may find you will outgrow the first solution.
 
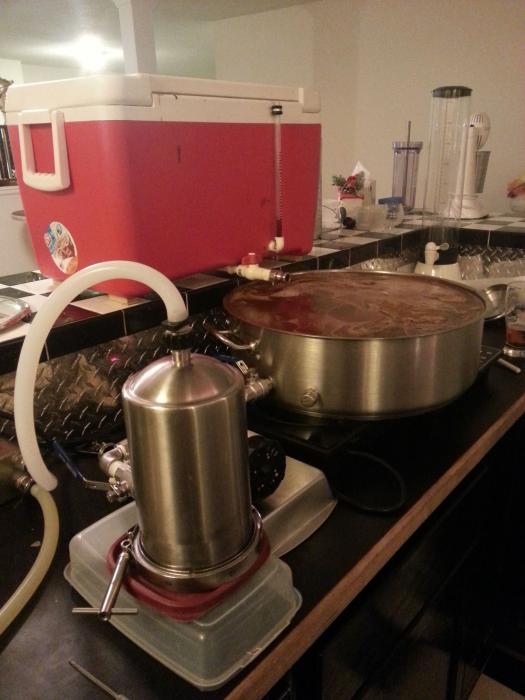
This is what I use to brew in the basement, you can't get much simpler than this. Dual 1800 watt induction cook tops and a 30 qt. sauce pan.

photo1.jpg
 
That thing looks like it would boil-over if you looked at it funny - you don't have any issues with having so little pan-space above wort level?
 
That thing looks like it would boil-over if you looked at it funny - you don't have any issues with having so little pan-space above wort level?

I get a nice rolling boil and have no issues with boil overs. I batch sparge so my first runnings fills it up to about the 1/3 level. To get the temps up more quickly I put put the lid on and monitor it closely, then remove it as it starts to boil. I do my second running for another 1/3 wait for it to return to a rolling boil, then the final running. I stir very gently of course :) I have always used the induction cook tops since I wanted to brew downstairs on the bar, plus keeps me close to the Keezer for a few on brew days.:) Initially I was using just one 22 qt. pot with a single 1800W unit, but it took too long to get a good boil, I was just thinking it would be cool if I could find a large diameter pot so I could use two 1800W units. The pan is 20" in diameter and fits perfectly covering both units. I now use the 22qt. pot and another 1800W unit to heat my sparge water.
 
Well my wife bought me a Blichmann burner for my Birthday, so I cant really shelve it and go electric now!.
On a side note, now I have been brewing a while on the new burner I enjoy it more, and I am happy to stay on Propane.
Thanks for all the replies though in=m sure they have helped others and if I ever do go electric I will be using the advice here.
 
Back
Top