The 'Keezer' Project

Homebrew Talk - Beer, Wine, Mead, & Cider Brewing Discussion Forum

Help Support Homebrew Talk - Beer, Wine, Mead, & Cider Brewing Discussion Forum:

This site may earn a commission from merchant affiliate links, including eBay, Amazon, and others.
nice, would you mind posting the outside dimensions of your freezer, mine looks almost the same, and may be the same size..

i was going to use the "colar" method until I found this thread!!!!

Any estimate of what it costs total for this project (minus the faucets, i'll be using cheapo's to start with lol)..

Thanks, and excellend job.. nice work with sketchup.. it's a good program, i used to use it with a real estate remodeling business i used to run...
 
EDIT: I just noticed that my sig link, saying 'Original' Keezer, might lead folks to believe that I think I came up with the whole idea of using a chest freezer for a keg dispenser! I DON'T!!!! I did, however, decided that 'kegerator' was not an accurate name when using a freezer, so I named it 'Keezer.' At the time, there were no references to the term anywhere on HBT, or google, for that matter. So, I think I actually did come up with the name, but CERTAINLY not the idea!!

Ok, so I am finally getting started with the 'Keezer' project! Some time ago, I saw BrewPastors gorgeous chest freezer conversion posted.

CIMG10072.jpg


Ever since, I have been thinking about how to go about doing my own. What I finally came up with was something along the lines of this:

7674-KeezerWide3.jpg


Looks familiar, no? Well, I told you I liked his :D

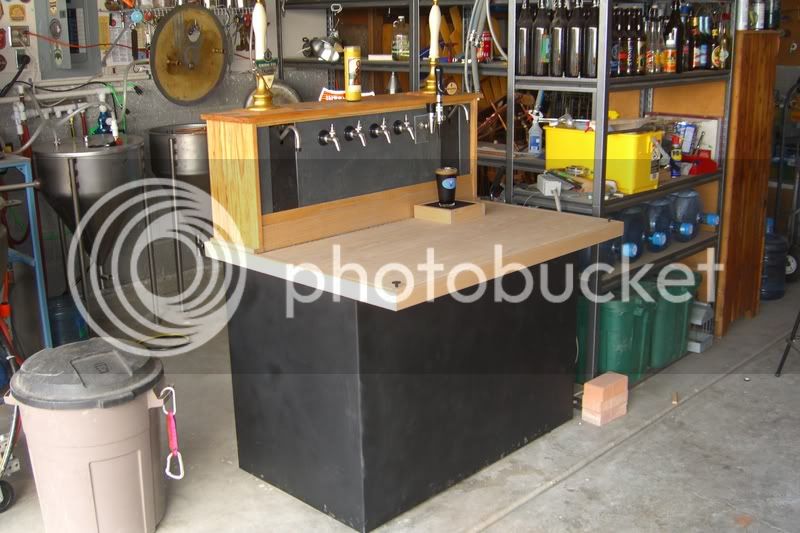
This is not exactly what the finished product is going to look like - I went with a larger freezer than originally planned so that I could get the desired number of kegs in it. The proportions are slightly different, but you get the idea!

The Keezer will be on casters to allow for some portability, although it will be heavy enough that it can't can't be considered 'mobile.'

In the base, there will be a cooling fan that draws air down over the sides of the freezer to draw away heat generated by the compressor. I was not aware when I first started looking into this that todays freezers use the exterior skin to shed heat, and that placing wood directly against it would seriously shorten the life-span of the compressor. Luckily, some sage advice was given on HBT, and a cooling fan was designed in! It will be wired in with the compressor to the Ranco, so whenever the compressor kicks in, so does the cooling fan.

I plan on posting periodic updates and photos as the project progresses.

I have always wanted to tell you my friend, that's a dang nice "keezer"! :)

It's no matter who came up with the idea!
 
I have always wanted to tell you my friend, that's a dang nice "keezer"! :)

It's no matter who came up with the idea!

Thanks! :mug:

Maybe this was covered in an earlier post, but I didn't see it. Where did you get the drip tray?

Thanks

Yeah, it's a 36. I think I got it from micromatic, but it was so long ago now I can't remember!

EDIT: They have them here
 
Just a real quick question regarding the computer fan mounted below the coffin. You said that it will turn on with the freezer when the temperature controller kicks on. I was wondering if you could detail that just a little more for me. How exactly were you able to wire this into the temp controller? Any additional information would be awesome. Read through all the other posts in the thread and that's really to only thing I'm stuck on at this point.
 
Just a real quick question regarding the computer fan mounted below the coffin. You said that it will turn on with the freezer when the temperature controller kicks on. I was wondering if you could detail that just a little more for me. How exactly were you able to wire this into the temp controller? Any additional information would be awesome. Read through all the other posts in the thread and that's really to only thing I'm stuck on at this point.

Well, I actually never got around to implementing it. The coffin stays cool enough, and there is so little beer in the lines between the chest and the taps, that I never bothered to go back and add the fan.

However, what I was going to do was to have three outlets attached to the temp controller, chained together, so that when the probe calls for cold, the compressor, the duct fan, and the computer fan would all come on. As it is, I have just the duct fan and compressor hooked up right now. Let me know if you need more info!

:mug:
 
Awesome... sounds good to me. I think I may be implementing this by wiring my Ranco directly to a power strip. I'll then just plug the freezer and computer fan into the power strip to ensure that the fan and compressor only come on when the controller tells them to. Thanks for the quick reply! You've been an inspiration to many of us!
 
I just found this and I must say...HOLY BALLS that's beautiful!!! :eek: ...and the keezer is OK, too! :D

-Tripod
 
Of all the home built and styles of keezers jester369 yours was the only one the wifey would allow in the family room. Congrats on your build plus the lighting. I had a couple freebie units from a rusty POS that died to a bright fire truck red without wheels needing no lighting even in the dark. Flat ugly eyesore. Yours got 100% approved by the War Department. Thanks for all your postings. I have a closed in laundry room wall that the keezer will fit against plus thinking this area also will hold the 150 cu/ft Nitrogen bottle with my collection of 20# C02 bottles until a larger C02 bottle is needed. In storage a 214 cu/ft O2 plus a 240 cu/ft Helium bottle that can I can convert the valves to Co2 if need be. I hate refilling small bottles the cost savings alone plus these are all free owner owned bottles with papers.
Just messing around I build your unit out of cardboard spray painted brown and stuck it in the family room, used X-mas rope lighting as a simulated keezer, sure looked great, got a gold star by the wifey.
 
Your keezer is truly inspirational. I am working on plans for one of my own as well as figuring out how to pay for it.
 
Jester did you you use standard cement for the tile or did you use something like liquid nails for tile? I am working on a similar build, and am trying to figue out how to get this step done.

Grafter
 
Hey there atomicpunk78, Grafter,

So far, it has been holding up very well. I never got around to cooling the tower, and it really doesn't seem to need it. The amount of beer in the line from the freezer to the tap is so small that unless you are drawing an ounce or so for a sample, it's fine.

The tile is actually just placed in, not adhered in any way. That way, if I ever feel like changing the color, or if one of the tiles breaks, I can unscrew and remove the coffin, and slide in new ones. It takes some patience to get the clearances just right so that there aren't gaps, but it looks nice. A little sealant in the seams is a good idea for the inevitable spills, however.
 
The only thing I would add is a dimmer for your string lights to tone it down to match the lighting of the room. Just an idea plus using a LED light strip in a yellow or orange color with dimmer control.
Hints of your build printed and deposited around the house, growing on the War department.
 
Jay, for a cheap fix, just get a two or three way regulator, then throw different distributers off of that. If you're running the same pressure to multiple kegs, you don't need to regulate the pressure to each one individually, like Jester has. No offense Jester, I still have have an erection because of your build. But a distributer is much cheaper that a multi-regulater.
 
Yep the source Jester used for his regulators dried up finally mid year. No more cheap secondaries I've found as of yet. Not planning on paying $25-$35 ea for my upcoming build.
 
Mainly the screw regulator thing in the middle. I can source the gauges, nipples and connectors but can't find that middle bastard to save my life.

Or at least ones not fully assembled that they want an arm for...
 
Mainly the screw regulator thing in the middle. I can source the gauges, nipples and connectors but can't find that middle bastard to save my life.

Or at least ones not fully assembled that they want an arm for...

Yeah, the regs can be pretty spendy. I lucked out when I got min ($5 a pop), so I went all out. You don't need a reg for each keg, of course - just one for each serving pressure you want. Save you a lot doing it that way. The only real advantage I have is I don't have to plan how many of what pressures I'm going to need - I just hook up and set.
 
I wish I got regs at 5 dollars a pop

Stick around someone will read this then use a translator that speaks Chinese then the market will be flooded with cheap regulators.

I can see using up to 3 regulators with manifolds allowing for 5 tap offs per manifold before adding "Y" splitters with check and shutoff valves. This for 3 different tap pressures for about unlimited amounts of gas supplies lines.

Depending on the where the regulators is manufactured will determine the thread for the regulators pressure screw, a bolt with a cross bar welded across the head as well a jam nut to prevent a change in your set gas pressure would help plus radius the end that contacts the diaphragm. With diecast regulators in the keezer run silicone grease on the threads preventing corrosion and locked up useless regulators if operating in the keezer with the moisture. I always had my regulators on the exterior of my refrigerators preventing corrosion problems.
 
Yeah I figured to have 4 (as I only have one tank)

3 for 2 kegs each and one that would have a long hose that sat outside my keezer so I could tap off new kegs and use the co2 for other stuff.

Might be cheaper just to get a three-way reg with splitters then a second co2 tank for the brew-space.
 
Yeah I figured to have 4 (as I only have one tank)

3 for 2 kegs each and one that would have a long hose that sat outside my keezer so I could tap off new kegs and use the co2 for other stuff.

Might be cheaper just to get a three-way reg with splitters then a second co2 tank for the brew-space.

Use a small tank in the brew-space but have a larger like a 215 or 260 cu/ft to refill the smaller bottles. We've been doing this for over 30 years, the big bottle paid for itself many times and has saved us big money vs small bottle refills alone. Just the high pressure jumper hose cost to refill the system. I know i'll hear some replies about refills, Co2 at 850 psi from a larger 2,250 psi bottle to 150 cu /ft 2,250 psi 'ex Nitrogen bottle is way within the safety limits.
 
Yeah well I invented the internet. I am wondering what your final cost was per secondary after you got all the parts?
 
This just might be the single most awesome thing I have ever seen. Stumbled into it while my Cowboys were busy murdering the Redskins, and nearly missed some good plays.

When I have my own place, I will definitely be building something very similar.

:mug:
 
Love this build and have looked through the whole thread, but forgive me if I missed it:

How did you circulate air through the "hose chase" on the serving tower? Is that where you used an old CPU fan or something more advanced?
 
How did you circulate air through the "hose chase" on the serving tower? Is that where you used an old CPU fan or something more advanced?

I actually never bothered to install it. Originally I was going to mount a computer fan in a box at the bottom of the freezer with a hose going up to one side of the chase. Of course, I was impatient so I started using the keezer as soon as it was functional, and so far I have not needed the additional cooling. There really isn't much beer in the line from the freezer to the tap, so unless you are only pulling an ounce or two for sampling, it's just fine by the time the glass is full.
:mug:
 
Absolutely love the build. 14.8 CF gets here tommorow and your thread got me motivated to pull the trigger on the order from micromatic. That was a lot of money, but if I can get my keezer to look any where near as good as yours, I'll be ecstatic. I definitely plan to rip off a lot of your ideas, I need to figure out the duct fan situation though, but hopefully I can get a lot of the top set up worked out over the long weekend.

Good work, I'll keep track of my build.
 
Back
Top