Spunding valve - video

Homebrew Talk - Beer, Wine, Mead, & Cider Brewing Discussion Forum

Help Support Homebrew Talk - Beer, Wine, Mead, & Cider Brewing Discussion Forum:

This site may earn a commission from merchant affiliate links, including eBay, Amazon, and others.

Poindexter

Well-Known Member
Joined
Oct 1, 2007
Messages
1,195
Reaction score
9
Location
interior Alaska
I seem to have crashed youtube tonight, or they crashed me, but I got one of three up there.

So I am going to edit some stuff into here now that you can see this very cool thing working. Thank you wortmonger...

[youtube]6m-uWqK7aNw[/youtube]
 
Kay. Post one was for the gunners at the front of the classroom. Hopefully Kaiser and wortmonger will handle you guys' questions. All I know is this thing is really cool.

For the folks on the short bus with me:

A spunding valve holds a fermenter at a particular pressure. So you could (and I can w00t! w00t!) ferment and carbonate at the same time. So your beer is ready sooner. So if your round ball team makes the NCAA after all you are looking at 3 weeks grains to glass instead of 6 weeks.

I bought this stuff because of wortmonger's thread here:

https://www.homebrewtalk.com/showthread.php?t=44344

I just finished updating my brew house. Rather then go big on the hot side I decided to clean up the cold side first. Real hard to develop an infection in something boiling, lots of awards for folks who primary in stainless.

So I ditched all the plastic, ditched all the glass. I am running a 5gal SS kettle, five 5gal SS cornies, and I got a plastic bottling bucket if I need to bottle something.

So with the spunding valve I transfer from primary to secondary to serving keg without having to stand there twiddling my thumbs, and my risk of contamination is very low. Plus I get the 3 weeks grain to glass thing...

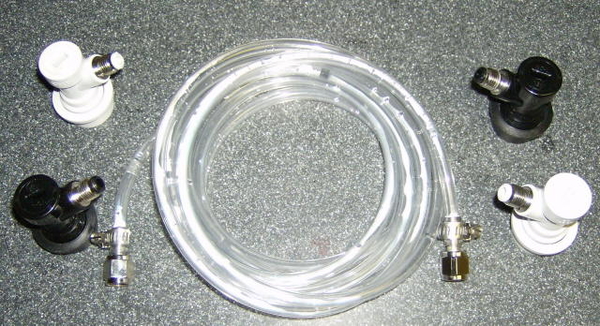
So, standard "line" in my new brew house, 9.5 feet of 3/16" ID:

13230-standardline.jpg


For the calibration runs coming I put a black connector on each end.

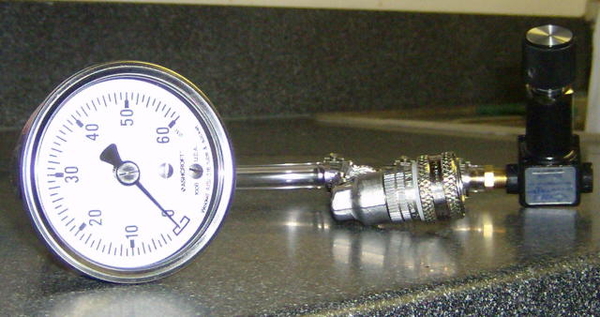
Here is the top view of the setup you are about to see. No, I am not quitting my day job. "S" means source, T is target and C is the red tripod my camera was resting on for this.:

13230-markup.jpg


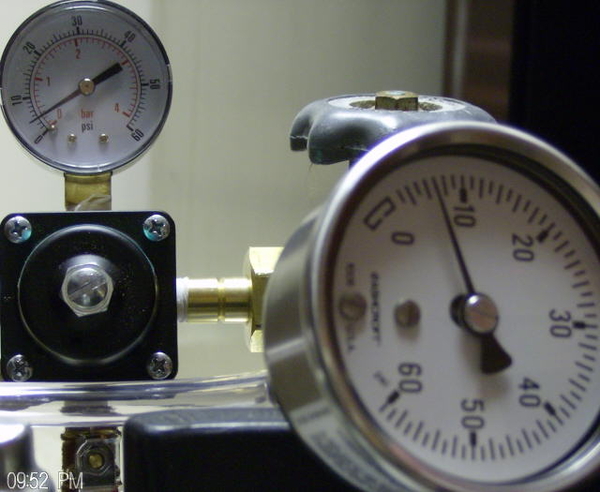
Finally, here is a view of the two pressure gages actually in focus:

13230-infocus.jpg


I think I am about to run out of image tags per post...
 
So here is two views of the actual spunding valve I built.

I bought a nice SS grey Corny connector from LHBS. It was still in the Foxx bag, so you might save a few bucks if you order from them anyway.

I also got the two pieces wortmonger specified in the thread I already linked, from McMaster -Carr.

I used 1/4" ID regular hose that I got I think from the LHBS (the 3/16" ID I get at Home Depot), also a 1/4 hose barb T connector from LHBS, 6 SS hose clamps from Home Depot and two brass fittings. McMaster-Carr named the threads correctly.

I used a 1/8" male NPT to 1/4" hose barb and 1/4" female NPT to 1/4" hose barb. Both of the pipe thread to hose barb fittings are stock items at Home Depot, Lowe's might even have them in SS. Not sure about Ace hardware.

**Note: American National Pipe Thread is not the same as UK National Pipe Thread says the man who owns a car built in Australia...**

Total for just the spunding valve was $100-$110, though I could have used a plastic corny conenctor.

Here are pics from two angles:

13230-spundtop.jpg


13230-spundside.jpg
 
Calibration with increasing pressure:

[youtube]KCpbTgwN-Jg[/youtube]


calibration under diminishing pressure:

[youtube]c26Tlog5zeM[/youtube]
 
So I may be dense and may be overthinking this, but how does your set up work exactly.

why are both kegs hooked up?

Please to explain for the thick headed folks like me!

Thanks for the video.

John
 
He explained it to me. They were hooked up to show something he was wanting to isolate the spunding valve from. The jagged output waveform of the regulator on the CO2 tank. Sort of a buffer so he could evaluate the valve separate from the vagaries of the supply.
 
Once wort is in the keg and he hooks up the spunding valve to the gas-in port on the keg, the other post would have a picnic tap hooked to it for testing/measuring gravity.
 
Nwcw2001 said:
why are both kegs hooked up?

John

There's a bunch of reasons.

First, I wanted to see the gauge of my spunding valve not responding to the saw tooth output on the regulator on my supply tank. 2 Corny's connected by ten feet of 3/16" is a great way to do that.

And I was originally interested in this setup as a way to minimize risk of infection when racking from primary to secondary, so it made sense to pressure test the transfer tube too.

And it was a great place to set the camera tripod.

And now that I have four gallons of steep/extract English Pale Ale pitched on 1.051 in corny number one, I still have more reasons to use a second keg.

Right now I have the four gallons of pitched wort in my primary with the black post blown empty from my CO2 tank and the pressure tested transfer hose on the grey post. The other end of the transfer hose in on the black post of my planned serving keg. I already have the 'other' gallon of RO water in the bottom of the serving keg. And my pretty new valve is on the grey post of the serving keg. And I blew that whole thing up to 5psi with CO2 via the black post on the primary. And that last gallon of water is going to carb along with the rest of the batch.

So if I end up not having enough head space in corny number one and I get krausen head pushing out the grey post on my primary I am going to be out 99 cents for a gallon of RO water but my pretty valve is gonna be OK.

And when it is time to push from primary to secondary I'll put the spunding valve on yet another keg so if I overfill th serving keg my pretty valve is still OK.

Need more Cornies. I want a dedicated corny for sanitizer, and I want a dedicated empty for my spunding valve to ride around on. And winning lottery tickets. And a shot at Jessica Simpson. And a supercharger for my car.

HTH,
P
 
wortmonger said:
I hope you pre-boiled the RO water in the serving keg if you are going to blend after fermentation.
Oh, also...... did you hook up your picnic tap to the primary black side for later gravity readings?

No and No ;-)

I went to CVS and bought a 1 gal jug of RO water, poured it in the serving keg. If I get burned someday I'll straighten up and fly right.

I have a real stubby hose with a picnic tap on it for pulling gravity samples, but I haven't pressure tested it. I don't really have a place to hook it right now.

The black post on my pri-ferm corny is 'open' right now, but I just blew CO2 through there to pressurize both kegs and blow all the wort out of the spear so it can all ferment together.

For now the temp in my primary is up four degrees from when I pitched three hours ago. A lot of that is heat transfer from the room - 71°F room v- 64° fermenter.

I will pressure check my stubby tap on the serving keg in my fridge that is at 10psi. I will pressure test my sampling tap to 60psi next time I have a chance. When primary starts to slow down - probably Sunday evening some time - I will pull a gravity sample at 5psi before I start cranking up the spunding pressure. I guess I should leave the tap on once I get there, I'll get to sample a spear's worth every time...

I am really not sweating it, I have gotten in the habit of leaving beer on yeast long enough that checking the gravity is almost (but not quite) a formality.

Actually, I probably will finally check the gravity of my 080808RIS today. I checked it when I pitched it, evaluated primary by fermenter temperature, racked after three weeks in primary, it has been in secondary for two weeks, I guess i should check the grav to make it sure it isn't stalled since I am planning to bottle it in another month.
 
Sounds like a plan, I am just "more-than-overly cautious" when it comes to sanitation. It is pretty difficult for things to start as fast as yeast. They are aggressive little buggers.
 
This is another way to transfer beer under pressure. It doesn't require a spunding or bleeder valve and I wrote aout it here and it helps me a lot:

Another efficient way of racking beer from one keg to another is to siphon the beer from one keg to another. For that place the source keg above the destination keg. Connect the gas-in of the destination keg and the gas-in of the source keg to the same CO2 regulator. This results in the same pressure in the destination and source keg. Now take a long jumper hose and first connect it to the bev-out of the destination keg and then to the bev-out of the source keg. Nothing is flowing yet. To get the siphon started disconnect the CO2 on the destination keg and briefly pull the pressure relieve valve on that keg. Now that the pressure is slightly lower in the destination keg the beer will start flowing and the siphon is started. Reconnect the gas-in of the destination keg to the CO2 system so the CO2 from that keg can flow into the source keg. This process will take a while, but you don't need to monitor it.
 
Hey Kaiser,
I am really wondering if it is possible to do this without a CO2 bottle hooked up. Is this possible with the adjustable relief valve on the spund and using the built-in pressure relief valve on the Target Keg? I guess I am asking you to explain if my drawing is possible, lol.
6533-SiphonTransfer.JPG


Oh, and see poindexter, I told you Kaiser was the shizzle for rizzle my nizzle.
 
Wortmonger,

It works w/o the bottle. I just don't have a jumper for gas but 2 gas connects on my regulator. You will have to pressurize the destination keg first to make sure that the overall pressure in the system is greater or equal to the CO2 pressure in the beer. Otherwise it might foam up.

It won't work with the spunding walve in the CO2 line as you need a pressure drop to open the spunding valve. You will need to bypass this valve.

Another tip. Always connect the beer line to the source keg last. If you don't do this and have more pressure in the jumper line than there is in the keg you will bubble through the dip tube and stir up lots of yeast. I have done that once and had to abort to let it settle for another week :(.

I have even thought about raising my lagering chest such that I can siphon from the kegs inside w/o moving them at all as I'm worried that sediment is roused when I move them even just a little.

Nice drawing BTW.

Kai
 
Got a question. If you put 5 gals in a 5 gal cornie keg and ferment under 25lbs of pressure is the krausen going to go nuts and foam out into the 2nd keg? That would be a killer way to harvest yeast come to think abou it, but would you harvest too much beer with that yeast or would the pressure keep the bubbles small diminishing the krausen to almost nothing?
 
Those of you doing this in cornies... what volume of wort are you fermenting in there? are you cutting the dip tubes in your kegs to leave behind the trub?

Thanks,
-J
 
@ post 16 and 17:

I think there is one guy trying this so far in Cornies.

25 psi is high enough to slow the yeast down apparently. I am running mine at 5psi for now and checkign the gravity every 12 hours or so. I am down to 1.026 this AM, I pitched on 1.050. When I get to 1.020 I'll start cranking up the spunding pressure.

Harvest krausen yeast into a disinifected keg so I could keep a yeast strain going? You mean if I get my volumes just right I could hook the fermenter keg to a keg with just enough wort for a starter, then hook the primary keg to the serving keg to carbonate the last of the water? Never thought of that. :evil grin: No idea yet what volumes will work for that.

I expect to open my primary fermenter/conry in a few days, I'll have to get back to you about the krausen height. My first batch notes are really getting edited in to wortmongers ferment under pressure thread in general techniques.


So far I am using standard cornys with standard length spears. I feel like I am pulling enough gravity samples that I dont have to be too terribly concerned about a few flakes of break. I am whirl pooling out of the kettle, so no hot break to speak of in the fermenter.
 
Oh, great to know kaiser. I love to draw on corel and photoshop and it does make for easier interpretation of an idea. Yuri and others have my brain wanting to try google sketchup for my future ideas (those guys are so informative). So, if I have both kegs at the same pressure and tap the Primary first, then the Target I should be ok? Once hooked up and no siphon yet, I would pull the pressure relief on the Target slowly until a siphon is started and then let nature take its course?
 
Kaiser said:
Wortmonger,
It works w/o the bottle.
Kai

Like I doubted, but I did try and it does work.

Kaiser was right, again.

I had two cornies, at the same 10psi, one on the counter full of beer, one on the floor empty.

First I hooked a transfer line to the black post of the cornie on the counter. The transfer line filled with beer.

Then I hooked the beer line to the black post of the corny on the floor.

Then I hooked another tranfer line to the grey posts of both cornies.

Then I vented some CO2 out of the corny on the floor.

It took FOREVER with 3/16" ID line, but it does work.
(is teh plural of Corny "Cornys" or Cornies" ?
 
how does krausening go under pressure. Are you worrying about it coming out the gas port?

For example I am guessing you don't want to ferment 5 gallons in a 5 gallon cornie.
 
Actually, pressure does keep krausen down... but not nonexistent. With the help of Ferm-Cap (haven't tried it yet just read a bunch about it), pressure should allow the fermentation of 5 gallons in a 5 gallon keg (since it actually holds more than 5 gallons). Just how much is unknown to me, but others have had success in doing so I believe. I have had krausen come out of my spunding valve doing 12.5 gallon batches in a 15.5 gallon fermenter-keg, but this was mainly due to not allowing pressure release from the start or from releasing pressure after fermentation has started (had more than I wanted and had to release). I have been wanting to try the Ferm-Cap and haven't had the ability yet. I can't wait to add more to my thread after I do. I mainly do the pressurized fermentation for the benefits of a single vessel, and the ability to carbonate at the tail-end of fermentation with the last remaining points of gravity. Other than that, I couldn't care less about any other aspects of the P-ferment. But... there are benefits in lowering esters, faster uptake of diacetyl once fermentation is done, and higher fermentation temperatures for a clean beverage (lagers for example). Try what you want, but prepare for the worst just to be safe. Also, different beers will not benefit from this technique (ie. if you wanted a estery type beer then you wouldn't get that with this).

Can't wait to hear your results. :)
 
Back
Top