My brewery controller: iBrew

Homebrew Talk - Beer, Wine, Mead, & Cider Brewing Discussion Forum

Help Support Homebrew Talk - Beer, Wine, Mead, & Cider Brewing Discussion Forum:

This site may earn a commission from merchant affiliate links, including eBay, Amazon, and others.
Joined
Dec 15, 2008
Messages
530
Reaction score
59
Location
Huntington Beach
Here are some photos of the latest generation of my iBrew. I hope to have it operational (meaning actually attached )by the Jan 3rd brew day. I made some changes to the circuit board. I added an inverter to the board to power the EL back light on the LCD and I moved the temp sensor jacks onto the board instead of connecting via headers; there were just too many wires going from the board to elsewhere in the enclosure. That allowed me to move the RC signal cleaning circuits to the board too. This enclosure is temporary, I don't like it and the switches are just too big. I wanted a heavy duty looking switch but I've since changed my mind and will go with something that A) doesn't require a square f-ing hole and B) Doesn't take up so much room.

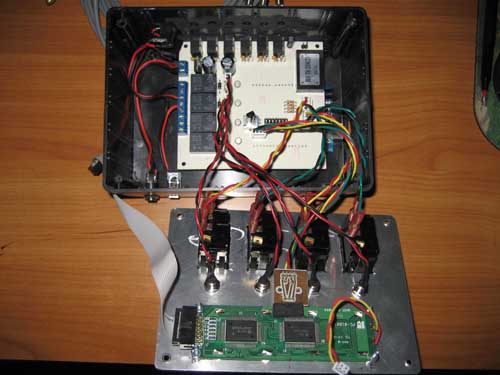
The controller is a 6-channel digital thermometer with 4 solenoids. It's basically the equivelent of 4 Ranco controllers and 2 additional digital thermometers. It's all based on an Arduino, which is under the circuit board in these photos, attached via headers like a Shield. It's been a very fun project. The burner control circuits also have a 30 second lock out to prevent the burners from firing on and off if the temp is hovering.

iBrew inside shot:
iBrew_Inside.jpg


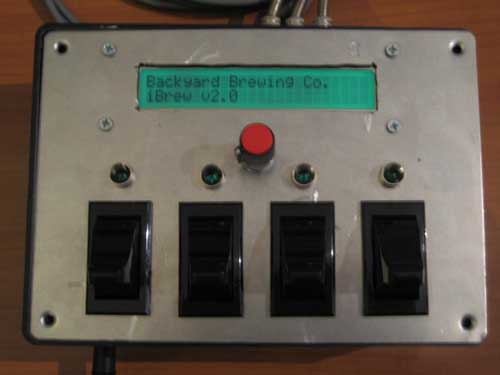
This is the new Splash Screen:
iBrew_Splash.jpg


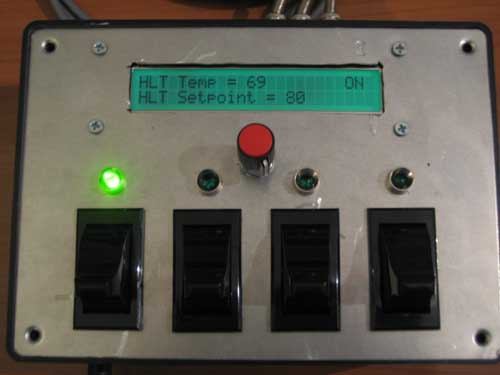
Here's the HLT screen. The setpoint has been set to 80* and the screen and LED are indicating the burner would be ON:
iBrew_HLT_ON.jpg


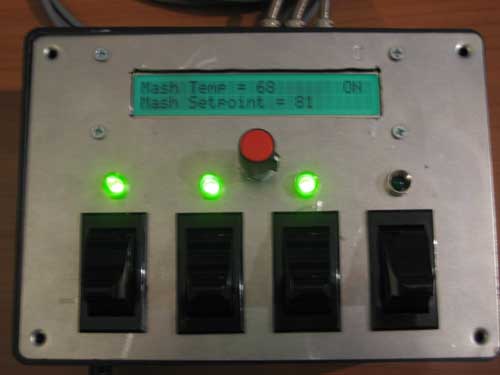
And the MLT screen, also indicating the MLT burner and pump are both on. If the iBrew turns on the MLT burner is turns on the pump at the same time to prevent scorching.
iBrew_MLT_ON.jpg
 
Sweet setup! I'm jealous- If it were mine, I would SOOO get toggle switches with covers from radioshack or pepboys. Got three set at pepboys and custom fabbed into my jeep for aux lights etc (round hole and can do aux. LED).

Side note, since you're using the audrino- Think about adding the network interface? E kettle thread mentions it- would be awesome (pending safety issues) to hop online and start preheating for a brew session right before you leave from a hard day of work :)


Thanks! I started with a system that would be web enabled, but decided I didn't want to HAVE to have a laptop or computer around while brewing. So, I decided on a stand-alone appliance.

I'd be afraid to pre-haet when i wasn't around since I use gas and as far as starting it before I leave the office..... well. I work at home. My office is 100' from where I brew. :ban:
 
This is the first I have read about the Arduino boards. A brief web search makes them sound perfect for automating a small brewery. Which board do you have? and how easy would it be to run it over the net?

Any and all Arduino info is welcome!
 
Very nice Derrin, I have wanted to do this too. What gas control valves did you use? Any information would be helpful on the circuits.
 
I'm using a Decimelia, but that isn't the current board anymore. The Duemilanove has replaced it. You can also Google Seeeduino which is a fully Arduino compliant board but isn't an "official" board. The nice thing is is has pin outs for the 2 additional analog ports the processor has. (The processor has 8 analog ports but this version Arduino only pins out 6) The Arduino is an incredible environment which unbelievable support. There are countless libraries written for common hardware like LCD screens and the line of One-Wire temperature sensors. There is an Ethernet shield available, but I don't know much about it. Most versions interface with USB standard. Check out Arduino - HomePage for more info.

I chose to use LM34 temperature sensors. They provide a linear analog output and are really easy to use. They are sensitive to noise though and do require a resistor-capacitor to clean the signal. The One-Wire DS18B20 is a better choice and several can be run from a single pin, but they require more code overhead to read and are a little more complicated if you're just learning to code like me.

For gas valves and ignition systems, I'm using Honeywell furnace valves I got off eBay for $20 each. I used something similar in my last brewery. I use them in conjunction with direct spark ignition ignitors for ignition. No pilots to have blow out all the time. A friend of mine sells HVAC equipment, so when they do a job and bring the old furnace back, he looks for valves and controls that can be used.

Oh, BTW. The typical Arduino only costs about $35. The Seeduino is only like $25 and the IDE and all the libraries are free!!!!
 
Would LOVE to build something like that, but being programming illiterate and not knowing much about hobby electronics (I can wire remote manually-controlled switches to turn my march pumps on and off, and can follow basic instructions, but actually creating anything like this setup is way beyond my technical skills. sigh. )
 
Maybe you could explain about the igniters and how they are triggered and safety if the burners don't light?
 
Maybe you could explain about the igniters and how they are triggered and safety if the burners don't light?

Sure!

Direct Spark Ignition is one of the two pilot-less ignition systems that most furnaces, fireplaces, dryers and boilers use. (The other is hot surface ignition). All the Arduino does is close a relay just like a Ranco would. On my last system I used a Ranco. The closed relay supplies 24VAC to the ignitor module. The module opens the gas valve and sends a high-voltage spark to the ignitor that looks something like a spark plug with long wires. Here is a picture from my last sculpture:

p1010023.JPG


Anyway, the ignitor must change resistance or do something magic in the presence of a flame, because as soon as it ignites, the sparking stops. There is no thermocouple or flame sensor and to be honest I don't know what happens if it doesn't light because it always lights instantly unless I forgot to turn on the gas valve. I might be missing a flame sensor, but there is no jack for it on the valve or module so I'd have no idea where it goes. The ignitor itself may be the flame sensor.

Here is a pict off the gas valve on my old system. The DSI controller is in the plastic box. This particular one was designed to ignite a pilot and the pilot would burn against the ignitor. I have it positioned so the ignitor is in the burner flames and it worked great. I'll be using this same one on the new sculpture with the Arduino.

P1010022.JPG


All said and done I'll have one of these for the HLT and MLT. The mash temp will be controlled by direct fire and the Arduino is programmed to run the pump if the MLT burner is on.
 
Didn't slnies (damn if I can get the name right!) post up the code for a temp controller for the Arduino?

I almost went with the Arduino - but unfortunately there aren't any temperature tables out in the open that I found, and I didn't want to have to spend lots of money and time trying to figure out the temp probe values. I went with a PID from Auberins, but someday I'd like to automate my brew system even more.
-keith
 
Anyway, the ignitor must change resistance or do something magic in the presence of a flame, because as soon as it ignites, the sparking stops. There is no thermocouple or flame sensor and to be honest I don't know what happens if it doesn't light because it always lights instantly unless I forgot to turn on the gas valve. I might be missing a flame sensor, but there is no jack for it on the valve or module so I'd have no idea where it goes. The ignitor itself may be the flame sensor.

The spark source is also the sensor. It uses a technique called flame rectification. The flame is actually conductive, but acts like a diode. With a small alternating current placed across the 'circuit', you can sense when the flame makes the connection.

I had a boiler converted to spark ignition a few years back and did a bunch of silly research...

BTW, cool Arduino setup!
 
I've been looking at using an Arduino for tons of automation tasks. I'm hoping to build a controller out of one for when I jump to all-grain, and another to control under-construction fermentation chambers and kegerator.

Temperature probe readings with the LM34 is trivial - it reads 10mV per degree F. So a reading of 800mV would equal 80 degrees F. Of course, there's a theoretical maximum for a temperature reading we might be interested in, so we can stick an op-amp between the sensor and the ADC pin on the Arduino to act as a voltage multiplier and up our effective resolution. Sample a bunch in the code and average the results to help tamp down noise. The sensor is accurate from the factory to about a degree - you can calibrate this with an adjustment factor in software.

I've not actually used an Arduino, but I've spent a good amount of time investigating it over the past week, and I'm impressed. I've an BS in EE (computer hardware specialization), and I was originally planning on building custom PIC based systems, but the Arduino is so easy, has so much useful stuff already hung off the processor, and has GNU tools available, that it seems a no-brainer to use the Arduino. Otherwise, I'd be designing entirely custom hardware and writing most of my code in assembly. I'd rather use C, thanks. Assembly is fun, and we did a ton of fancy stuff in our senior design project (many moons ago) on a PIC in assembly, but C is just faster to develop in.
 
Didn't slnies (damn if I can get the name right!) post up the code for a temp controller for the Arduino?

I almost went with the Arduino - but unfortunately there aren't any temperature tables out in the open that I found, and I didn't want to have to spend lots of money and time trying to figure out the temp probe values. I went with a PID from Auberins, but someday I'd like to automate my brew system even more.
-keith

I posted the code for this over on BrewCommune.com but I can email it to you or post it here if you like. But like Fooshino pointed out, reading the LM34 is the easiest part, you don't need a temp table. This is all it takes to read 6 temperatures, convert them to *F and store them as a variable to compare against or record.

Code:
for ( i = 0; i < 6; i++) {                                   // Read all sensors
  tempReading [i] = (analogRead(sensorPin [i]) * LM34);      // Reads each analog pin, converts the reading to *F and stores it in the TempReading array
  }

LM34 is defined as 0.48828125 and the variables are declared earlier.

When I first started this, I was going to use thermistors (Super cheap). I even created a table and formula to read the thermistors I bought (surplus, no spec sheets) I glued the thermistor to a DS18B20 (like a LM34 but digital and one really cool chip) put them in an oven and logged data up and down with temperature swings in the oven. Once I discovered the LM34, I bailed out on that idea. LM34's are only $2.50 each and can be read and converted to *F in one line of code.

Using the rotary encoder was the trickiest part.

BTW: The last code I'd written was in a PASCAL class about 20 years ago. That's one of the things that's so cool about the Arduino. There is so much support that if you just understand the basic concept of a computer program you can code for this thing (Which is also explained on the Arduino site!) If you are serious about having always wanted to build something like this, spend the $25-35 on an Arduino or a clone and just try it. It's remarkably easy and that desire to do it will get you through it.
 
The spark source is also the sensor. It uses a technique called flame rectification. The flame is actually conductive, but acts like a diode. With a small alternating current placed across the 'circuit', you can sense when the flame makes the connection.

I had a boiler converted to spark ignition a few years back and did a bunch of silly research...

BTW, cool Arduino setup!

Ah ha! I knew it was magic! That makes perfect sense and is good to hear because I need a second ignitor and looks like I could just make one.
 
LM34's are only $2.50 each and can be read and converted to *F in one line of code.
BTW, if somebody wants accurate Celsius readings, get an LM35 instead. Same principle, with the voltages calibrated to C instead of F.

Derrin said:
Using the rotary encoder was the trickiest part.
So that's what that is. I assumed it was a manual setting for your boil kettle; my thought was to read a potentiometer setting and turn around and put that back out on a PWM port, unless the volume sensor on the kettle dictates an emergency shutoff to avoid burning out the heating element. Without a direct human-in-the-loop, it's unclear to me how to maintain a boil while simultaneously avoiding a boilover. Did you automate your boil kettle?

I think my plan will use a computer connected via USB (running a Java app, similar to Yuri Rage) as the I/O component. I could conceivably have realtime data logging, temperature charts, and other stuff I absolutely don't need but would be really cool. The Arduino would then be relegated to actually maintaining the hardware status such that the temperatures requested by the PC are maintained and that I don't do anything stupid like turn on a heating element that isn't submerged, or if I do a RIMS setup fire up the heater while the pump is off.

If I wanted to get really crazy, I could use electric solenoids to control water/wort flow, and not have to worry about manually reconfiguring the plumbing when switching operating modes.

Anyway, thanks for sharing. I love to see this stuff, and how other people attack these challenges. Gives me lots of good ideas. And if not for this board, I never would have discovered the Arduino and all of the inherent awesomeness (which I could bring to bear on other non-brewing projects).
 
Derrin, I just saw a few threads of yours on another forum (not a member there) about some of the problems you were having with the LM34 and noise. How did you eventually solve this? How far away are your sensors from your Arduino?
 
Derrin, I just saw a few threads of yours on another forum (not a member there) about some of the problems you were having with the LM34 and noise. How did you eventually solve this? How far away are your sensors from your Arduino?

On the breadboard they worked flawlessly, once at the end of a 6'ish shielded cable they were useless. After turning to the spec sheet I should have read initially, I added a 1uF cap and 82ohm resistor in series from signal to ground which stabalized the output perfectly.

I don't control the boil. It's not interfaced with the stand yet as I just finished welding that up, but I only intend to control HLT temp and MLT temp with it, the other 4 temp sensors are just monitoring. I plan to store temp data in the EEPROM, although there is extrmeley limited space there, the ascii codes fit in the range of temps we use, so I can store temps as single bytes.
 
On the breadboard they worked flawlessly, once at the end of a 6'ish shielded cable they were useless. After turning to the spec sheet I should have read initially, I added a 1uF cap and 82ohm resistor in series from signal to ground which stabalized the output perfectly.
That's what I figured. Thanks.

Derrin said:
I don't control the boil. It's not interfaced with the stand yet as I just finished welding that up, but I only intend to control HLT temp and MLT temp with it, the other 4 temp sensors are just monitoring.
Yeah - I can't seem to envision a control scheme for the kettle that would work. I'm probably going to leave control manual, but allow the Arduino to keep me from doing something really stupid (like expose the electric element to air).

Derrin said:
I plan to store temp data in the EEPROM, although there is extrmeley limited space there, the ascii codes fit in the range of temps we use, so I can store temps as single bytes.
As I mentioned, my plan for the brewing setup involves an attached PC, so I'll probably dump data there via USB as it is collected, and let the PC app handle logging.

However, my fermentation controller probably won't be connected to a PC all the time. I also don't think I'm going to splash out for an ethernet shield (I could tweak temperature setpoints over the web - that'd be pretty cool - but little else, and that doesn't seem worth it). I'll have to see once I get a prototype built how much stuff I can keep in a logfile in memory before I run out of space. I figure I can offload that log file when I want it by hooking a laptop up to the controller via USB and having a little Java app that grabs the logfile off of the Arduino's memory. If I can't store enough to be useful, I might have to see about adding an off-board RAM chip or something along those lines to my custom shield. I haven't done any memory calculations about how much I can keep of a certain variable size and a certain sample rate yet. Just kinda spitballing.
 
If I can't store enough to be useful, I might have to see about adding an off-board RAM chip or something along those lines to my custom shield. I haven't done any memory calculations about how much I can keep of a certain variable size and a certain sample rate yet. Just kinda spitballing.

I'd like to save to a SD Ram card. There are a few threads on the Arduino forum for doing this, but I'm out of pins. I might build a new shield and take advantage of a couple multiplexers to free up pins and also get a serial LCD which would free up more than enough pins to implement an SD ram reader/writer. Of course, being attached to a PC solves all that, but I'm still pushing for stand alone.
 
I'd like to save to a SD Ram card. There are a few threads on the Arduino forum for doing this, but I'm out of pins. I might build a new shield and take advantage of a couple multiplexers to free up pins and also get a serial LCD which would free up more than enough pins to implement an SD ram reader/writer.
Good call. I'm looking at similar pin limitations in my proposed design. If you do work out an SD card setup, I wouldn't mind seeing how you accomplished it.

Have you seen this LCD? Serial LCD Board
 
Good call. I'm looking at similar pin limitations in my proposed design. If you do work out an SD card setup, I wouldn't mind seeing how you accomplished it.

Have you seen this LCD? Serial LCD Board


Sparkfun has a serial enabled 20X4 LCD for $32.95 or eBay has a serial enabled 20X4 for about 28. I'm using a 24X2 that was only $4 though.
 
Sparkfun has a serial enabled 20X4 LCD for $32.95 or eBay has a serial enabled 20X4 for about 28. I'm using a 24X2 that was only $4 though.

So where did you get a display for $4.00? That's unbelieveable. Do you have a part number for it?
Another concern about the Arduino is that I do not know how large the program can be and can memory be increased if needed?

My experience:
I have done limited programming (Basic) and tried to learn a little "C". I know basic electronics and have done some interfacing and electronic projects as well as holding an amateur radio license. I also took a class at the local college in digital electronics and did well in that class (It was really fun and interesting).

About designing the brewing program:
I was thinking of using loops within a loop in the program to jump to various parts of the program to select a given mash schedule. This way you could have standard infusion mashing as well as step temperature mashing subroutines. I would have one of the input buttons labeled as "Brew Mode" and once you got to the desired mode displayed you would press the "Start Brewing" button. When that routine finished then it would jump out of the loop to the add finish hops and then to the chilling subroutine. I would think I would need some help from an experienced "C" programmer at times so if there are any reading this who would like to help develop a freeware "Brewing program" using the Arduino then please chime in. This is as much fun to me as brewing and computers.


I bought This display from All Electronics. Used but it great shape. I bought two. Includes EL backlight but no inverter.

There is a 16K limitation on the Arduino, 2K of which is used by the bootloader. There is only 1K or RAM for variables and tables and such and 512 bytes of EEPROM. My code uses just over 6K and is probably pretty well bloated.

Due to the limited number of pins, it would be best to have a single button cycle through your choices and accept inputs as well. That's why I chose to use a rotary encoder. The one I'm using also has a push button so I can cycle through selections and then press to accept or move on depending on what's happening. The best way to read the encoder is using interrupts, this way you can pickup each change in state and use the full resolution of the encoder. I'm using SWITCH / CASE commands as the backbone of selection where things are at. It's pretty straight forward. I also have encoder limits programmed depending on the circumstances. For example, when inputting a temperature setpoint, it will not accept less than 0 or more than 212.

I tried to post the code but couldn't post more than 10000 characters. I'll post the current version on BrewCommune Again, this is my first attempt at any real coding and I'm sure someone that actually knows how to program will laugh their arse off, but hey, it's working for me!
 
I'm sure you did the best you could at building and coding and should not be ashamed of anything. A lot of people could not accomplish what you have done and usually those who make fun of others are not kind to others as a general rule and they will have a hard time in life anyway.

I think I will try to order next week and gather what I still need to get started. "Nothing ventured, nothing gained".
 
Again, this is my first attempt at any real coding and I'm sure someone that actually knows how to program will laugh their arse off, but hey, it's working for me!
I program supercomputers for a living, and (after spending about 2 minutes scanning it) it looks fine to me. There might be some areas where we can reduce program size, but I'm not real familiar with optimizing for the Arduino yet. (My dev board is on it's way, tho!) You've got lots of memory left, so... if it's functional, I wouldn't mess around too much trying to optimize things.

WBC, I definitely plan to make my reference designs and code available for all of my automation projects. I'm not sure if I want to maintain a full-blown SourceForge project, but I'll probably make my SVN repository read-only (and invite feedback/suggestions/comments/interaction here, on my dev blog or via email).
 
You know, I wonder if 10 to 15 years from now we'll look back and chuckle at those that did things manually, much in the same way we look at 70s-era homebrewers using cheesecloth over plastic buckets now that we have Better Bottels, etc., and airlocks/blowoff tubes?

I already use a PID to keep my HLT at a set point - it's not too much of a stretch to automate the running of the pump, MLT and BK given a set of criteria to brew from.

:mug:
-keith
 
Congrats on your project. Very impressive. I have to admit though, I am quit lazy when it comes to wanting to program computers. I have automated though, I have a BCS-460 from ECC Inc. Check it out. It doesn't have the cool LCD screen, but it does do some incredible things. Cheers, and keep up the great work on the project. I look forward to your next posts. S.
 
Thanks Derrin for your information and the program to look at as well as the LCD display link. This really helps because it has been a long time since I coded anything. I believe when compared to the BCS-460 the Arduino will do a lot more because it is so versatile in it's design.

I will study the code and try to see how you write to the display as well as read temperature and control the burner to hold temperatures.

Did you use plug in relays or are they wired.(Part numbers?).

What compilers are available that will work for me? I am using Windows XP and prefer it but can also install Ubuntu Linux on another computer I have and use the open source "C" compiler.
 
WBC, I definitely plan to make my reference designs and code available for all of my automation projects. I'm not sure if I want to maintain a full-blown SourceForge project, but I'll probably make my SVN repository read-only (and invite feedback/suggestions/comments/interaction here, on my dev blog or via email).

Thanks Foosinho, I need all the help I can get sometimes.
 
Go to the Arduino - HomePage website, they have a compiler and a ton of libraries all for free. I'm also using XP. I'll compile a list of part numbers and post them, but the relays are from Electronic Goldmine. They're 5V and only cost like $1.25 each. The Arduino can only source or sink 40mA so you have to use a transistor. There are several tutorials on the website about using transistors to drive relays. I have the PCB Express board patterns, but I don't have a good schematic. I'll try and put one together.

I like the BCS 460, I think it's pretty cool, but the real purpose of this project was to get my feet wet coding and have a project I could actually apply something I knew too. Just like building my entire brewery was an exercise in learning to TIG. I do what I do for control over the process and to learn something. The "iBrew" will probably never actually be done. The board in these photos is the 3rd I etched and built for this project and I already have ideas for the next one!
 
Go to the Arduino - HomePage website, they have a compiler and a ton of libraries all for free. I'm also using XP. I'll compile a list of part numbers and post them, but the relays are from Electronic Goldmine. They're 5V and only cost like $1.25 each. The Arduino can only source or sink 40mA so you have to use a transistor. There are several tutorials on the website about using transistors to drive relays.

I have done that before using 2n2222 transistors so that is not a problem.
I have the PCB Express board patterns, but I don't have a good schematic. I'll try and put one together.
That will help.

I like the BCS 460, I think it's pretty cool, but the real purpose of this project was to get my feet wet coding and have a project I could actually apply something I knew too. Just like building my entire brewery was an exercise in learning to TIG. I do what I do for control over the process and to learn something. The "iBrew" will probably never actually be done. The board in these photos is the 3rd I etched and built for this project and I already have ideas for the next one!

I know what you mean. After you build something you get new ideas and have to satisfy yourself and build another.:) I have no idea how much you can do with the BCS460 (Programing and control?)
 
I got my Arduino clone over the weekend. Very slick little system, and the little Java IDE makes it really easy to program and test. I wrote version 0.1 (heh) of my brewing controller in about 15 minutes last night. OK, calling it a brewing controller is a little glorified, since I'm doing electric extract brews. It's more like something to log the potentiometer setting that controls the heating element as I do my boil.

Now to prototype some hardware...

This free PCB CAD software is awesome: ExpressPCB - Free PCB layout and schematic software They etch prototype boards but they're not cheap. They give you the software to use their service, although you don't HAVE to use their service. Anyway, it really helped me with the prototyping of my boards.
 
I was under the impression you had to use their PCB service. Did some research a few years back when I was finding "my" PCB software. IIRC this was the feature that deterred me from Express PCB. If this has changed, like you say, that would be awesome and I may have to reevaluate my choice. Which was btw Eagle mostly due to the widespread use within the avrfreaks.net community. So are there any plans to setup a space for an open brewing controller?
 
I was under the impression you had to use their PCB service. Did some research a few years back when I was finding "my" PCB software. IIRC this was the feature that deterred me from Express PCB. If this has changed, like you say, that would be awesome and I may have to reevaluate my choice. Which was btw Eagle mostly due to the widespread use within the avrfreaks.net community. So are there any plans to setup a space for an open brewing controller?


I like his because it's free. Don't you have to pay for Eagle? I am making my own boards with the iron-on Press N Peel or what ever it's called. But I can print the copper layer out on to a laser printer with no problems at all.
 
Another alternative to consider is the Sanguino. It is based on the atmega644P vs the atmega168 on the Arduino and has 4 times the memory and 32 general purpose IO pins vs 20. It is intended to be programmed from the same Arduino environment so there is very little modifications needed.
 
Another alternative to consider is the Sanguino. It is based on the atmega644P vs the atmega168 on the Arduino and has 4 times the memory and 32 general purpose IO pins vs 20. It is intended to be programmed from the same Arduino environment so there is very little modifications needed.


I had heard about the Sanguino but never took the time to look further into it. That is one awesome little platform!!

Anyone want to buy an iBrew ??
 
I like his because it's free. Don't you have to pay for Eagle? I am making my own boards with the iron-on Press N Peel or what ever it's called. But I can print the copper layer out on to a laser printer with no problems at all.
You can get a free version, the restriction are that you can only make boards that are 10x8 cm or smaller. Also you only get 2 layers. This has been sufficient for me for the past 2 years. But I must agree with you that the Express PCB package is a lot of power for free! If you don't mind being stuck with one board supplier.
 
You can get a free version, the restriction are that you can only make boards that are 10x8 cm or smaller. Also you only get 2 layers. This has been sufficient for me for the past 2 years. But I must agree with you that the Express PCB package is a lot of power for free! If you don't mind being stuck with one board supplier.

Oh yeah, that was the problem, on the stir plate circuits I etch 9 to a 4X6 board and I couldn't print a 4X6 board with the free Eagle. I remember now.

Anyway, I just print them and etch myself so it has worked great. I have a library of custom components in it and it is very easy to use.
 

Latest posts

Back
Top