Raspberry Pi made easy? Complete tutorial in layman's terms needed!

Homebrew Talk - Beer, Wine, Mead, & Cider Brewing Discussion Forum

Help Support Homebrew Talk - Beer, Wine, Mead, & Cider Brewing Discussion Forum:

This site may earn a commission from merchant affiliate links, including eBay, Amazon, and others.

Byrd

Active Member
Joined
May 13, 2011
Messages
44
Reaction score
5
Location
Charlotte
Hey all,

To preface this DIY project, I'd like to start out by saying I come from the finance field and a lot of the hardware/software jargon goes right over my head (especially the scripting languages and getting everything to talk to each other). I've spent the better part of two days researching Arduino/Raspberry Pi setups to control the cooling/fermentation process in your fridge over the internet/intranet in the easiest most user friendly way possible.

I love the Web Interface that Steve71 put together here (https://github.com/steve71/RasPiBrew) from this thread (https://www.homebrewtalk.com/f235/raspberry-pi-temp-controller-344529/) however I'm lost at getting Aptana 3, JQuery, and Web.py to all work without a degree in computer programming.

Needs: Monitor/Log temperature in the fridge and turn on/off a light (heating element) if it's too cold and turn on the fridge if too warm. I'd set the desired temperature and allowed deviation from that temp. (usually 1 degree on each side) via a website and it'd send the command wirelessly to the raspberry pi and then log/control from there. Steve71's setup seems to do it perfectly but I can't get past/understand the jquery/web.py to display the log/settings.

Hardware:
1. Raspberry Pi Model B: $35 http://www.newark.com/jsp/search/productdetail.jsp?SKU=43W5302&CMP=KNC-GPLA

2. Digital Temperature Sensor: DS18B20: $10 https://www.sparkfun.com/products/11050

3. 1-wire USB to Thermometer Adapter: $23 http://www.ebay.com/itm/1-wire-adap...742?pt=LH_DefaultDomain_0&hash=item337dcab526

4. 4GB SD Card with Raspbian Wheezy already installed $6 http://thepihut.com/products/4gb-sandisk-sd-sdhc-card-with-raspbian-wheezy-linux-preinstalled

5. Mini USB Wifi Dongle: $6: http://www.ebay.com/itm/New-MINI-US...SB_Wi_Fi_Adapters_Dongles&hash=item4d07af67ad

6. Adafruit USB Port Power Supply 5v: $5: http://www.newark.com/adafruit-industries/501/usb-port-power-supply-ac-adapter/dp/44W4932

7. Jeelabs Output Plug to control relays: $10 http://jeelabs.com/products/output-plug

8. 40A Solid State Relay to control the turning on and off of the heating/cooling element.

9. 4.7K Resistor

Total Cost: $95-125 depending on shipping

Anything I'm missing hardware related? Maybe improvements?
Do I have to have the adafruit pi plate kit?
How do you wire the Jeelabs output plug to the relay and the raspberry pi and open/close given conditions found?
Can someone give me step my step instructions on how to set up the Jquery and web.py and get everything talking to the javascript (?) gauges over the internet?

Thank you so much in advance and any and all advice is much appreciated. Happy Holidays :rockin:

Using a love tss2 temperature controller would be too easy!
 
I'm taking a slightly different approach.

I'm using a Teensy 3.0 board to monitor and control the one-wire switches and thermometers, and the Raspberry Pi is set up as a LAMP stack which interrogates the Teensy 3.0, updates the web pages, and stores info in the MySQL database. I've created my own OS Distribution based on the Moebius Linux OS that fits easily into a 4GB SD card with about 2GB of available space. I'll be making the OS image available shortly, as well as the Teensy 3.0 sketch. I've tested it as both a wired and wireless configuration.

I'm currently waiting for some Raspberry Pi shields that I made, which will mount the Teensy directly onto the Raspberry Pi, and allow for easy hook-up. This set-up should be easily expandable, and could handle multiple thermometer/ switch combinations.

This is the culmination of some of the projects I started here .
 
Thanks for the replies gents! I decided to go through with this and learn the hard way. I'm going to update this thread with helpful hints and tips to accomplish my goals with the thought that others maybe had the same idea and just didn't know how to go about it. I'm a complete newb when it comes to hardware and have a little experience on the coding/software side. I'll try to explain things as easy as possible.

I have a vintage fridge that I want to constantly monitor the inside temperature through a micro-controller and a temp sensor. That temperature will be sent to an Red/Green/Blue LCD screen that will display the temperature and be blue if cooling (beer's in the fridge) and red if fermenting (70deg). The Raspberry Pi will be installed somewhere probably inside the fridge so it need to talk to the micro-controller through my wireless signal and tell it what temp. I'd want it as well as have the ability to log the temperatures.

Apparently there are many many many ways to skin this cat. I'm looking for the most economical, user friendly, and easy to replicate setup. You'd think that would be any easy enough task eh? Here's what I've found to be the best way to do this.

Items I purchased:
1. Raspberry Pi Model B - this product is currently sold out at many of the online retailers so I had to resort to Ebay and spent $54 for a $35 product. I bought through a seller named triple9s and it came new in box in a few days.

2. 4GB SD card with Raspbian Wheezy preloaded: $15 https://www.adafruit.com/products/1121 . This is the Linux distribution that you need for the Raspberry Pi and the only thing you need to do is stick her in. No updates are necessary.
*No longer using! See post #9 - moved to Occidentalis v.02*

3. Waterproof DS18B20 digital temp sensor: $10 https://www.adafruit.com/products/381 . There are other temperature sensors out there. But their disadvantages and additional work required to make it a smooth install led me to this sensor which I'll be using the one-wire method.

4. MiniUSB Wifi: $10 I got this one off of Ebay as well. I chose a EDUP 300M wifi adapter from a seller named playb2c_cn. Took a little longer to get to my house since it came from shenzhen china but I literally took it out of it's case, stuck it in, ran wificonfig and was searching google in seconds.

5. 20x4 RGB LCD: $25 https://www.adafruit.com/products/499 - I chose the positive. It all comes down to preference really but I like it better then the 16x2. See #6 below as you may be able to save some money by going with the pi-plate and lcd package. I didn't have the option and they don't sell the pi-plate by itself so I'll be stuck with a 20x4 LCD and a 16x2 LCD that I won't be using (any buyers? :))

6. ** Very Important if using a RGB LCD with a Raspberry Pi ** I'll spare you the details, but to easily use an LCD that shows red/green/blue colors you're going to need this pi-plate. There are other ways to do this using level shifters, shield for an arduino etc. but for the newb...this is it. Wait for it to come back in stock. If you're not using an LCD - skip this step. https://www.adafruit.com/products/1109

7. USB hub so you can hook up your wifi, keyboard, and mouse into your Pi. Already had one of these.

*Powered hub is not needed for the EDUP Wifi dongle listed above. It uses a RTL8192cu chipset btw.*

8. 5v 1.0Amp USB to MiniUSB Power Source. I have a Samsung Galaxy SII phone and the OEM charger that plugs in to the wall works perfectly. I'd imagine the Apple ones will work also.

9. HDMI cord to plug your Pi into your TV and set up your LAMP server other other things.

My next post will be a how to for putting all the above together making it work with your fridge! :tank:
 
Here's what I did to get things rolling with my Pi straight out of the box.

1. Plugged in the usb hub with keyboard, mouse, and wifi adapter.
2. Plugged in HDMI cord to TV and Pi
3. Plugged in the 4GB SD card and 5v Power Supply.

The first time it boots, follow this tutorial: http://learn.adafruit.com/adafruits-raspberry-pi-lesson-2-first-time-configuration . My TV did not have to disable overscan. When I disabled overscan and rebooted it cut off the Raspberry logo. I then enabled it and she looks great.

I rebooted into the windows environment and clicked on the wificonfig icon and connected to my network. Woot! :rockin:

Windows Environment after first start
20130104_191515_zpse2fbeb0e.jpg


Awww yea!
20130104_200304_zps68700eac.jpg


Next up will be wiring the one-wire temp. sensor, reading the temp., displaying the temp. to a browser. I hope by that time the Pi-Plate will be back in stock and I can do a how-to on that one also. :drunk:
 
This is also a very nice addition to the RPi: Pi Crust. It basically takes that confusing 16 pin male header and re organizes into function groups of female headers for easy prototyping. All pins are clearly labeled.
 
You might want to make sure that the mini-wifi dongle can penetrate the refrigerator's skin and coils if you still plan on putting the RPi inside the fridge.

I've done a similar project with Arduino boards here, and a slightly more advanced project with a RPi and Teensy 3.0 Board
here.
 
Ok ladies and gents! I have put together an incredibly easy how-to on setting up your Raspberry Pi, Reading the temperature, and sending it to a COSM account.

What it's feeling like in my living room lol This is what your Pi will output. :mug: 
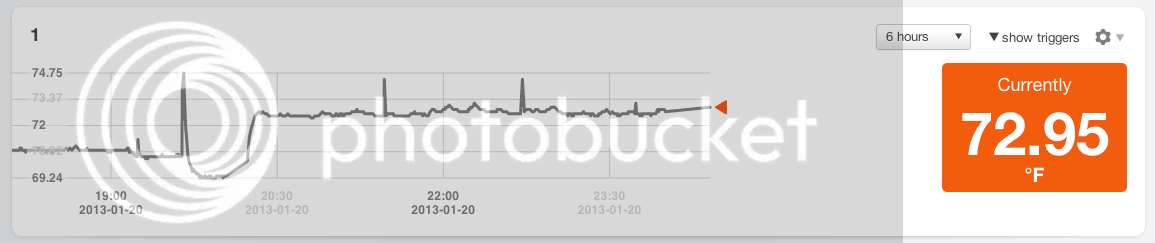
Disregard the spikes it was from me touching the sensor and seeing it react.

ScreenShot2013-01-21at122440AM_zps1c98c993.png


Major Notes
1. I am no longer using Raspbian Wheezy - I'm using Occidentalis v.02
2. My coding is not perfect. If you have a better way of coding the bitbanging of GPIO #4 please share!
3. This code does not turn on and off anything (yet), it simply reads the temp. and sends it to a website for temperature logging of potentially anything. From here you could push the data to your own website using the Apps.

Please read the pdf and comment!

Next up is sending the data to the LCD (if Adafruit will ever restock my Pi-Plate! :mad:) which should be pretty easy. I also need to turn on and off a condensor and a heat lamp via the code using solid state relays. :fro:

View attachment Automated Temperature Logging.pdf
 
I've tested it as both a wired and wireless configuration.
a16.jpg

This would be a bot ^

You can get a Prototyping Pi plate from MCM Electronics. I've ordered almost everything from there. Their prices are amazing and ship faster then almost any place I've ordered online.

http://www.mcmelectronics.com/product/83-14384

The pi-plate that Adafruit provides make it a two wire ordeal into the i2c GPIO pins on the Raspberry Pi and would allow for Red, Green, and Blue to be displayed. Wiring that way requires chips and resistors etc. and I couldn't put it together based on the pictures they put up for that plate. It would take me longer to figure out the prototyping plate then it's worth. I'll just wait for the Adafruit's Pi-Plate to come out. Thank you for the suggestion!
 
Nice info on this, I just got a Pi and looking for the first time into working with a web interface and how to program for that. Any recommendations on where to look to get started on info for programming web interfaces
 
Back
Top