My Brew-in-a-Bag/No-Chill setup

Homebrew Talk - Beer, Wine, Mead, & Cider Brewing Discussion Forum

Help Support Homebrew Talk - Beer, Wine, Mead, & Cider Brewing Discussion Forum:

This site may earn a commission from merchant affiliate links, including eBay, Amazon, and others.

eulipion2

Supporting Member
HBT Supporter
Joined
Sep 4, 2006
Messages
1,807
Reaction score
121
Location
Lakeville, PA
This is for those brewers interested in Brew-in-a-Bag and/or No-Chill brewing. This isn't really a how-to, as there are a few really good ones. This is more of a "Here's what I've got, and it's easy!" type of thread.

The following photos were taken on a non-brewing day while I was trying to build up an oxidized layer in my kettle, so no grain bag or tubing.

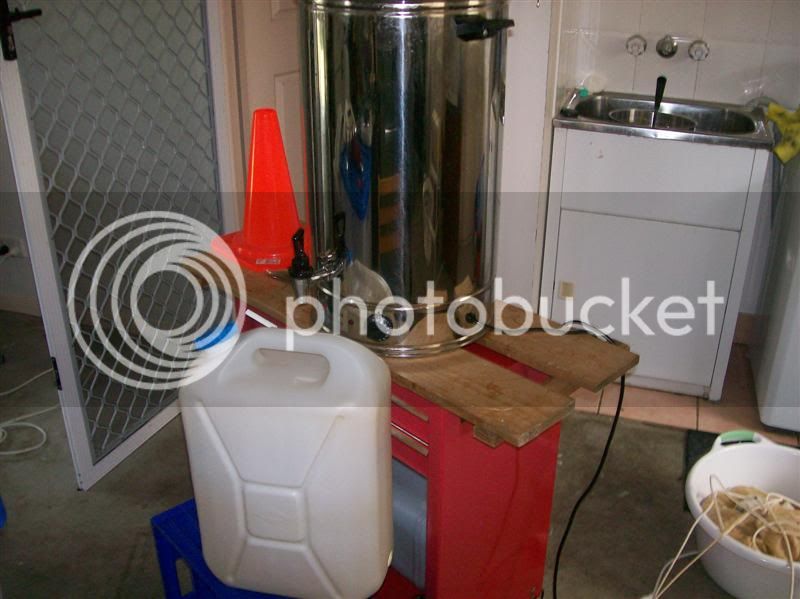
Here's my setup (reusable coffee cup not included):

Setup4.jpg

It consists of:
  • (1) Propane burner/turkey fryer with 15 lb propane tank
  • (1) 70-quart aluminum kettle with steamer basket, weldless bulkhead from Bargain Fittings, a ball valve, and a bazooka screen
  • (1) Extra-large (2'x3') grain bag (not pictured)
  • (1) 6-gallon HDPE Winpak from US Plastics (the white vessel)
  • Silicone tubing from McMaster-Carr (not pictured)

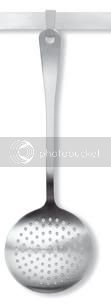
I use my mash spoon to prop the basket up off the internal parts during the mash, preventing pressure that leads to bending and/or leaking. (picture to come)

The large grain bag fits nicely over the steamer basket, meaning I can contain the grain and not have to worry about the bag breaking. I heat the water and grain together, so in order to not overheat, I have to stir often. Otherwise, the bottom of the mash will be a lot hotter than the top where the thermometer is, and you will overshoot your mash temp!

When it comes to draining/straining the grains, many people without strainers have to figure out a way to suspend their grain bag above the kettle. Here's what I do:

Straining.jpg


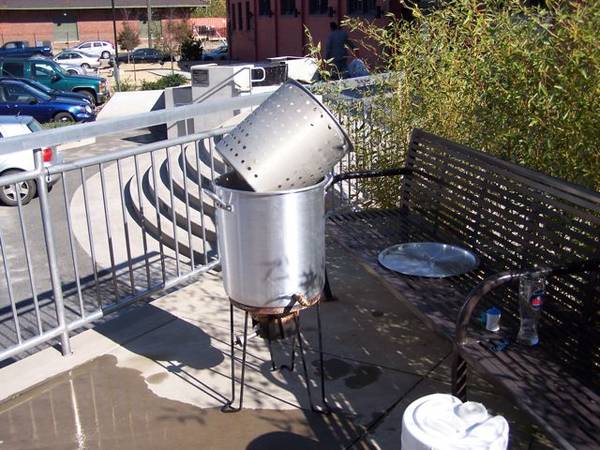
From this position, I can squeeze additional liquid out of the grain with a spoon, hand, or whatever, again without having to worry about the bag breaking. Just make sure the basket can't/won't slip.

I am horrible at maintaining a siphon, and siphoning boiling-hot liquid makes the matter much more difficult. I tried using a stainless racking cane with silicone tubing, but it just didn't work. So since it's easier than trying to make my own heat-proof auto-siphon, I drilled the kettle and added a ball valve. This way, when I'm done with the boil, I just hook up the silicone tubing to the ball valve, insert it into the Winpak, and let 'er rip! However, if you add a ball valve, be careful. Here's what happened to me:

Handle1.jpg


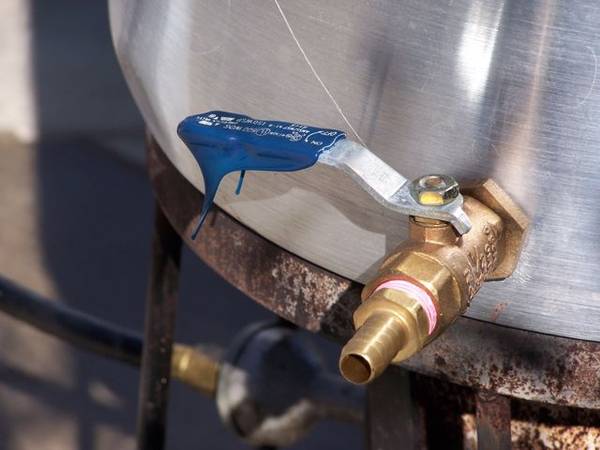
That's right, the plastic on the handle melted right off!

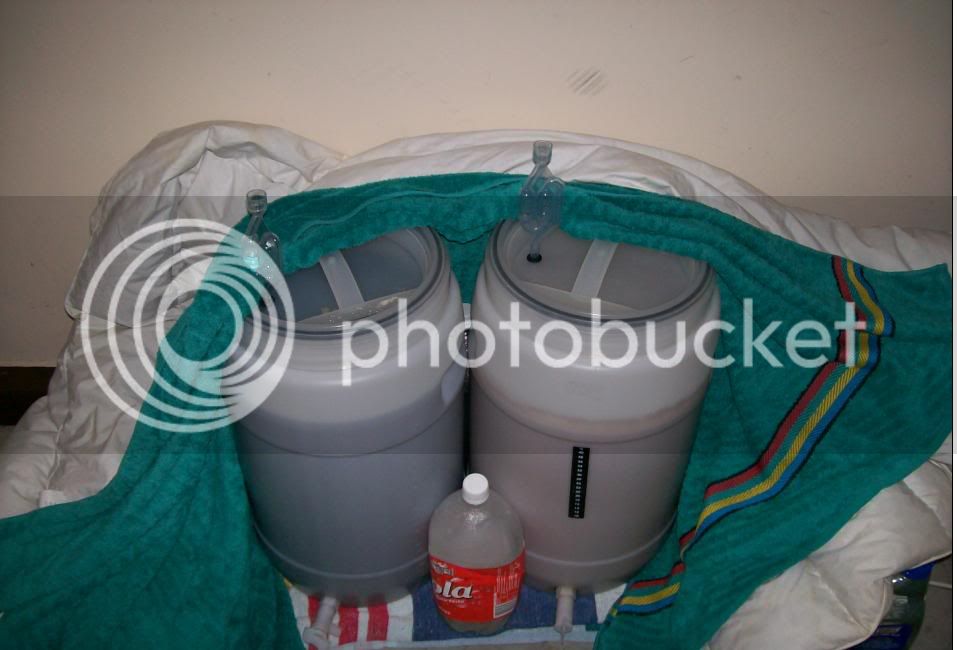
Once you're done transferring to the Winpak, squeeze out excess air, seal tightly with the lid, and rotate on its side for about 10 minutes to sanitize the top.

By doing BIAB and No-Chill, my brew session is significantly shortened, cleanup is a breeze, and if I so choose, I can ferment right in the Winpak.

I highly recommend this method to anyone who:
  • doesn't have an outdoor water source (me)
  • wants to lessen cleanup time (me)
  • wants to cut back on water usage (me)
  • has time to brew, but maybe not time to pay attention to the fermentation.

If there are any other parts of my setup you'd like to see, just comment and let me know. I'll try to add as requested.
 
I do BIAB and No Chill as well!

I love it, and really recommend www.biabrewer.info . I actually have a proper Igloo cooler MLT, and still prefer BIAB. I get great efficiency, super easy, less cleanup, etc etc.

And the reason I no-chill is because I have to brew at my Dad's house and then I haul my wort back to my apartment for everything else (ferment, bottling, drinking :p)


Edit: You heat the grain with the water? That's really weird, never seen that. Why do you do that?
 
iijakii, I actually cannibalized the ball valve and bazooka screen from my Coleman Xtreme mash tun to put in my kettle! I'd love to put the cooler to good use, but I really don't see a reason to do so. And since I lack an outdoor water source or an easy way to filter my tap water (landlord installed designer faucets so I can't install anything in-line), I really can't anyway.

That said, even at 70-quarts (17.5 gallons), if I want to do a REALLY BIG imperial stout, I may be hard-up for space. My Coleman handled BrewPastor's Dark Night of the Soul with ease. May have to try it as a BIAB/NC. I need to do some math first...

As for no-chill, as mentioned above, I lack an outdoor water source, so I can't run any kind of water-based chiller.

I heat my grain with my water because I haven't found a better way to hit my mash temp. It always ends up too high. And since there's extra water in the mix because of BIAB, I haven't found a program that can accurately do calculate it. By doing water and grain together I can stop when I get to temperature, and I've read in other threads that you can get some of the effects of a step mash.
 
Sounds like you have a great process. I'm a no-chiller myself.

I'm curious as to why the calculators won't work for you? I use this one. It allows you to set all the variable (even the ratio of water to grain) anywhere you want. I find it works pretty well once you get your system dialed in.

http://brew365.com/mash_sparge_water_calculator.php

Check it out.
 
I use the Brewzor app on my Droid X and it gives me strike temp for the amount of water I use for BIAB, the more water I tell it the lower the strike temp. I haven't used it enough to say its 100% proven but for the few times I have used it my temps have been spot on.
 
I'm curious as to why the calculators won't work for you? I use this one. It allows you to set all the variable (even the ratio of water to grain) anywhere you want. I find it works pretty well once you get your system dialed in.

I don't really know. I've used BrewTarget, StrangeBrew, and qBrew, and if they say add x much water at y degrees, it always overshoots. I have yet to try it with no-chill, but I really do like the simultaneous heating: one less thing to calculate!

The pot with the holes usually comes with larger pots and is used for steaming and shrimp/lobster/whatever boils. I referred to it above as a "steamer basket."

I'm definitely going to look into Brewzor. I've been looking for a good homebrew app for my phone.
 
does that plastic container keep water warm? i was thinking how much easier it would be to do brew in a bag if i could preheat my sparge water and store it in a cooler or something so it's all ready to go when sparging time comes. that strainer thing looks like it would prevent any grains from getting into wort and would elimate need for runoff and recirculation. the spigot looks like it would make it easy to transfer the cooled wort to the fermenter. only thing i would do different is add a immersion cooler since i want the process to get over as quickly as possible
 
does that plastic container keep water warm?
Not as warm as an insulated cooler would.

i was thinking how much easier it would be to do brew in a bag if i could preheat my sparge water and store it in a cooler or something so it's all ready to go when sparging time comes.
It's my understanding (and as such, my preferred method) that BIAB brewing has all the water added at once, no need to sparge/recirculate/etc. Somewhat diluted mash, but that seems to be the way it goes.

that strainer thing looks like it would prevent any grains from getting into wort and would elimate need for runoff and recirculation. the spigot looks like it would make it easy to transfer the cooled wort to the fermenter. only thing i would do different is add a immersion cooler since i want the process to get over as quickly as possible
I do no-chill, so I run the hot wort from the kettle into the Winpak, seal it up, and wait for it to cool (usually the next day), though some brewers have kept sealed worts up to a few months.
 
So, I'll give a rundown of the process.

Grain into grainbag; grainbag into steamer/strainer basket; basket into kettle; water into kettle. Stir to combine.

Bring to mash temperature, stirring along the way. Remember, stir frequently to prevent stratifying the mixture. By the time the thermometer at the top registers your target temp, the water and mash at the bottom of the kettle will be well past your target.

Once your mash is finished, remove grain bag/strainer basket and allow to drain over the kettle. You may squeeze, press, or otherwise try to extract extra wort from the grain, or just pull the bag, let it drain, and toss the grain.

Next, consider your boiling schedule. If doing a no-chill, your hopping rates will be significantly altered. The Pol has a nice schedule here for adjusted hopping. Don't miss your First Wort hops!

Once the boil is finished, attach silicone tubing to the ball valve/nipple, insert into the Winpak (the white vessel in the first picture), transfer the wort, squeeze the excess air out of the container, seal tightly, and turn the vessel on its side to allow the hot wort to sanitize the top of the container. Allow to cool to pitching temperatures, usually overnight. Some no-chill brewers have kept their wort sealed for up to 6 months with little-to-no ill effect. At this point, if you have a 6-gallon Winpak you can use it as the primary fermenter (no transferring!). If you have a 5-gallon Winpak, you should probably transfer it to a carboy before pitching.

Notes about the Winpaks:
  • US Plastics have a couple other vessels that work the same way. Search this thread for other options (I think that's the one).
  • If you get a 6-gallon vessel, it will bend out of shape when you squeeze the air out of it, but it is big enough to use as a fermenter.
  • If you get a 5-gallon vessel, it's not really big enough to use as a fermenter, but most of the brewers who store their worts long-term seem to use the 5-gallon vessels, as there's less air to squeeze out, and they keep their shape a little better.

Awesome! One question: what is your grist to liquor ratio? I am dying to try BIAB, and have a very similar situation (no outside water source, limited space, etc.).

My main question is which size pots will limit me to a certain number of pounds of grain? Say, I wanted to brew beers that used 20lbs of grain. What size pot would I need with BIAB? Thanks!

There are online calculators that can do those volume measurements, and www.biabrewer.info has a fantastic excel-sheet calculator as well.

But with that said,

I just made a 8gal (final volume, ~10.7 preboil) batch with 21.25 lbs of grain in my 15.5gal pot last night. That was a 1.075 SG, and I had plenty of room and managed well into the 80s% efficiency. If I was making a truly beast RIS or what not, I'd have to sparge some how, or I could probably knock it to a 5gallon batch and be fine.


Edit: This is a quick and easy one I think someone off of here, HBT, made. http://up.jamesnweber.com/_brew/biabcalcs.html
 
Honestly, the hardest part is making sure your tun is big enough to do that massive barleywine you've been eying.

Of course, if you don't drill the kettle and add a ball valve, the hardest part is transferring 5+ gallons of boiling wort...

If you don't have a spigot you'll need a SS siphon.
 
If you don't have a spigot you'll need a SS siphon.
I just can't get a siphon going without an auto-siphon. I've tried the suck method, I've tried priming the tube and cane with water. I've tightened the tubing down with hose clamps. Nothing works for me! Spigot or "dump method." :(

EDIT: I do have a SS racking cane with silicone tubing, but still no luck. That's why I drilled the kettle :)
 
Yeah, someone really should market a SS autosiphon. I guess they're just too expensive to make for what people would be willing to pay.
 
Yeah, someone really should market a SS autosiphon. I guess they're just too expensive to make for what people would be willing to pay.

I considered trying to make my own, but I get stuck on the one-way valve at the bottom. Food grade, high temp rubber/silicone gaskets are easy to find, but not always cheap.
 
I don't have necessary permissions to view the pics, but if it involves any kind of metal work, it's over my head too. Should sign up for that forum so I can see the pics.
 
I no chill BUT I fly sparge. I like first wort hopping for no chill, but I'm letting them 'steep' in the runnings for about na hour. How long do your FWH hops sit in the runnings when you BIAB? I mean, it could only be like 5-10 mins vbefore you apply heat to the boil kettle,, right? How does that affect FWH for you? Please describe your FWH porcess for BIAB. Thanks.
 
I had never thought about adding the grain from the beginning. Hitting mash temps would be easier for sure... I might just do a hybrid of your version and add the grain at 140F and heat up until I arrive at my temperature so as to not spend too much time at the lower rest temperatures wich can alter the ph of the wort and other characteristics. It's always a gamble with BIAB since you have to stir a lot more than with an ample sized MLT.
 
Great setup there, a few of the guys over here use those crab cookers with a bag fitted. I use a 40 Litre (around 11 US Gallon) electric hot water urn - I think there are a couple of brands in the USA - "Buffalo" if I recall.
The water carrier in the picture is 23 Litres (6 gallons) and believe it or not has done over a hundred brews and still in perfect nick as you can see.

BiabbasickitMedium.jpg
 
I no chill BUT I fly sparge. I like first wort hopping for no chill, but I'm letting them 'steep' in the runnings for about na hour. How long do your FWH hops sit in the runnings when you BIAB? I mean, it could only be like 5-10 mins vbefore you apply heat to the boil kettle,, right? How does that affect FWH for you? Please describe your FWH porcess for BIAB. Thanks.
So, for FWH, I add the hops when I pull the basket with the grains out of the mash. That way, the first wort hopping goes from the time the grain is pulled out to drain up to when the boiling starts. Usually 15 minutes or so, depending on the grain bill.

I had never thought about adding the grain from the beginning. Hitting mash temps would be easier for sure... I might just do a hybrid of your version and add the grain at 140F and heat up until I arrive at my temperature so as to not spend too much time at the lower rest temperatures wich can alter the ph of the wort and other characteristics. It's always a gamble with BIAB since you have to stir a lot more than with an ample sized MLT.

That would probably be faster. Might have to give it a go!

Great setup there, a few of the guys over here use those crab cookers with a bag fitted. I use a 40 Litre (around 11 US Gallon) electric hot water urn - I think there are a couple of brands in the USA - "Buffalo" if I recall.
The water carrier in the picture is 23 Litres (6 gallons) and believe it or not has done over a hundred brews and still in perfect nick as you can see.

Your picture looks like a big coffee percolator, which would be a very interesting way to brew. I try to keep my stuff in good condition, but for over 100 brews, that looks incredible!

My brew day is going to be either Thursday or Saturday. I'll take some action shots.
 
Brew in a Bag and No Chill for the win!! I love that combo and do most of my batches this way. I do normal mash volumes in a smaller bag though, including a sparge.
 
Brew in a Bag and No Chill for the win!! I love that combo and do most of my batches this way. I do normal mash volumes in a smaller bag though, including a sparge.

I don't have a convenient way to keep sparge water warm. I really dig the dump-and-stir nature, and I haven't noticed any over-extraction (or any other) issues from doing such a diluted mash. In fact, my American Wheat I brewed on Labor Day just got some pretty rave reviews at my homebrew club meeting last night!

I think, perhaps, I've chosen the simplest method, heating the grain with ALL of the water, because it is so simple. No need to fuss, just throw it in, crank the heat, stir often, and that's it. No worrying about when to add stuff, sparge, and assuming I stir often, even hitting mashing temp isn't a big concern.
 
BTW, I'm getting a Winpak. I think it would be a practical fermenter; you could lay it on its side for transfer out through the lid. Of course you would need some type of valve but it could be done.
 
What about oxygenation prior to pitching the yeast?

You know, I've never done any "proper" oxygenation, and I'm not feeling the need to start anytime soon. I just don't think it matters all that much. Isn't it true that dry yeast and starters don't need extra oxygen when pitching? I have no idea, but thought I heard that somewhere.

I suppose once I've finished all my other beer fantasy purchases (including a beer room w/ a 20ft dark-stained oak bar w/ red-headed serving wenches), I'd go buy the oxygenation equipment and give it a whirl, but I just don't see the need.

Do commercial breweries oxygenate wort prior to pitching? Or do they just do massive overpitches where they don't need to grow any more yeast?
 
Do commercial breweries .... just do massive overpitches where they don't need to grow any more yeast?
Well I'm pretty sure the good ones don't do something as silly as that to their product (what is making them money)
 
any downside to no chill?

You have to claim that the Australians were right about something...........

Also, none of the beer you've ever bought was brewed that way, but you're a homebrewer do what you want....right? We shouldn't be trying to mimic the professionals.....that's stupid....
 
any downside to no chill?

The only difference I've noticed is that hoppy beers are tricky. There's some disagreement on how to First Wort Hop (some say its awesome, some say it sucks), and its hard to adjust your hop additions for the extra time they spend steeping in the no chill vessel. It's sort of like boiling them for an extra 20 minutes (rough guideline) but not exactly like that, IMHO.

My next batch is going to be a Hoppy Alt Bier and I'll probably chill it normally and not do No Chill. If I was more confident in my FWH ability I might do it differently.

If you can do dry hopping to compensate for the late hops, then I see no downside at all for No Chill.
 
You can ferment in the Winpacks, but honestly I try not to.

Relative to a bucket or carboy, they're a real pain to clean due to the lip and roof. Plus, you can't see in to them!

I stopped doing a kettle whirlpool and when I dump my wort from Winpack -> Fermenter I pour it through a SS mesh filter. It gets gunk out, plus as I'm pouring there's fantastic oxygenation.
 
Here in Australia we rarely use carboys, but instead use either bucket fermenters with snap on lids or 'barrel' screw top fermenters like this:
doonah1.jpg


So the cooled wort gets poured out of the cube with a lot of splashing and frothing to aerate, then I give it a good thrashing with one of these - and with some highly floccing yeasts such as Wyeast 1469 PC I even do it morning and night for the first 2 days.

:)

aerator.jpg


Yes, with the hops, late additions are a bit like adding twenty minutes to the addition time due to the alpha acids getting a little more isomerised for the time spent in the near boiling wort, so 20 min or 10 min additions tend to go in right at the very end, almost like a hop back 'addition'. In practice it's not really all that noticeable and with very hop driven APAs for instance there's often a fair bit of dry hopping going on as well.
 

Latest posts

Back
Top