Haier wine fridge fermentation chamber

Homebrew Talk - Beer, Wine, Mead, & Cider Brewing Discussion Forum

Help Support Homebrew Talk - Beer, Wine, Mead, & Cider Brewing Discussion Forum:

This site may earn a commission from merchant affiliate links, including eBay, Amazon, and others.

fall-line

Supporting Member
HBT Supporter
Joined
Mar 15, 2011
Messages
434
Reaction score
55
Location
Seattle
I've had a Haier BC112G 30 bottle wine fridge in my basement, largely unused for a couple of years now as the wine has moved into a larger cabinet. I started using it as a fermentation chamber a few brews ago since it can accomodate any of my fermentation vessels (6 & 5 gallon better bottles, 5 gallon glass carboy, and 6 gallon bucket.)

Until today, I've just been using the internal thermostat (cooling only) to maintain a temperature within about 3ºF of the target. This is great for many of the beers I brew, but since my basement is only ~60-65ºF this time of year, I couldn't hold a higher temperature. What's more, as this is a wine cooler, the lowest setpoint I could achieve with the built in thermometer was 45ºF (again +/- 3ºF), so it wasn't well suited for cold crashing, laggering, etc.

As you will see in the photos below, I made a few modifications today to bypass the internal thermostat (as well as the built in control panel), and installed a heating element in the form of a brew belt in the bottom of the chamber. Both the heating element and the fridge compressor are now controlled by a Love controller that I built into a project box.

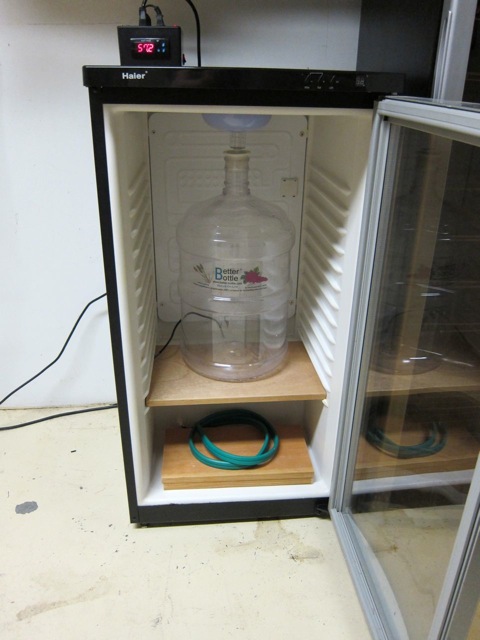
Finished Product with 5 gallon better bottle as an example. A 6 gallon bottle fits as well, by placing it on the lower 'shelf' and wrapping the brew belt around the wood:
IMG_0587.jpg


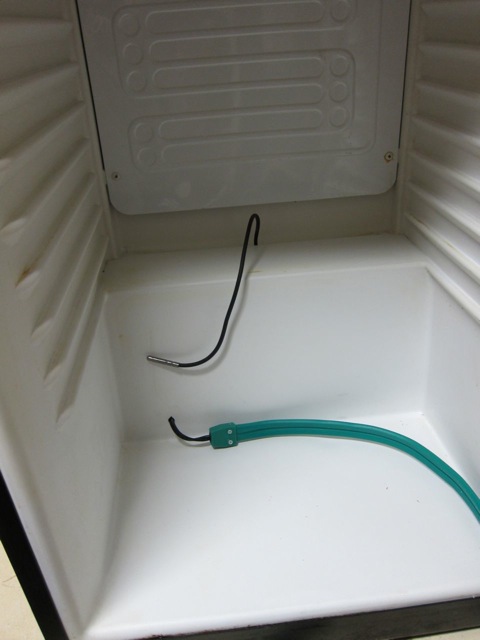
Probe (through drain) and brew belt (through new hole):
IMG_0580.jpg


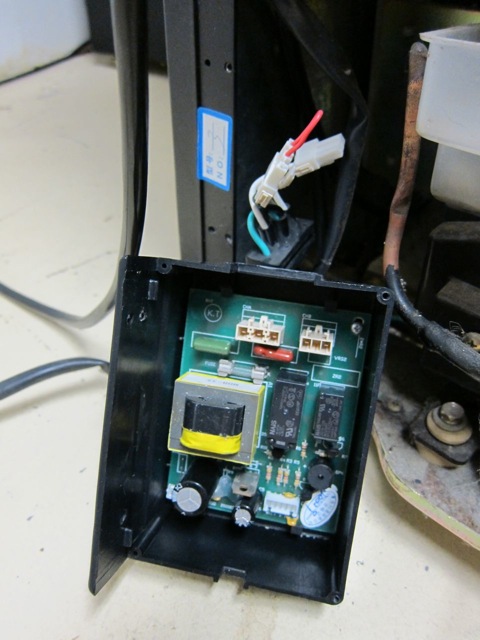
Removed the control circuit and hot wired the compressor (see little red jumper cable), ensuring that whenever the unit has power, the compressor is running.
IMG_0574.jpg

IMG_0577.jpg


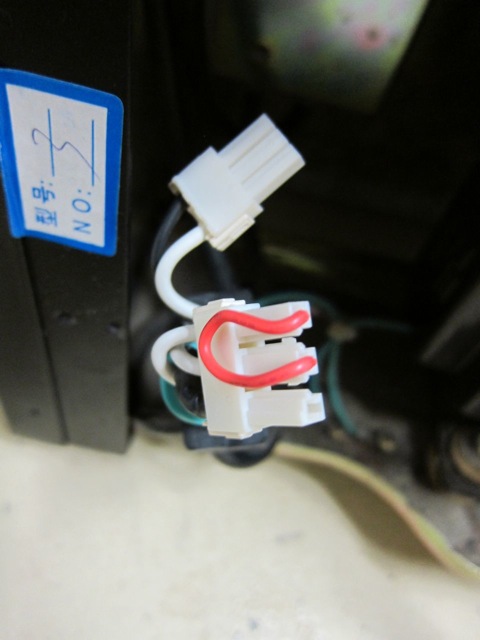
Back pannel view. See the compressor jumper on the left, temp probe inserted in the drain hole in the middle, and the brew belt (not yet wired in) inserted through the new hole on the right:
IMG_0571.jpg

IMG_0576.jpg


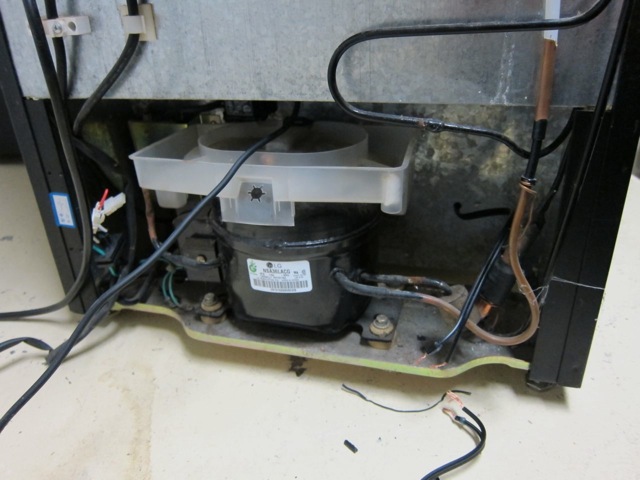
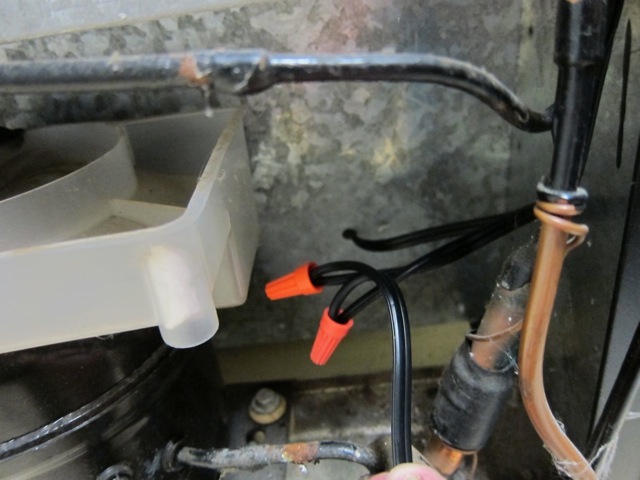
After these photos were taken I finished securing and sealing all the wiring connections with wire nuts, electrical tape, etc where needed. I also used silicone caulk on the hole that I drilled for the brew belt cord, to protect the insulation from condensation.

You can definitely get more bang for your buck with an old full sized fridge or the like as a fermentation chamber, but if you happen to have one of these Haier units laying around like I did, or see one on Craigslist for a few bucks, this may be useful for you. It fits many types of fermentors, and is relatively compact for those of you with small places.

I've got it running at 70ºF right now in order to help the silicone caulking set. It's been holding a perfect temperature for several hours now. If I warm the chamber up artificially, it cools down via the compressor to the target setpoint very quickly. Warming it up with the brewbelt takes a little longer, but I found it was able to gain 10ºF in air temp inside the chamber in just over 10 minutes.

I'll be running it 'dry' (without beer) for a few more days, just to ensure that I didn't mess anything up, but so far it is working great.All things considered, I'm very happy with how it turned out. I took care while working on this project to ensure that every step is easily reversible, so that if I need extra wine storage capacity in the future (and have another, fermentation option) I can just plug the controller board back in and I'm all set.
 
As a test I've cranked the setpoint up on the Love controller to 80ºF, and the brew belt has proven to have more than enough heating power to do the job.

I also dropped the sent point down to 30ºF last night and as expected the air temp in the chamber dropped very quickly.

It'll be interesting to see how long it takes to adjust the temperature of the beer (so much more thermal mass), especially with heating, but I don't expect any problems. I'm extremely pleased with how it is performing for both heating and cooling, and am really looking forward to getting the next batch of beer in there now that I have total control over my fermentation temperature.
 
you know, i was wondering about this same exact thing. don't they have external temp controls as well?
 
They do have a fairly advanced built in temperature controller, yes. You can see in the upper right of the first photo I posted, where the (now bypassed) control mechanism and display is. The problem is, they were designed specifically to be a wine storage cabinet so the thermostat operates in three modes:
  • Red Wine - Auto Range 55-60ºF (+/- 3ºF)
  • White Wine - Auto Range 50-55ºF (+/- 3ºF)
  • Custom - Where you can set any specific temp from 45-65ºF (+/- 3ºF)

For many needs this internal controller is just fine. I just wanted a finer temperature control (I am getting +/- 1ºF now), wider temperature range, and the ability to heat as well as cool since this unit lives in my basement.
 
Several days on now and this thing is working great. I did notice (as is to be expected) that running it empty created a lot of cycling of both the heating and cooling cycles. I have my Love controller differential set to only 1ºF, and without anything in the chamber to add to the thermal mass, it would cool down to just below the set point and then the heater would kick on, raising the temp to just above the set point, and repeat.

I've added a 5 gallon bottle full of water to increase the thermal mass and it is much more steady now, with fewer cycles. I can't wait to get a batch of beer in there this weekend!
 
Awesome! I live in a tiny 1 bedroom apartment, so there is no room for an extra beer fridge. Tired of messing with the swamp cooler, plus SWMBO hates that thing. A wine fridge would be perfect to control ferm temps in my little apartment, and be "pretty enough" to pass the SWMBO test.

Off to craigslist....
 
Fall-Line, I also have an Haier BC112G and want to convert it to a beer cooler by by-passing the thermostat and installing a lower temp t'stat. Which wires did you jump for the compressor to run continuously?
 
Fall-Line, I also have an Haier BC112G and want to convert it to a beer cooler by by-passing the thermostat and installing a lower temp t'stat. Which wires did you jump for the compressor to run continuously?

I would think most of these are the same. You will see one of the connectors has three wires. One should be a ground, and the other two should be the two ends of the switch. By jumpering the two wires (probably both white), you bypass the switch. The ground is still the ground, but the compressor (motor) gets power constant.
 
Are you using a brew belt to heat the air because you are not using a Thermowell and therefore having it wrapped on the fermenter would be less accurate? Im not sure if I'm making any sense...why not put the belt on the fermenter?
 
Mainly, out of lazyness to be honest. With the probe taped to the side of the fermenter, I get a pretty good (not as good as a thermowell, but ok) reading on what the beer temperature is. The little bit of heat that the belt needs to produce from time to time seems to transfer to the thermal mass of the beer ok. It's not as efficient as it would be if strapped around the bottle, that is true. Most of the time the chamber is cooling rather than heating anyway, so it hasn't been much of a problem.
 
In case anyone is looking at other Haier models (say, on Craigslist), I can share that the 42 bottle HVF042ABL model has the same configuration and you can follow fall-line's process (and photos). The circuit board is even the same (has BC112G0 stamped on it). Maybe it's even the same damn thing and they figured out how to "fit" more bottles into it and rebranded it as a 42 bottle cooler???
 
Good info, thanks for sharing. I think all of the Haier units of this generation share the same control system. I also have a 60 bottle unit that we actually use for wine, and as far as I can tell, it is wired the same.
 
Hi everybody I'm actually going to pick up a Haier HEC 30 bottle wine cooler I found on eBay for $75 tomorrow.

Do you guys know if this is the same as the Haier BC112G cause it looks exactly the same and if so will my 6 gallon better bottle with spigot fit inside?

Also are you guys able to set the regular external temp to a specific temp like say 66 degrees?

Thanks!
 
I almost bought one of these today off Craigslist, but it was gone by the time i got to it.
I am a little concerned with the temp controller only going down to 45 degrees... I want to be able to crash it down to a pretty low temp.
If I used a ST 1000, and bypassed the built in thermostat, think that would work?
 
acidrain said:
I almost bought one of these today off Craigslist, but it was gone by the time i got to it.
I am a little concerned with the temp controller only going down to 45 degrees... I want to be able to crash it down to a pretty low temp.
If I used a ST 1000, and bypassed the built in thermostat, think that would work?

Yes
 
I almost bought one of these today off Craigslist, but it was gone by the time i got to it.
I am a little concerned with the temp controller only going down to 45 degrees... I want to be able to crash it down to a pretty low temp.
If I used a ST 1000, and bypassed the built in thermostat, think that would work?

Yep, please see the first post in this thread. The photos detail exactly how I bypassed the internal thermostat and used an external controller.
 
Hi everybody I'm actually going to pick up a Haier HEC 30 bottle wine cooler I found on eBay for $75 tomorrow.

Do you guys know if this is the same as the Haier BC112G cause it looks exactly the same and if so will my 6 gallon better bottle with spigot fit inside?

Also are you guys able to set the regular external temp to a specific temp like say 66 degrees?

Thanks!

Sorry nobody was able to reply before you went to get it. I can't find any info on that specific model, but if it looks the same as the one in my original post, it should be no problem.

As stated in the first few posts of the thread, if you use an external temp controller like the HTC-100 or Love controller as I did, you can hold a specific temperature very well. The internal control mechanism works pretty well (cool only) but only holds within a ~6ºF range based on my experiments.

Best of luck!
 
I almost bought one of these today off Craigslist, but it was gone by the time i got to it.
I am a little concerned with the temp controller only going down to 45 degrees... I want to be able to crash it down to a pretty low temp.
If I used a ST 1000, and bypassed the built in thermostat, think that would work?

I have a 50-ish bottle Haier wine chiller with the glass door (probably can't get as low as the fridge), and it will go well below 32F. I ran it without the controller, and it went from 68F to 30F in about 30 minutes with nothing in it. I shut it off, but it would have gone well below 32F. The lowest setting on the units thermostat is around 50F.

All of these are likely similar.
 
Thanks to @EthenWithAnE for pointing out my images were broken. I've moved the site containing them to a new server. The changes would have taken a few hours to fully take effect due, but they should be visible again for everyone at this point.
 
I want to do the same as you did so I can bypass the internal thermostat and have the compressor always running when the fridge has power from the external controller. Looks like the setups are similar but a tad different. Can you provide some guidance for me?

20150120_212622.jpg
 
dbhammel, your control board looks very similar. I would guess that you would want to remove those two plugs at the top and jumper the on on the left in your photo, similar to how I did mine in this photo:

IMG_0577.jpg


That said, yours may be wired differently despite looking essentially the same. Please really careful, and use a multimeter or at least a voltage sensor to make sure you know where the current is flowing before before adding wires. :)
 
Hey, that's too funny! I had this same fridge, although it was the 42 or 45 bottle model laying around for a bit, so I decided to turn it into a dual stage fermentation chamber. I've got mine setup more or less the same as yours, with the exception that I did not jumper my compressor to be always on. That's a great idea! So all I do is remove the little module from the back and put in the jumper cable like you show? Is that jumper something you can just pick up at Radioshack?
 
Hey, that's too funny! I had this same fridge, although it was the 42 or 45 bottle model laying around for a bit, so I decided to turn it into a dual stage fermentation chamber. I've got mine setup more or less the same as yours, with the exception that I did not jumper my compressor to be always on. That's a great idea! So all I do is remove the little module from the back and put in the jumper cable like you show? Is that jumper something you can just pick up at Radioshack?

I just used a short piece (~2 inch) of 14 guage romex. It worked perfectly. I wrapped it in electrical tape once I was done to ensure that it didn't come loose, but it fit in there snugly even without.
 
I just used a short piece (~2 inch) of 14 guage romex. It worked perfectly. I wrapped it in electrical tape once I was done to ensure that it didn't come loose, but it fit in there snugly even without.

Thanks for getting back to me. After looking at the photo a little closer this morning I said to myself, "I think he just jammed a piece of wire in there," so glad to have you confirm. I was confused at first and thought those white connectors were on the wire you added, not the plug itself. I'll give it a shot this afternoon!
 
Hey, all set! That took all of about 5 minutes to accomplish. Plugged it straight into the wall and the compressor kicked right on. I didn't let it stay on long as I've got an IPA bubbling away in there right now, but it definitely worked. I was worried I'd have to bring my beer into the kitchen fridge, and the SWMBO was not going to care for that at all, so you just solved my problem, appreciate it!
 
Would anyone who has the BC112G or something similar mind posting the interior measurements? The depth of that bottom "shelf" with the compressor bump and the height specifically? I have a couple of plastic 6.5 gal big mouths and they are pretty tall.. but narrower than a standard 6 gal carboy.. I see one on CL and would love to pick it up if they will fit! :rockin:
 
Would anyone who has the BC112G or something similar mind posting the interior measurements? The depth of that bottom "shelf" with the compressor bump and the height specifically? I have a couple of plastic 6.5 gal big mouths and they are pretty tall.. but narrower than a standard 6 gal carboy.. I see one on CL and would love to pick it up if they will fit! :rockin:

Hey, sure thing! I have the HVF042ABL which looks identical to the one the OP used, and I followed his pictures to remove the internal controls and jumper my compressor. My internal measurements are:

32.5" High X 16.5" Wide X 14" Deep

The hump raises up 8.5" from the bottom. I don't have a board installed in mine, I just use the first shelf that basically sits on the hump, and that gives me 24" of clearance from the shelf to inside of the top of the fridge. I removed the internal plastic light dome on mine as well as it is useless if you bypass the controls.
 
Thanks!

Any estimate on the depth of the floor? From the door to the side of the hump? IIRC the plastic bigmouth with an airlock is about 29"hX16"w
 
Thanks!

Any estimate on the depth of the floor? From the door to the side of the hump? IIRC the plastic bigmouth with an airlock is about 29"hX16"w

From where the door meets the inside of the fridge to the base of the hump gives you 9.5" of usable space on the ground level. My ale pail would not fit there, which is why I put it on the first shelf.
 
Just wanted thank everybody for the detail in this thread.. Been wanting to use a wine fridge to ferment in for awhile now and wondered how a digital thermo could be bypassed easily. As luck would have it I found the exact same fridge on CL for $50 and went off repurposing..

I just wanted to update for anyone not wanting to drill, that there is a hole in the top of the chamber that the interior light is wired through that has plenty of room for passing wires. I have a lamp cord and the 2 sensors for the Black Box temp controller through there with room to spare.

Lagering (!) my Alt in there currently :D
 
I'm not sure if this a a Speidel Fermenter question or Haier BC112G one, but I just picked up one of these chillers off of CL after reading this thread. I knew I might have to modify my fermenter airlock to squeeze it into the chiller, but after bending the wire rack a bit it looks like I can squeeze the fermenter in, but I have to keep it tilted towards the front to do so. I can't imagine that the tilting fermenter would pose any issue, but any concerns folks would have would be appreciated. I can still modify the airlock if it is worth the effort. I may keep it tilted with the spigot on the high side when I actually use it (to minimize trub near the spigot). Sorry for the poor picture.

chiller90.jpg
 
You've got sooooo many options Eamon . . . .

Build up a wooden shelf on the bottom to match the back compressor shelf. Ditch the wire rack.

and/or

Drill the Spiedel cap and install a grommet and smaller airlock. Ditch their huge airlock and adaptor.

and/or

Install a blowoff tube for the entire fermentation

and/or

:D
 
the wire racks bent like that scare me quite a bit - onec you start bending them down, it makes them less secure on the walls.

i'd say build up something below before tossing 5+ gallons into that while it's bent
 
I'm not sure if this a a Speidel Fermenter question or Haier BC112G one, but I just picked up one of these chillers off of CL after reading this thread. I knew I might have to modify my fermenter airlock to squeeze it into the chiller, but after bending the wire rack a bit it looks like I can squeeze the fermenter in, but I have to keep it tilted towards the front to do so. I can't imagine that the tilting fermenter would pose any issue, but any concerns folks would have would be appreciated. I can still modify the airlock if it is worth the effort. I may keep it tilted with the spigot on the high side when I actually use it (to minimize trub near the spigot). Sorry for the poor picture.

Hey there, it looks like you've got a newer (or different) model then the one that kicked off this thread and is the same one I have. If I were you, I would do one of three things:

1) Take out that light at the top of the fridge. I did that and am able to fit my Spiedel in my fridge on the bottom shelf (which doesn't have those bottle shaped curves like yours and doesn't bend).

2) Swap out the orange bung in the top of your Spiedel and use a regular bung with air lock. It won't look quite as cool, but it will work just fine.

3) Ditch the bung all together, put your spigot on the top set of threads, and bam, you've got yourself a low profile connection for a blow-off tube.

I would definitely swap out that lower wire shelf for some marine grade plywood though.
 
The light doesn't work once you jumper compressor anyways.. I took mine out too

Yep, exactly, another reason I took mine out, and I definitely recommend jumpering the compressor to bypass the fridge's "brains." Otherwise you will have two different things trying to regulate the fermentation chamber (assuming you hook up something like an STC-1000 of course).

I just put the light and temp regulator module from the fridge, put them in a ziploc, and threw that on a shelf in the garage with all of the shelves I'm not longer using. That way if I ever decide to go back to a wine/beer fridge or to get rid of it, it'd only take 10 minutes or so to throw it all back together.
 
Back
Top