Black Sunhsine - My Keezer Build - Lots of Pics

Homebrew Talk - Beer, Wine, Mead, & Cider Brewing Discussion Forum

Help Support Homebrew Talk - Beer, Wine, Mead, & Cider Brewing Discussion Forum:

This site may earn a commission from merchant affiliate links, including eBay, Amazon, and others.

electrichead

Well-Known Member
Joined
Dec 11, 2010
Messages
143
Reaction score
5
Here it is, the finished product.
DSC02995.jpg

DSC02954.jpg


When I joined a few months ago I was researching info on building a keezer. I found tons on great info and a lot on inspiration. I wanted to start with a new chest freezer. Particularly the Kenmore 8.8 in black. The price tag of the freezer new was holding me up at first but a few weeks ago they went on sale for 35% off. Combining that with my grandmothers 10% retired sears employee discount and an extra 5% off for using my sears card, I got the thing for 45% off :rockin:.

Here it is in its new home
DSC02835.jpg


I ordered all the parts and they have been slowly arriving for the past week and in the mean time I picked up the collar building materials from Home Depot. I am starting with 2 taps and will add 4 more as I can afford them.
DSC02878.jpg

DSC02852.jpg

DSC02850.jpg

DSC02839.jpg


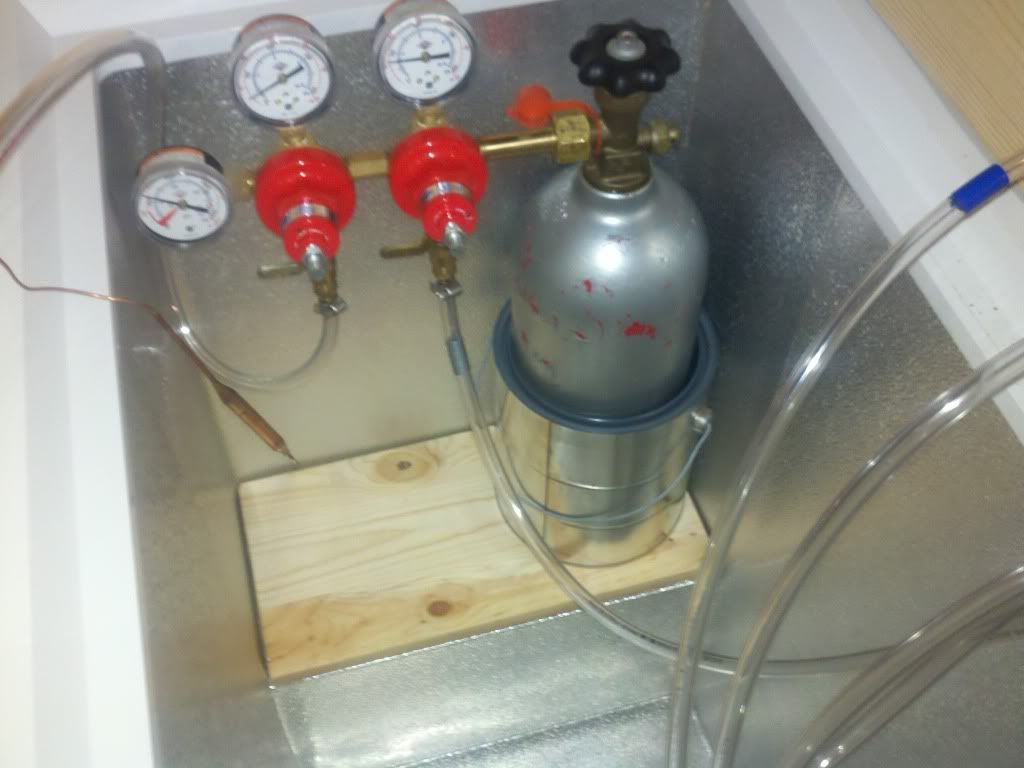
Here are some shots of the inside of the freezer.
DSC02837.jpg

DSC02836.jpg
 
I started construction yesterday. The collar is Red Oak. I made the miter cuts and laid it out to get a feel for hardware placement.
DSC02886.jpg

DSC02884.jpg


I used glue, brads and brackets at all four joints.
DSC02903.jpg

DSC02892.jpg


I made a template on graph paper for the tap positions and transferred the the center marks onto the collar. This spacing will allow for a 19" drip tray to fit nicely underneath. I also measured for the Love controller and the outlet that will be on the back.
DSC02905.jpg

DSC02911.jpg

DSC02918.jpg

DSC02919.jpg
 
Next I mounted the boxes and made the hole where the wire for the main power will come through. I found this nice rubber grommet sitting in a pile of miscellaneous stuff on my work bench.
DSC02920.jpg

DSC02923.jpg

DSC02925.jpg

DSC02926.jpg


Here it is just resting on top with all the hardware installed. I will be wiring it all up tomorrow. The last few components should be here soon. I forgot to get 5/16 swivel nuts for the gas disconnects on my first order and sears shipped the two hinges separately. I will be staining it a dark mahogany (I think, we'll see how it looks on the scrap).
DSC02928.jpg
 
Looks great! I have this same freezer, but am stuck with picnic taps for now. This gives me something to look forward too. :)
 
Here it is just resting on top with all the hardware installed. I will be wiring it all up tomorrow. The last few components should be here soon. I forgot to get 5/16 swivel nuts for the gas disconnects on my first order and sears shipped the two hinges separately. I will be staining it a dark mahogany (I think, we'll see how it looks on the scrap).
DSC02928.jpg

Love this, is the handle for users that may need help with balance after a long night of partaking?

:tank:

Orlando
 
Thanks for the kind words guys.

Love this, is the handle for users that may need help with balance after a long night of partaking?

:tank:

Orlando

Hahaha, I put the handle on for ease of lifting the collar and lid. Both will be hinged separately so I didn't want to be lifting the weight from the taps.
 
Im jealous.

Good for you though dude. one i day i dream of have 4 different kegs at once. but for now, all i got is my one. cheers!
 
Wiring Time!

I bought a 15' outdoor extension cord to use for all my wiring.

Here I have the strands separated and the Hot lead spliced for constant power to the controller and the feed for the switched power. In the spirit of neatness I have designated the ground in this section to be the switched hot out of the controller. I made sure to clearly identify both ends with red shrink tube.
DSC02930.jpg

DSC02931.jpg


Here is the controller wiring hooked up.
DSC02932.jpg


The wires from the controller and the wall will meet in the outlet box on the back of the collar.
DSC02934.jpg


Here you see the wires mocked up for measurement and test fit.
DSC02935.jpg

DSC02936.jpg


Once I mocked it all up, I drilled the holes in the boxes and ran all the wires to see how it all works together. You can see the temp probe wired up as well.
DSC02938.jpg


Now that all the holes are drilled and wires are ran its time to dismantle it all for staining. I will measure and cut the insulation once all the hardware is reinstalled.
 
Here are the last pics of the build. I decided to not permanently attach the insulation. It is a snug fit. All openings and the edges of the electrical boxes are sealed with silicone caulk.

DSC02965.jpg

DSC02966.jpg

DSC02951.jpg
 
Very nice! I wish I had the skills to put something like that together! I have the same CO2 regulator, do you find it to be so heavy that it tips your 5lb tank over?
 
I'm so glad you opted for the cleaner 45 degree cut on the corners of the collar. Looks SO much better than some of the others I've seen. Great job, I can tell you put a lot of effort into it.
 
Very nice! I wish I had the skills to put something like that together! I have the same CO2 regulator, do you find it to be so heavy that it tips your 5lb tank over?

If I was closer to you I would be glad to assist. Its a great project to learn some basic handy skills.

It does tip it over. I have the tank placed in the bottom of the freezer against the hump and the regulator just reaches the wall above the hump for balance.

I'm so glad you opted for the cleaner 45 degree cut on the corners of the collar. Looks SO much better than some of the others I've seen. Great job, I can tell you put a lot of effort into it.

I almost went with 2x8 and was going to do regular butt joints with some type of embellishments but opted for the more clean modern look of the miter. My SWMBO is fully behind this design for future kitchen or living room placement.
 
It looks great. I am looking at building one as well. Do you happen to have a list of all the part you purchased to put this together?
 
I'm putting one together tomorrow so I can see what the total final wallet damage was. I'll post it up.
 
Very nice work! It's nice to see the thought, time and care you put into it instead of just throwing something together. Gives me something to work forward to. I'm gonna have to tag this to come back for when I do mine. Once again kudos!!
 
Awesome job.... This is the first build that has ever made me want to give up my converted commercial kegerator.
 
I'm a little confused about the outlet. Your freezer plugs into itself at the collar outlet...? And the another cord from the collar plugs into the wall? Is that it?
 
It does tip it over. I have the tank placed in the bottom of the freezer against the hump and the regulator just reaches the wall above the hump for balance.

Suggestion: The off-centered 1" x 6" with a paint can screwed to it... There's about 1/4" clearance between a standard paint can (you can buy them un-used) and a 5 lb tank.

2010-09-22_21-32-39_976.jpg
 
I'm a little confused about the outlet. Your freezer plugs into itself at the collar outlet...? And the another cord from the collar plugs into the wall? Is that it?

I'm guessing the temp controller controls the on/off power to the plug. The temp controller is plugged into the wall (really, the power for the whole system, controlled through the temp controller). With the temp parameters set, the temp controller will cycle on/off the power to the plug in the collar, turning the power to the keezer on/off to get to the desired temps.
 
I'm guessing the temp controller controls the on/off power to the plug. The temp controller is plugged into the wall (really, the power for the whole system, controlled through the temp controller). With the temp parameters set, the temp controller will cycle on/off the power to the plug in the collar, turning the power to the keezer on/off to get to the desired temps.

Correct. The wire going through the grommet powers the controller and the controller powers switched hot to the outlet. The freezer plugs into the outlet. The other wire in the pics is the power for the factory installed light and temp alarm(which has an on/off switch on this model freezer).

IrregularPulse, I didn't want to cut up the factory wiring or have a separate control box. This was the neat and organized solution.
 
I’m no electrician…not even close, but I personally would have not run the electrical inside the freezer. My fear would be that condensation may form in or around your electrical box. I would hate for a fire or some sort of electrocution to happen. Just my $.02 but everything else looks great!
 
Very nice job! Congrats. Thanks for sharing with the rest of us. I like how sleek and clean it looks. About what did it cost you from start to finish and about how long would you say you put into it?
 
What hinges did you use for the collar? They look like the ones that came stock with the freezer. Do you have an issue with the weight of the lid/collar opening? I want to make mine with the entire collar swinging up for easier cleaning and loading kegs.
 
I’m no electrician…not even close, but I personally would have not run the electrical inside the freezer. My fear would be that condensation may form in or around your electrical box. I would hate for a fire or some sort of electrocution to happen. Just my $.02 but everything else looks great!

Condensation IS a potential problem. But I think with some good silicone sealant and the use of a dehumidifier (the EvaDry units are great) this build should be fine.
 
What hinges did you use for the collar? They look like the ones that came stock with the freezer. Do you have an issue with the weight of the lid/collar opening? I want to make mine with the entire collar swinging up for easier cleaning and loading kegs.

Read the first post.

He got a second set of factory hinges. You can lift the collar, or just the lid.
 
Very nice job! Congrats. Thanks for sharing with the rest of us. I like how sleek and clean it looks. About what did it cost you from start to finish and about how long would you say you put into it?

I should have a parts and cost breakdown to post later tonight.

What hinges did you use for the collar? They look like the ones that came stock with the freezer. Do you have an issue with the weight of the lid/collar opening? I want to make mine with the entire collar swinging up for easier cleaning and loading kegs.

The hinges are replacement stock from Sears. The lid can be lifted alone and the collar and lid can be lifted together. The hinges don't even seem to notice the extra weight.

Condensation IS a potential problem. But I think with some good silicone sealant and the use of a dehumidifier (the EvaDry units are great) this build should be fine.

Sealing the electric was definitely a concern. I looked at various box seals but decided that good old silicone caulk would get the job done. I don't have pics but I thoroughly coated all the edges of the knock-out holes on each box from the inside. The edges were given a good thick bead before being screwed on. I made the holes where the wires go through a tight fit and once it was wired I sealed round the wires from the inside. I plan on taking off the cover plate for the outlet to check for condensation but seriously doubt there will be any.

ScubaSteve, do you think the mini EvaDry will be ok for my freezer size?
 
For you guys curious about the cost, here is the breakdown. Sorry for the sloppy layout, my Excel somehow uninstalled itself. This doesn't include the Kegs,taps, shanks, reg, CO2 tank, hoses, and hardware. I suppose I could add that if you like. I also have to order and mount a drip tray.

Hinge Screws - #12x½” Wood - $2.36
Hinges – Sears Direct Replacement Part - #216478801 x2 – $33.70
Stain – Minwax Dark Mahogany – $4.45
Polyurethane - Minwax Semi Gloss – $5.98
Silicone Caulk – GE Silicone 2 Clear – $3.89
Hole Plugs – 7/8 Metal x4 – $8.84
Insulation – 2’x8’x2” Pink R10 – $15.75
1”x8”x12’ Red Oak – $56.64
Rubber Seal – ¾”x7/16”x10’ Foam Self Stick – $3.98
Electric Box Screws – $1.96
Single Gang Box - $0.88
Shallow Single Gang Box – $1.15
Outlet – $3.49
Stainless Face Plate – $1.59
Angle Gusset Plates x4 – $3.76
Gusset Screws – $1.96
Extension Cord – Black Outdoor 15’ – $9.97
Drawer Pull – $4.97
Controller - Love TSS2 – $69.00
Temp Probe – Love TS-21 – $12.00
Freezer – Kenmore 8.8CF Black – $239.39

Total = $485.51
 
Well, I know him personally, and I can say yes :D My freezer is about the same size, and the EvaDry works pretty well. I must have recharged it at least 20 times. You really need to watch it if you keep the freezer in a warm room or garage. The condensate can get pretty crazy. I think I have the regular sized unit.

Also, keep in mind that condensate can still form in your electrical boxes based on the temp differential between the freezer and ambient temp. They'll basically sweat on the inside. If you can insulate the boxes themselves, you can probably combat this. Just cover the deep one with pink foam; the other you may have to jury rig. OR, use it for a while and see if it's even a problem. It may not be!
 
nice looking build! i have that same freezer and it has been great for me so far. my only question is have you fit 6 kegs in there? it seems like you would be able to fit 5 on the bottom, but only 4 fit. i suppose if you remove the co2 tank to outside the unit you can fit 2 more on the hump (i didn't make my darn collar big enough to fit the extras on the hump, but 4 suits me well.
 
Electrichead,
Thanks for posting this - it's brilliant.
Do you mind if I use this as a starting point for the one I'm planning?
 
Back
Top