You are using an out of date browser. It may not display this or other websites correctly.
You should upgrade or use an alternative browser.
You should upgrade or use an alternative browser.
My single tier build
- Thread starter n2fooz
- Start date

Help Support Homebrew Talk - Beer, Wine, Mead, & Cider Brewing Discussion Forum:
This site may earn a commission from merchant affiliate
links, including eBay, Amazon, and others.
Komocabo
Well-Known Member
- Joined
- Oct 16, 2012
- Messages
- 1,083
- Reaction score
- 159
Well done! I finished mine a few weeks ago. I also learned how to weld by doing it so that was awesome. I love my single tier... pumps are up next now that Christmas is all done  heres a few pics and one from my brew this past weekend
 ")


heres a few pics and one from my brew this past weekend
Golddiggie
Well-Known Member
Got the square tubing cut for my stand (2"x2"x.083") yesterday. After cutting all that with the h/v bandsaw I'm not going to use that for the gussets. I will be getting an order of 1.5"x.125" angle iron later this week. I'll simply cut the gussets from that. I'll just position them as needed to mount the burners. At this point I'll transplant my two Blichmann burners over, leaving the third slot open (for now). I have a bucket heater that I can try and use to get the sparge water up to temp (in a keggle HLT, to be made).
I realize this is an old thread, but n2fooz, I was wondering if you could tell me what material and gauge you used for the sheet metal "floor" on your stand. Is that stainless steel?
Gadams, sorry I didn't see this post. The floor is 1/4" aluminum sheet that I had leftover from another project.
Golddiggie
Well-Known Member
Gadams, sorry I didn't see this post. The floor is 1/4" aluminum sheet that I had leftover from another project.
I'm going to see what the steel mill has for drops that I could use for the floor. Going there tomorrow, or Friday, to get the angle iron and maybe some expanded steel sheet.
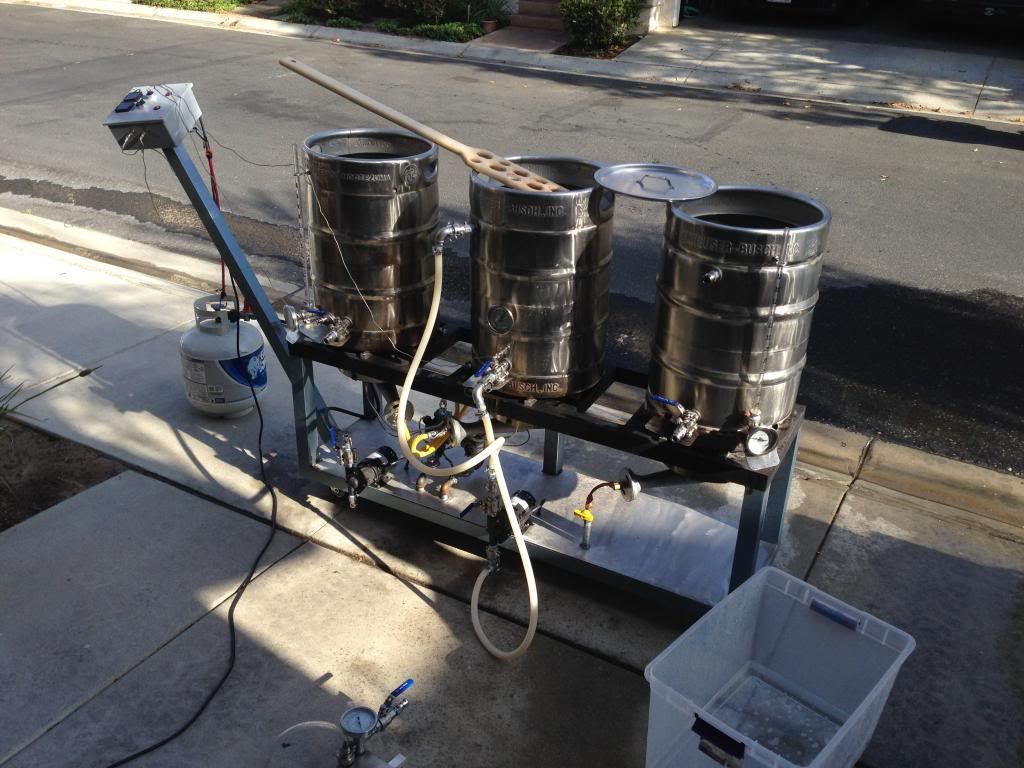
Thanks guys. Here it is in action from Tuesday's 10gal Hoegaarden clone brew. Screwed up and used 2oz of bittering hops instead of 1oz. It's supposed to be around 13 IBU but probably will be 26. Probably won't be a big deal but I wanted this batch to be perfect.

Golddiggie
Well-Known Member
Here's how my stand is going...
First day's progress:

While test fitting the gussets (as I cut them) I discovered I had placed one of the 12.5" pieces 2" too close to the end (one at the bottom of the picture). DOH!! So, I cut it out, ground the weld off, cut a new section and welded that in position. Also after the first day, I welded the wheels in place. These are rated at somewhere in the 250-350# range [each]. So more than enough support. Plus, they have real ball bearings, grease fittings, and you can SEE the bearings and grease in there.

Gussets tacked into position:

Test fitting my Blichmann burners:

Need to move one of the gussets in the middle position to get the second burner in place. I'll remove it, then clamp the burner in position while getting the gusset in place. I'll then check the third position to make sure a burner will fit there. I'm using 1-1/2" angle iron for the gussets (1/8" thick). Since they only need to hold the burners in position, I didn't see any reason to not use that. Plus, it will be easier to bolt the burners into position with angle iron than trying to do it with square tubing.
Next up is putting the [two] pumps in position, as well as making the mount for the plate chiller. Still haven't decided where I'll put the switches for the pumps.
I figure my investment, so far, in the stand is maybe $125-$150 (not counting time).
First day's progress:
While test fitting the gussets (as I cut them) I discovered I had placed one of the 12.5" pieces 2" too close to the end (one at the bottom of the picture). DOH!! So, I cut it out, ground the weld off, cut a new section and welded that in position. Also after the first day, I welded the wheels in place. These are rated at somewhere in the 250-350# range [each]. So more than enough support. Plus, they have real ball bearings, grease fittings, and you can SEE the bearings and grease in there.
Gussets tacked into position:
Test fitting my Blichmann burners:
Need to move one of the gussets in the middle position to get the second burner in place. I'll remove it, then clamp the burner in position while getting the gusset in place. I'll then check the third position to make sure a burner will fit there. I'm using 1-1/2" angle iron for the gussets (1/8" thick). Since they only need to hold the burners in position, I didn't see any reason to not use that. Plus, it will be easier to bolt the burners into position with angle iron than trying to do it with square tubing.
Next up is putting the [two] pumps in position, as well as making the mount for the plate chiller. Still haven't decided where I'll put the switches for the pumps.
I figure my investment, so far, in the stand is maybe $125-$150 (not counting time).
Golddiggie
Well-Known Member
Thanks... It's helping me to get better at welding. I made a new welder cart between the first and second day on the brew stand. Also set up my welding plate with new legs today (needed to be done). I plan on keeping the legs for the burners, in case I ever need to use them outside of the stand... I might need to make a hole in the burner ring so that I can light from below... Or I'll just slide the keggle out of the way when I need to light one of them. That is, unless I install something to light them for me.
Thanks... It's helping me to get better at welding. I made a new welder cart between the first and second day on the brew stand. Also set up my welding plate with new legs today (needed to be done). I plan on keeping the legs for the burners, in case I ever need to use them outside of the stand... I might need to make a hole in the burner ring so that I can light from below... Or I'll just slide the keggle out of the way when I need to light one of them. That is, unless I install something to light them for me.
Unless you do electric start you still need to light the pilots. I have holes to light the pilots but for my boil kettle (no pilot) I don't even use the hole. I just come from underneath with a long lighter.
Golddiggie
Well-Known Member
Unless you do electric start you still need to light the pilots. I have holes to light the pilots but for my boil kettle (no pilot) I don't even use the hole. I just come from underneath with a long lighter.
I think the ring around the Blichmann burners is deeper than what you made. I don't bend well enough to be able to reach under there with a long lighter, while turning the valve, and NOT scorch my eyebrows (or goatee)...


N2, and the rest - how are you controlling the flames in each pot? Isn't the advantage of 3 burners to have at least 2 heating at one time? Looks like just an on/off valve to each element. Thanks!
N2, and the rest - how are you controlling the flames in each pot? Isn't the advantage of 3 burners to have at least 2 heating at one time? Looks like just an on/off valve to each element. Thanks!
I control flame intensity on the temp controlled burners by hand with the valve by the burners. I believe that I got them from Williams Brewing.
The boil kettle flame is controlled by the single valve in line.
I usually don't really mess with the HLT or MLT intensity because of the temp control box. The boil kettle gets jockeyed a bit to avoid boil overs.
Post #114 has the parts for temp control listed with links.
Similar threads
- Replies
- 0
- Views
- 541
- Replies
- 0
- Views
- 426
- Replies
- 1
- Views
- 520
- Replies
- 3
- Views
- 1K
- Replies
- 0
- Views
- 479

Latest posts
-
-
-
 Why didn't anyone ever tell me to buy a grain mill sooner
- Latest: corkybstewart
-
-

-

-
-
