Jeebas's 3 Phase Keezer Project

Homebrew Talk - Beer, Wine, Mead, & Cider Brewing Discussion Forum

Help Support Homebrew Talk - Beer, Wine, Mead, & Cider Brewing Discussion Forum:

This site may earn a commission from merchant affiliate links, including eBay, Amazon, and others.

Jeebas

Supporting Member
HBT Supporter
Joined
Mar 16, 2010
Messages
474
Reaction score
42
Location
Pittsburgh
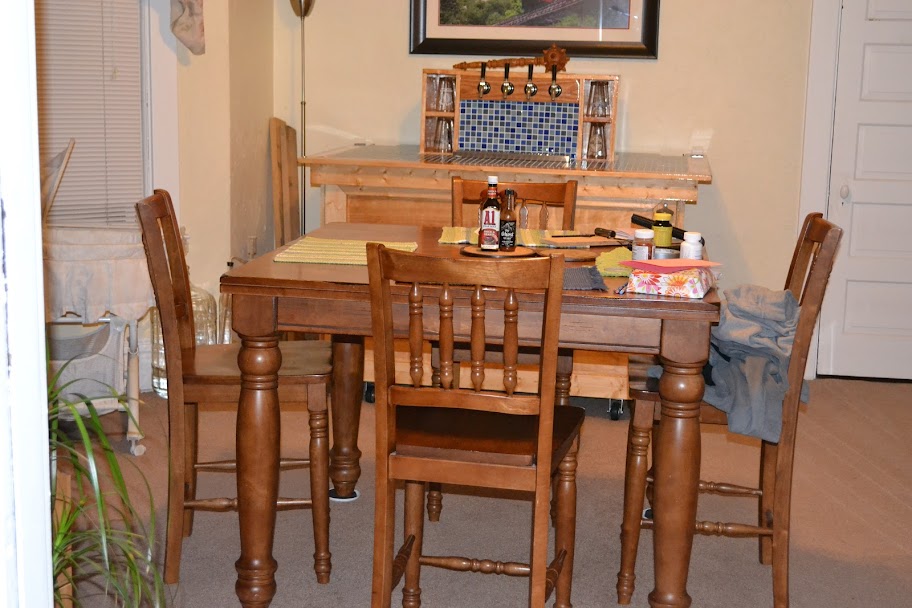
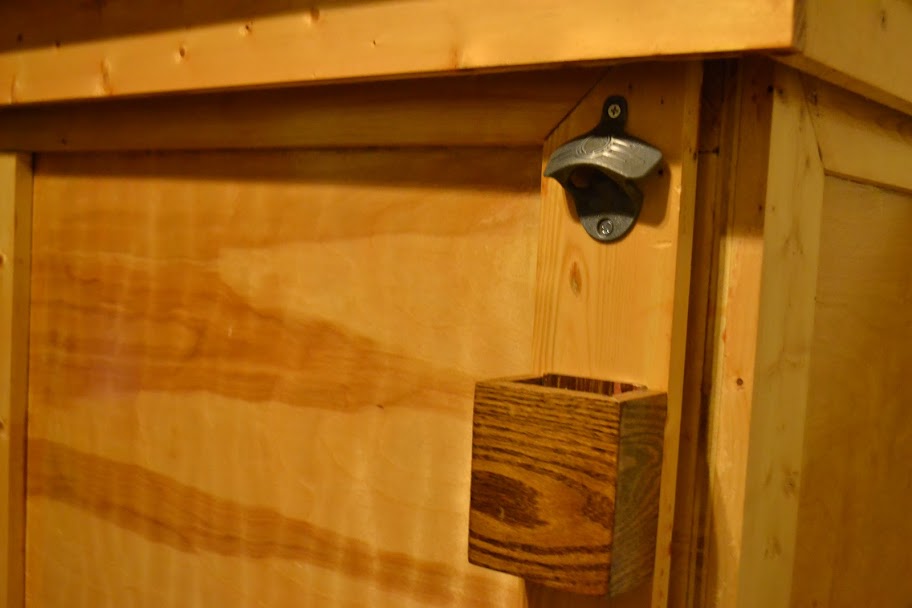
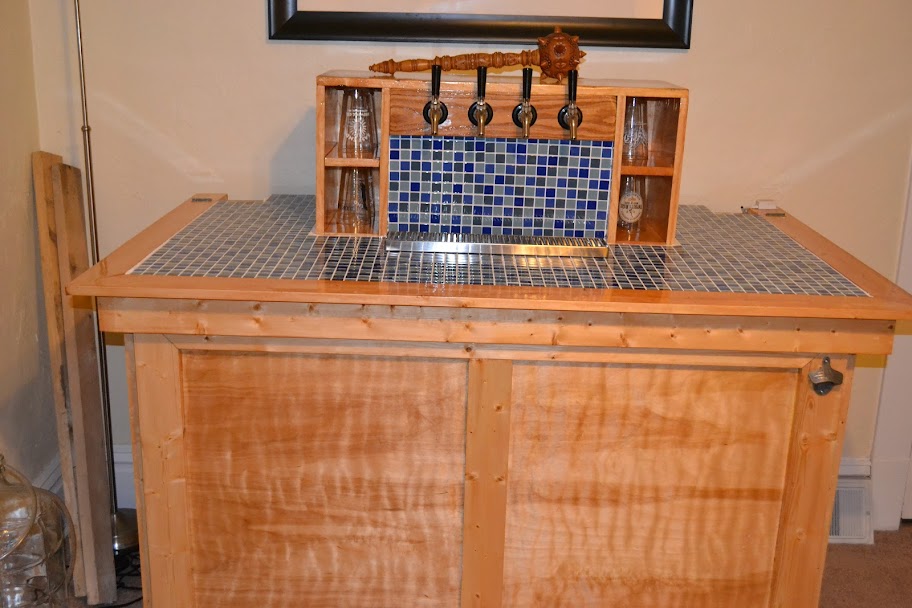
EDIT: I started planning out this build back in the beginning of April and really only started the woodwork back in mid October. I just finished early in the day on this past New Year's Eve. Here is the most recent picture of the keezer -

DSC_0028.JPG


ORIGINAL POST:

So I figured I would start my own Kegerator / Keezer Build thread. I remember grumbling after bottling my first few batches but always thinking "It's never gonna be worth the money to get all of the kegging equipment and another fridge to store them". I have been homebrewing since March 2010, so a little over a year and have bottled 12 batches and now my opinion has changed completely - I won't mind bottling the occasional batch, but kegging seems to be much less work.

As it stands I don't have the $1000 - from my estimations what it costs to build a nice keezer with a new chest freezer, nice taps, good workworking and nice finishing (tiles on the top and backsplash and the like) - just sitting around. I also don't have the patience to wait until I save up the $1000 to buy the materials and build the thing to start kegging. I do however have an extra fridge - two months after we bought our house, we bought a brand new fridge and kept the old one as a beverage fridge - which is more or less what it is now, though we do store some food in it. So I decided to split this into three phases.

Phase 1 - 2 kegs and a CO2 tank with picnic taps in the beverage fridge. Nothing too fancy, just enough to have two batches on tap. gonna get the dual body regulator so that I can have one conditioning and one tapped at the same time.
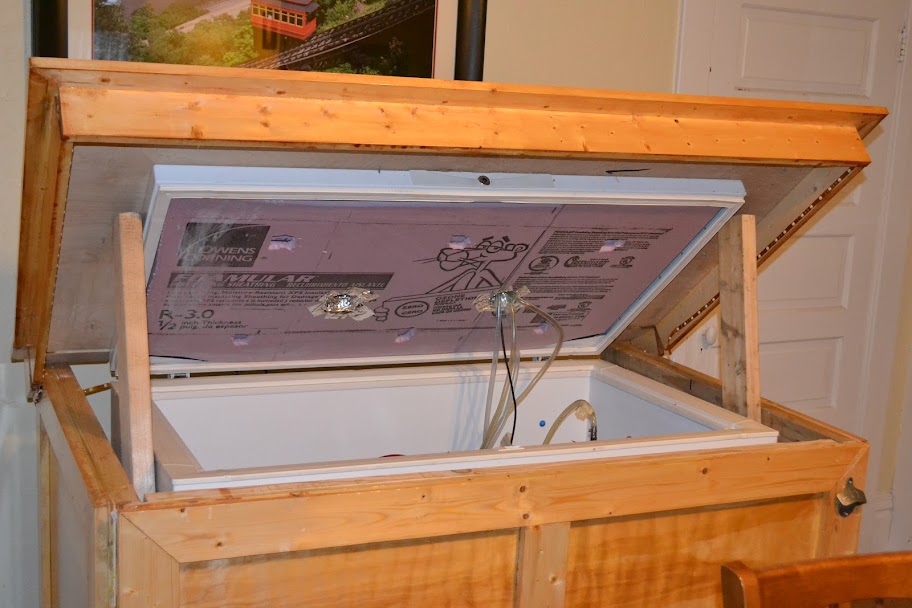
Phase 2 - 4 Kegs (2 for conditioning, 2 with picnic taps) in the temp-controller modified chest freezer with wooden frame / lid Complete (not yet trimmed / stained), no holes for taps in freezer or lid, and obviously no real taps yet.
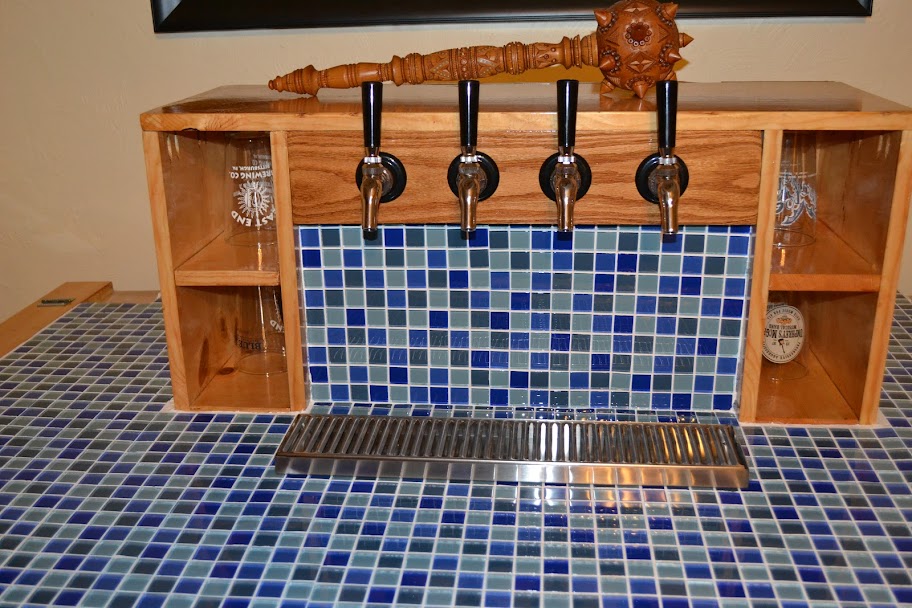
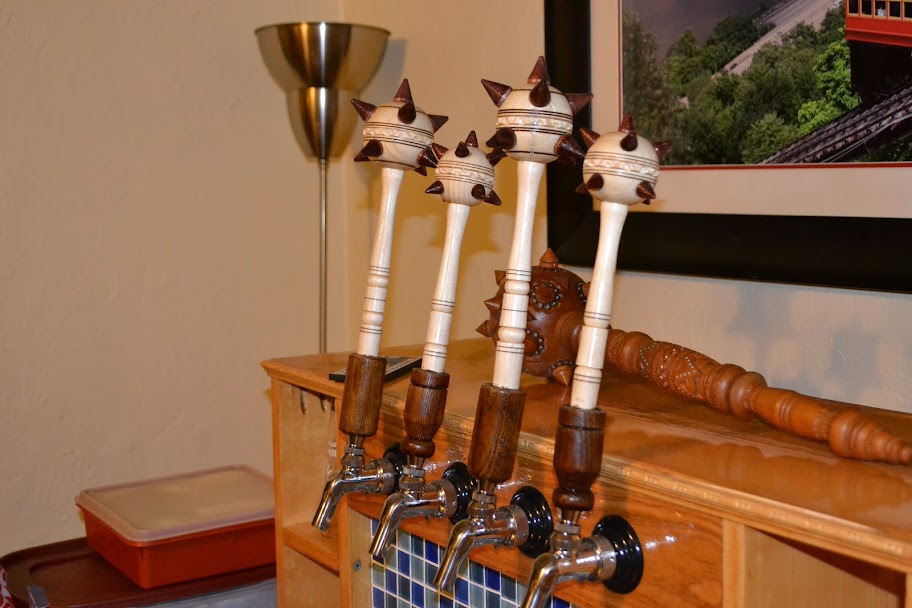
Phase 3 - See Phase 2 but add the coffin and three taps (perlick 575s), whatever fan setup i need for the coffin, lights, finishing for the lid / bar area. Ideally there would be 3 kegs tapped and one conditioning

I am able to save a little bit of money because my father-in-law gave me two old corny kegs. Other than that I need to buy everything on the list below, broken up by phases.

Phase 1 (~ $300)
Brew Logic Dual Tap Draft System (no CO2 Tank) - $159.95 - Brew Logic Dual Tap Draft System
^ This would take care of the two extra kegs that I need, the dual body regulator, the picnic taps for serving at Phases 1 and 2, gas hookups for the first two kegs. I can't find a cheaper alternative to this with the individual pieces broken out or any better bundle deals, and have heard good things from people about these. I opted to exclude the CO2 Tank from this because I wanted to go with a 20 lb tank, which leads me to.
Reconditioned 20 lb. CO2 tank - $84.95 - Reconditioned 20 lb. CO2 tank- Empty
Again the best price that I could find right now. In fact I can get both of the above for $245 and around $294 shipped

Phase 2 (~ $475 plus whatever shipping, also dependant on chest freezer cost)
3 Way CO2 Distributor $30 - 40 (I have seen prices in this range on a few different sites)
Chest Freezer - I am willing to spend up to $250, but preferably as low as I get one, at least 8.8 cu feet - 4 kegs and a 20 lb tank without modifications are the minimum - I don't want to bother with putting a collar on this.
2 Kegs - already have them, but for other's purposes, you can get them for around $40 a pop
wood and Hardware for Frame and Lid - Again nothing fancy yet, just probably pine 2x4s and maybe plywood for the frame and lid; this is before any of the trim on the lid or corners and any staining, any suggestions on types of wood or is using pine / softwood for the base is ok are welcome - $50 estimated
Casters - Still need to do pricing research on these, any suggestions are welcome. - $10 each estimated
Temperature Controller - I need to do a bit more comparative research into this - I have read almost every Keezer build thread that I could find over the last two months so everything kind of mixes together. But I *think* I am gonna go with a Love Controller that then powers the freezer. Or maybe I'll go with something like this - ETC Supply since I don't know a whole lot about wiring myself. Again suggestions welcome. - $80 estimated
Gas Hookups for 2 Kegs - $8 each

Phase 3 ($250 for faucets + stain / trim / finishing stuff)
Shanks, Faucets and all beer line for 3 taps - My best guesstimate for now is faucet-shank-tailpiece-beerline-liquid QD for each would be $80
Fan solution - TBD
Wood for Coffin - TBD
Insulation Solution for Coffin - TBD
"Cool Looking Lights" Solution - TBD
Stain for Frame / Trim / Lid - TBD
Tile / Mosaic / other type of Finishing for Lid and Backsplash - TBD
 
Now for some newbie kegging questions -

1) How much clearance can I expect from the top of the gauges on a dual body regulator on top of a 20 lb tank? I read somewhere that tanks of that size are 27.5" - I have about 29" and some change to work with from the top of my crisper drawers to the top of the fridge compartment.

2) What would be the best way to reinforce the shelf on top of the crisper drawers to sustain weight? I have put one full carboy on top of the drawers before but I was a bit wary of putting two full 5 gallon kegs on this and it holding up.

3) Really noob question - once I carb a keg, its OK to disconnect the gas line from the keg if I needed to, right? It will still hold the pressure in it as long as the keg is in good condition, correct?

I'm sure I'll have more interesting questions as time goes on. Thanks for the time :)

1. You can install the regulator at an angle to get clearance. It makes it hard to read, but will fit.

2. A precisely cut 4x4 works (i.e. scrap wood)

3. Yes, once carbed, it will stay carbed.
 
3) Really noob question - once I carb a keg, its OK to disconnect the gas line from the keg if I needed to, right? It will still hold the pressure in it as long as the keg is in good condition, correct?

You will have to reattach the gas from time to time in order to maintain serving pressure.
 
Thanks for the responses guys.

Now for an electrical question - I have noticed a lot of builds where people wire a box with one outlet powering the temp controller and another outlet that is powering fan/lights. Has anyone used a heavy duty surge protector / power strip instead?
 
Thanks for the responses guys.

Now for an electrical question - I have noticed a lot of builds where people wire a box with one outlet powering the temp controller and another outlet that is powering fan/lights. Has anyone used a heavy duty surge protector / power strip instead?

I built a temp controller from this thread. I had thought about using a power strip directly wired to it and couldn't find one at a decent price that fit my dimensional requirements.

For a keezer build though, I'm not sure why you would need more than 1 or 2 outlets (1 for the fan, 1 for the condenser). If you want to get fancy with lights and blender outlets and such, I'd probably wire up 2 project boxes. 1 box would have all the outlets I want to run with an always hot lead, ground lead and common lead going to the second box. I'd then run these into a dedicated project box for the temp control stuff. Good luck in either case. :tank:

Thanks. That aquarium temp controller thread is interesting.

I have no electrical experience whatsoever, but have friends that do that could check my "work" before I shock myself, burn the house down - or as we would say in Pittsburgh - burn the haaas dahn. Is there a beginner's guide out there for wiring a project box that anyone could point me to?
 
I just picked up http://stores.kegconnection.com/Detail.bok?no=324 with a 10lb tank upgrade - $280. The MidWest Brew Logic Dual Tap Draft System was out of stock, and the KC one ended up being cheaper with shipping by $20 I also decided to go with the 10lb tank rather than the 20lb due to height restrictions in my fridge and a little bit more flexibility with the chest freezer that I end up buying.
 
I just picked up http://stores.kegconnection.com/Detail.bok?no=324 with a 10lb tank upgrade - $280. The MidWest Brew Logic Dual Tap Draft System was out of stock, and the KC one ended up being cheaper with shipping by $20 I also decided to go with the 10lb tank rather than the 20lb due to height restrictions in my fridge and a little bit more flexibility with the chest freezer that I end up buying.

While I wouldn't call that a great price, it's not bad. At Beverage Factory, it looks to be around the same price but with chrome faucets. I called them when I ordered mine with Perlicks and 2 draft towers (with a 5# tank) and got it for $370 shipped. The nice thing with yours is that the kegs come reconditioned with new seals.
 
While I wouldn't call that a great price, it's not bad. At Beverage Factory, it looks to be around the same price but with chrome faucets. I called them when I ordered mine with Perlicks and 2 draft towers (with a 5# tank) and got it for $370 shipped. The nice thing with yours is that the kegs come reconditioned with new seals.

I probably would have done something closer to what you did, but I just found out about some home repairs that need taken care of, so the 2 kegs with picnic taps is gonna have to be good enough for me for the next 6 months or so. Looking forward to kegging all the same!
 
Long time, no update... So I have changed my plans a bit. I managed to get a 15 cubic foot chest freezer at a yard sale for $50 a few months ago. I then refined my original 3 step plan into two steps:

Phase 1 - Four Kegs (two w/ Picnic Taps) in Chest Freezer with 3 Way Gas Manifold, Temperature Control Wiring Done and Wooden Frame / Lid Complete (not yet trimmed/stained), no Coffin & Real Taps yet
Phase 2 - Add Wooden Frame / Lid, Coffin, 4 Taps

I'll post my entire parts / price list when the project is done. For now, here are some pics:

Cleaning out my four kegs. Two of them I got as part of a kit from KegConnection, the other two my father-in-law was given back in the 70s (unused), and since gave them to me (yes they hold pressure!)

4830-7-10-2011-cleaning-out-my-kegs-before-kegging-my-first-batch.jpg


The inside of the freezer in my current ghetto "I only have picnic taps" phase. I left the freezer basket in there for now as a way to suspend the temp probe away from the wall (Once this is all done, I will probably place the probe in a jar of water or something). This photo is actually a bit old, right now I have 4 kegs, tank and 2 carboys and room to spare. I could probably fit more kegs in there but I don't foresee needing more than 4 taps.

4831-7-10-2011-inside-keezer-i-only-have-picnic-taps-phase.jpg


The temperature controller box build that my father-in-law helped me with. This was done almost exactly how https://www.homebrewtalk.com/f51/another-tss2-controller-box-build-195713/ describes. Once I get the coffin built I may take this apart and incorporate the controller into the coffin sidewall.

4834-7-17-2011-love-temperature-controller-box-http-www-homebrewtalk-com-f51-another-tss2-controller-box-build-195713.jpg


Now for some "construction" - A few pics of the base for the keezer. I borrowed the design for the base from https://www.homebrewtalk.com/f35/knotty-pine-cedar-log-keezer-build-223902/#post2627257

4832-7-17-2011-wooden-base-keezer.jpg


4833-7-17-2011-wooden-base-casters-attached.jpg


4835-7-17-2011-keezer-wheels.jpg


I currently have two kegs filled, and two carboys / two empty kegs waiting for the 3 way manifold (so that I can run four kegs off of the dual body regulator) and other gas hardware to arrive from KegConnection this weekend.

I hope to get the rest of the woodwork for the skirt / lid / coffin planned out, built and stained in the next month or so. It would be sooner but September is a busy month, anniversary, kayaking trips, etc. AND we still have to install a privacy fence.... Ugh priorities :p Then hopefully I can order the taps (Perlick 575), get them installed and decide on and install some sort of tile / lidtop option in enough time for our annual NYE party!
 
I just ordered my faucets today. I decided to go with the Perlick 525 SS as most of what I read about the 575 SS said that the creamer option is not worth the extra $ and could be recreated easily by partially opening the tap.

I got 4 taps and SS 4.25" shanks for $210.51 shipped. The lowest price that I found was $30.49 for the 525, $19.89 for the shank (with tailpiece assembly). I did a lot of price comparison research and I don't want to favor any vendors in an open forum, but if anyone is interested in the results (best prices on 525, 575, beer hose, MFL liquid disconnects, swivel nuts, etc.) of my findings, send me a PM (bearing in mind that prices change all the time, since I started looking at prices a few weeks ago, at least 4 vendors raised their prices on faucets)

Still deciding on what I want to do for the paneling and coffin... I need to find an idea and stick with it.
 
Quick update - I bought all of the lumber necessary for my build about a month ago. I then proceeded to leave my CC in the HD parking lot :p I got a new card (and more importantly the money to pay it off), bought some tools (including a half decent table saw). I spent last weekend cutting all of the lumber (2x4 for the frame, birch ply for the panels, pine for the trim and coffin box, and red oak for the tap board) to the specs I had been staring at and constantly reassessing, for months. Saturday I busted out all of the straight cuts. I didn't quite trust myself enough to accurately and (more importantly) safely make miter cuts with the table saw, so I borrowed a miter box that my dad had laying around and on Sunday did all of the miter cuts for the trim by hand - it probably took a lot more time and work, but I still have all 10 fingers :p

I also picked up a pocket hole jig. I plan to use it for the joints on the coffin box at least, and maybe some of the joints for the lid overhang. All that remains now is putting it all together, sanding & finishing, tiling of some sort. I am hoping to have this done well before NYE.

I am going away for the holiday weekend, so I probably won't make much progress until next weekend. In the meantime I am gonna start looking at fans for coffin box air circulation, lights, and drip trays. I also need to decide on whether I want to do a PVC constructed chase inside of the coffin box or just stuff insulation to create a chase. The downside of the PVC would be the need to create a back access hatch in the PVC to get to the shank tailpieces. That and its probably more expensive than just buying insulation.

Oh well, I guess it is time to look through everyone else's builds again.
 
Quick update - I managed to get all of the sanding and most of the gluing done. I picked up a random orbital sander a few weeks ago, and went through the lesson-learning experience of sanding all of the wood I plan on staining. I also purchased some decent 24" clamps and borrowed some others from my dad, so I have been able to assemble the cabinets and lid in the last few days. Upon trying to put my coffin box + shelves together, I realize that some of my measurements were off by a bit, not to mention some of cuts not being straight. So I had to recut some of the wood for that and will need to resand it as well.

All I should have left to do is:

1) Sand replacement wood for coffin box.
2) Fill in imprecise miter joints and finishing nail holes with wood filler.
3) Sand away any excess wood glue / wood filler.
4) Assemble the coffin box, minus the backsplash and tap board.
5) Pre-stain wood conditioner, stain (light since I'm dealing with pine and birch mostly), and then poly.
6) Assemble the three sides of the cabinet.
7) Attach the lid to the freezer lid with bolts and t nuts and another piece of plywood beneath the lid. I will probably attach the 3 way CO2 distributor to this so its out of the way.
8) Drill holes for air circulation / beer lines through lid and freezer.
9) Attach fan within and lights around the coffin box. Cut foam board insulation to fit within the coffin box and create a path for the air.
10) Clean out freezer, sanitize beer lines and get all plumbing taken care of, drill the holes for but do not attach the faucets
11) Tile the lid and backsplash.
12) Attach backsplash and tap board to coffin box.
13) Attach faucets, connect beer lines.
14) Attach any corner trim to the cabinet / coffin box where necessary.

Hopefully I can do this all by New Year's Eve :)

I will post pictures of this in progress soon.
 
Finally here are some pictures of my progress:

Here is the lumber that I used for the cabinet panels. The frames are 2x4s joined with angle brackets and the panels themselves are 1/2" birch plywood. I only made panels for 3 sides, as I am leaving the back open (as most folks do). The plywood will be sanded (100, 150, 220) and then screwed to the frames with woodscrews. The frames are 3" "shorter" (on the bottom) than the plywood to allow the bottom of the frames to sit on the base. The middle panel is 3" "narrower" than the ply to allow the side panel's 2x4s to butt up against it. (this will be more evident later). I hope to fill the remaining gap with some sort of corner moulding.

5933-img-0175.jpg


Here is the lumber for the lid and panel trim, and the overhang for the lid. This is 1"x4" pine and will be glued onto the plywood.

5934-img-0176.jpg


Because I was a little nervous about making precise miter cuts on a table saw I used this old miter box that my dad let me borrow, it actually worked out perfectly.

5935-img-0178.jpg


I learned very quickly that one can never have too many clamps. The 24" clamps were key for gluing the coffin box.

5936-img-0180.jpg


This is the assembled (but not to each other) cabinet panels with 2 coats of Minwax PolyShades on them. I put two coats of Minwax Fast-Drying Polyurethane on them after this.

5937-img-0182.jpg


Here is the lid, unstained sitting in the eventual long-term home of the keezer with the glass mosaic tile on it.

5938-img-0184.jpg


I used some of the scrap wood from the red oak that I used for the tap board to make risers to elevate the tap board from the backsplash and to provide a spot for the led lights to go - they will run under the lower support as to backlight the tile backsplash.

5939-img-0185.jpg


Here are the panels sitting on top of the frame. They are propped up with chairs as they are not yet attached to one another. In retrospect I should have done something like Jester (https://www.homebrewtalk.com/f51/keezer-project-31221/index5.html#post704882) or Lilrascal (https://www.homebrewtalk.com/f51/my-keezer-build-176752/#post2046778) did as these panels - 1x4s on top of 1/2 ply on top of 2x4s - are ludicrously heavy, but I wanted to make it so the cabinet could be removed and that each piece could be worked on independently before joining them together. Oh well.

5940-img-0186.jpg


Next up to stain will be the trim and overhang for the lid...

5941-img-0187.jpg


... and the coffin box with the shelves (they should fit 3 pint glasses on each, so 12 total). The coffin box is 1"x12" pine, other than the back cover and backsplash - which are 1/2" birch ply - and the tap board (not pictured), which is red oak.

5942-img-0188.jpg
 
Almost done!

The day after Christmas I got started on what I thought would be a day of staining... Detatching the lid from the freezer and attaching it to the wooden lid took much more time than I expected though. Here is the lid with 5/16" tee nuts sunk in from the top.

5988-img-0210.jpg


The freezer lid with the holes for the tee nuts drilled through. I used another piece of 1/2" plywood to go under the freezer lid, so that this plywood and the plywood on the wooden lid make a "freezer shell sandwich".

5989-img-0211.jpg


Here is the freezer with the lid removed and cleaned out. I definitely remembered the bit about sticking a nail or long screw through the hinge before removing them or else I would have had some busted fingers for sure. After 5 months of moderate use serving from four kegs with picnic taps, the inside was quite a mess, so this took a while.

5990-img-0212.jpg


Once I got the hex bolts ran up through the lid and nested into the tee nuts, I flipped the lid over, traced out the interior of the coffin, and drilled the two holes for beer lines, temp probe and ait circulation. The fan will go in the left hole, the beer lines and temp probe in the right hole. I should have drilled these holes BEFORE I bolted the freezer lid to the wooden lid. The bi metal hole saw that I used would have probably had an easier time just going through one layer at a time, or even just the metal and then using a jigsaw for the wooden layers.

5991-img-0213.jpg


Later that day I figured that I wasn't gonna get any staining done, so I went ahead and assembled the cabinet pieces together with some scrap wood at the corners. They aren't the strongest joints, but as the cabinet will be resting on the base, they don't need to be. I may strengthen them later or leave them as is, in case I want to move the keezer to a different location in the house. Though I foolishly assembled the cabinet in a different room than where it ended up, thankfully it was only a room away.

5993-img-0215.jpg


Here is the keezer in its long term spot without the lid.

5994-img-0216.jpg


A friend of mine helped me get the keg of Yuengling up and into the freezer. The cornies were half-full so I was able to get them myself. Because I didn't want the kegs getting warm, and the wooden lid was still being finished, I used the inner plastic shell from the freezer lid to keep some of the cold air in.

5995-img-0217.jpg


Here is the lid and coffin box immediately after the final coat of polyurethane was applied. Given a tight deadline (we're hosting a New Year's Eve party on Saturday night), I kept a pretty hectic schedule - coat of stain Tuesday night, then again Wednesday morning, left work early to put the first coat of poly on Wednesday evening, another coat later that night, and then the final coat Thursday morning, with all of the necessary steel wool, fine grit sanding and wiping with tack cloth between each coat. And somehow I managed to get my son to daycare / me to work on time and not tick my wife off. Phew!

5996-img-0218.jpg


So the "insulation" that came in the freezer lid was this nasty fiberglass nonsense (half of it had got wet and stunk horribly), so I pitched that and cleaned the excess out from the interior of the freezer lid. I then used 2 sheets of 1/2" Foamular (with holes cut for the hex bolts and the air circulation holes) and Loctite PL300 and the heaviest books that I could find to get it bonded to the plywood inside of the freezer lid.

5997-img-0219.jpg


Here is a view of the interior of the coffin box with the beer lines (3/16" ID) attached to the shanks (1/4" tailpieces). I tried doing this by just holding the beer tubing under hot water from the tap and all that I got to show for it was a bunch of scrapes on my knuckles. Sticking the ends of the beer tubing into a pot of boiling water for 30 seconds allowed them to slide right onto the tailpieces though.

5998-img-0220.jpg
 
Here is the keezer in its final spot.

5999-img-0221.jpg


Still to do:

Short-term (before tomorrow night):

1) Attach fan to interior of coffin box.
2) Drill hole into the back of the coffin box for temp probe / LED lights to go in and fan power to go out.
3) Attach LED strip around lid and behind coffin box.
4) Cut foam board insulation to fit within the coffin box and create a path for the air. I am not going to tape / glue this to the interior, I'll just put it into place so that it is easily movable.
5) Fashion a prop for the lid. Without the coffin box on the lid wouldn't stay open by itself (but it wasn't falling backwards thankfully). Hopefully I won't need a safety strap until after the tile has been put on.
6) Reattach gas setup with freshly filled 10 lb CO2 tank. Attach beer and gas lines to kegs. Attach the faucets to the shanks.
7) Attach hinges and sash lock to coffin box door.
8) Attach coffin box to lid. Once secured, place the foam board insulation within.
9) Attach hinges to corner pieces on the back of the lid. I miscalculated the lid depth to only cover the front overhang and the freezer depth, not the depth of the base / cabinet, so without me removing these back corners, the lid would never open. Instead of removing them completely I thought it would be neat to have them on hinges.
10) Find a decent place to attach some accessories I acquired - a bottle opener and a really cool hanging sign.

Long-term:

1) Drip tray!
2) Place all of the tile on top of the lid. See if the lid is impossible to open. If so, come up with a better idea of something nice to put on the lid / backsplash, maybe decent hardwood flooring?
3) Decide on a better solution for corner trim for the cabinet. I had cut and stained some corner moulding, but it just isn't gonna fit. Maybe I will get some logs with Hoppopotomus did for his keezer - https://www.homebrewtalk.com/f35/knotty-pine-cedar-log-keezer-build-223902/index2.html#post2649760
4) Find a decent looking way to display the temp controller. I am currently using a temperature controller box exactly like the one in https://www.homebrewtalk.com/f51/another-tss2-controller-box-build-195713/ which works great, but is lacking in aesthetics.
 
Not yet finished but fully operational!

So I spent more or less all of last Friday night and Saturday afternoon getting the last bits of the keezer running.

Here is a view of the interior of the coffin after the lines had been attached and the coffin had been secured to the lid using corner braces. I lightly hammered in finishing nails around the right hole so that the fan would slip onto them.

6057-img-0224.jpg


Notice the LED light strip going in on the right and coming back out on the left.

6058-img-0225.jpg


Here is a shot looking up at the LED lights mounted underneath the tap board from where the drip tray will eventually be.

6059-img-0228.jpg


The LED lights running around the inside of the overhang on the lid.

6060-img-0229.jpg


The back of the coffin with the hinges and sash lock for the access door installed.

6061-img-0230.jpg


The inside of the coffin box with some 1/2" Foamular taped to the inside walls. The path for the air is made when the rest of the insulation pressed up against this.

6062-img-0233.jpg


The rest of the foam insulation simply cut to fit, taped together in 1" blocks and placed inside the coffin.

6063-img-0234.jpg


The keezer fully operational in its permanent spot in the dining room. I got the LED lights from here - http://www.amazon.com/dp/B0040FJ27S/?tag=skimlinks_replacement-20 - Pretty decent setup for the money (its nice to be able to change the colors and the remote is cool)

6064-img-0235.jpg


We kicked 3 half-full cornies and an as-of-yet-undetermined amount of Yuengling at our annual New Year's Eve party... I shoulda known that folks would drink the homebrew first :p Oh well, that's why I put it there! Time to brew again!

6065-img-0237.jpg
 
Last edited by a moderator:
Nice work Jeebas! It's been a little while since I have been on HBT, so I'm trying to get back up to speed with member builds. Looks fantastic.........
Congrats! :mug:
 
I just put the cement backer board on the lid and backsplash last night. I forgot how musty / gross mortar smells... Though I am proud to report that no mortar wound up on the carpet. Gonna scrape the excess and clean the backer board and lay out tile tonight. Then maybe hit up Lowe's or Home Depot (depending on which I still have a gift card for) tomorrow and get some more tiling supplies (gloves, spacers, a smaller trowel). Probably won't get to the tiling until next weekend as the wife is out of town this weekend and trying to do glass tiling with my 3 year old son running around is probably not the wisest idea :p
 
I just put the cement backer board on the lid and backsplash last night. I forgot how musty / gross mortar smells... Though I am proud to report that no mortar wound up on the carpet. Gonna scrape the excess and clean the backer board and lay out tile tonight. Then maybe hit up Lowe's or Home Depot (depending on which I still have a gift card for) tomorrow and get some more tiling supplies (gloves, spacers, a smaller trowel). Probably won't get to the tiling until next weekend as the wife is out of town this weekend and trying to do glass tiling with my 3 year old son running around is probably not the wisest idea :p

Very Nice! As you may find out, excess mortar is easier to scrape and clean before it cures!:cross: Are you using thinset or mastic to adhere the tile to the cement board? Mastic is a little bit easier to work with and it comes pre-mixed, but you can't use it below the water line. In this case, I think you'd be fine with it instead of having to mix thinset. If you're using translucent glass tile make sure you use a mortar that's white and that there are no air bubbles behind the tiles. I can't wait to see the finished product! :ban:
 
Very Nice! As you may find out, excess mortar is easier to scrape and clean before it cures!:cross: Are you using thinset or mastic to adhere the tile to the cement board? Mastic is a little bit easier to work with and it comes pre-mixed, but you can't use it below the water line. In this case, I think you'd be fine with it instead of having to mix thinset. If you're using translucent glass tile make sure you use a mortar that's white and that there are no air bubbles behind the tiles. I can't wait to see the finished product! :ban:

I'm using this thinset - http://www.homedepot.com/h_d1/N-5yc...splay?langId=-1&storeId=10051&catalogId=10053
and this grout - http://www.homedepot.com/h_d1/N-5yc...splay?langId=-1&storeId=10051&catalogId=10053

The tile is opaque at the bottom of each tile, so I don't think I need to worry about the air bubbles, but I'm gonna be patient with it, and try to get it as close to perfect as I can. We tiled our addition (Bobby - its that room off the side of the deck of my house) December 2010 (I don't know why I have this insane need to do projects in December and time-crunch to have them done before New Year's Eve) and that was definitely a humbling experience when it comes to tiling but it taught me a lot about dealing with mortar and grout.

The lights are a nice touch, looks really good.

Thanks! I can't wait to see them with the glass tile.
 
The tile is opaque at the bottom of each tile, so I don't think I need to worry about the air bubbles, but I'm gonna be patient with it, and try to get it as close to perfect as I can. We tiled our addition (Bobby - its that room off the side of the deck of my house) December 2010 (I don't know why I have this insane need to do projects in December and time-crunch to have them done before New Year's Eve) and that was definitely a humbling experience when it comes to tiling but it taught me a lot about dealing with mortar and grout.

Cool man, that should work out pretty well. Good luck with it and give me a call if you have any questions!
 
I got the tiling finished a few weeks ago but I haven't had any time to take pictures until now.

Here's one of my intricate support system - Two 4 foot 2x4s

DSC_0006.JPG


The keezer is tiled, grouted and sealed. This process was a lot easier than I thought it was going to be AND I managed to not spill any cement / grout on the carpet!

DSC_0028.JPG


DSC_0029.JPG


The picture that's hanging behind the keezer is a photo that my wife took from the Duquesne Incline on Mt. Washington here in Pittsburgh the first time that I took her there. When were living in Northern VA, she got this blown up and framed for my birthday.

DSC_0030.JPG


Having the keezer in the dining room is great, we didn't really have anything in the space that it now occupies and it doesn't really get in the way as much as I thought. It beats the heck out of having to put on my shoes and go out to the addition to get a beer.

DSC_0035.JPG


Unfortunately when I was closing up the keezer after getting a fresh keg hooked up, the lid closed funny and the excess lighting strip between the left side of the lid and coffin got caught and snapped. So the lights still work just fine under the lid, but the ones under the tap board are out. I ordered one of those LEd light strip connectors to fix it, and it worked OK after some playing around with it, but I really didn't have enough slack to get this to go where I wanted it, so I will probably be ordering some more LED light strip to make up the difference or maybe wire another length straight from the controller box. Minor issue.

Beyond that, next steps for this include:

1) Fashioning a custom bottle cap catcher out of the spare red oak I have from the tap board.
2) Fashioning a custom controller box some more spare red oak with the outlets in the back and the Love controller mounted in the front.
3) Figuring out what to do with the corners between the front cabinet and the side cabinets. I like what Hoppopotomus and ishcor2000 did on theirs but I dunno that I have the skills to fashion those on my own and don't know where to get them commercially.

... There are always improvements to be made!

Thanks for all the help and advice everyone!
 
Nice mace. I think my level 40 dwarf left it on your keezer the other day while drinking them Skull Crushers you have on tap.

On a serious note nice build. When's the party? my level 45 mage would like to sample some of your finer vintages.
 
Looks great Jeebas....nice work! As far as trimming out the front vertical corners....are you talking about using logs like I did? My suggestion is that unless you have a rustic cabin type decor. in your home, which it doesn't appear that you do, I would just trim it out with a nice moulding. Log corners may be a little over the top if it's not in a rustic type room. You can find nice decorative pine trim at HD with beveled edges in various widths with different patterns to clean up the exposed edge of the side cabinet panel. I have attached a link to my of my thread....scroll down and you can see some horizontal trim pieces that I used to trim out the coffin. Mine have a leaf pattern to go with my rustic, cabin decor, but you could use any style that you would like. Really simple....just cut it to size, apply a thin bead of wood glue, finish nail vertically in place and put a coat of poly (or whatever finish you used) over it. You could also incorporate it into your coffin as well if you wanted to add a little more flare.

https://www.homebrewtalk.com/f35/knotty-pine-cedar-log-keezer-build-223902/index26.html

Great job! :mug:
 
Nice mace. I think my level 40 dwarf left it on your keezer the other day while drinking them Skull Crushers you have on tap.

On a serious note nice build. When's the party? my level 45 mage would like to sample some of your finer vintages.

Thanks!

The mace is a bulava - a Ukrainian hetman's ceremonial mace.
 
Looks great Jeebas....nice work! As far as trimming out the front vertical corners....are you talking about using logs like I did? My suggestion is that unless you have a rustic cabin type decor. in your home, which it doesn't appear that you do, I would just trim it out with a nice moulding. Log corners may be a little over the top if it's not in a rustic type room. You can find nice decorative pine trim at HD with beveled edges in various widths with different patterns to clean up the exposed edge of the side cabinet panel. I have attached a link to my of my thread....scroll down and you can see some horizontal trim pieces that I used to trim out the coffin. Mine have a leaf pattern to go with my rustic, cabin decor, but you could use any style that you would like. Really simple....just cut it to size, apply a thin bead of wood glue, finish nail vertically in place and put a coat of poly (or whatever finish you used) over it. You could also incorporate it into your coffin as well if you wanted to add a little more flare.

https://www.homebrewtalk.com/f35/knotty-pine-cedar-log-keezer-build-223902/index26.html

Great job! :mug:

Thanks! I had purchased some trim and molding from HD - http://www.homedepot.com/h_d1/N-5yc...splay?langId=-1&storeId=10051&catalogId=10053 (and actually stained and poly'd it as well) but it turned out to be too narrow to fit the gap. So I had thought about putting this - http://www.homedepot.com/h_d1/N-5yc...splay?langId=-1&storeId=10051&catalogId=10053 - over the gaps left from the external corner trim but something still didn't look good. Maybe I was just in a rush the last few hours before my NYE party. I'll have to take another look at it. I am eventually planning on adding a bit more style to the coffin as well. Projects upon projects... And a new baby due in about a week...

You're right about the log trim - it probably wouldn't work with the rest of the decor.

Thanks for the info!
 
How are hinges handling the weight of the top with tile etc? I am looking at doing a coffin keezer and see some people have had issues with extra weight.

All suggestions/tips for doing top are welcome.
 
How are hinges handling the weight of the top with tile etc? I am looking at doing a coffin keezer and see some people have had issues with extra weight.

All suggestions/tips for doing top are welcome.

I hadn't noticed specifically noticed any issues but then again I hadn't specifically looked either. I can tell you that the lid is very very heavy, even before the tile. I'll take a look tonight.
 
I have 1 1/2" of plywood, and I'll have tile. Im scared to even think about lifting it, I see me lifting it, and the entire top falling on the floor.
 
I have 1 1/2" of plywood, and I'll have tile. Im scared to even think about lifting it, I see me lifting it, and the entire top falling on the floor.

Well I have 1/2" plywood and the plywood is trimmed in 1x4 pine, not to mention the 1x4" overhangs beneath the trim and the 33" x 11" x 14" coffin box (much larger than I needed for the four taps, but I wanted glass storage). Also, beneath the freezer lid I have layer of plywood so the bolts that rest in the tnuts have somewhere to screw into. A smaller coffin, smaller thickness of plywood and thinner trim, not to mention a smaller surface area (i.e. using a smaller capacity chest freezer) would have saved me some weight on the lid.

If you notice in the picture below I only really open it up when its just a little out from the wall. That way its never gonna fall completely open. If you prop it like this it has the weight of the lid distributed onto the 2x4s which are wedged into the wheel base, so short of someone bumping into the keezer and/or purposely karate-chopping the supports the lid should stay open like that.

DSC_0006.JPG


You can save on the weight by also using glass tile (its MUCH lighter than stone or ceramic tile)
 
Well here is my parts list for my keezer in case anyone was interested.

As you can see I came in around $1500 and that was even with getting the freezer for $50 and getting two kegs for free from my father-in-law. Also not counting the table saw, orbital sander and various other tools (~$500) that I bought, but I have those tools to use again now.

If I were to do it again, I would use thinner plywood for the panels (1/4" instead of 1/2") and not used 2x4s to back them (I woulda just done the 1x4 trim and attached the plywood from the back). People have done keezers for much less, but this was really my first woodworking DIY project so I may have overspent in some places. No regrets though!

Phase 1 - Four Kegs (two w/ Picnic Taps) in Chest Freezer with 3 Way Gas Manifold, Temperature Control Wiring Done and Wooden Frame / Lid Complete (not yet trimmed/stained), no Coffin & Real Taps yet

Phase 1 Total: $542.23

Phase 2 - Add Wooden Frame / Lid, Coffin, 4 Taps


Phase 2 Total: $963.92
Grand Total: $1,506.15
 
Last edited by a moderator:

Latest posts

Back
Top