5 or 10 gallon mash tun?

Homebrew Talk - Beer, Wine, Mead, & Cider Brewing Discussion Forum

Help Support Homebrew Talk - Beer, Wine, Mead, & Cider Brewing Discussion Forum:

This site may earn a commission from merchant affiliate links, including eBay, Amazon, and others.
Thanks for all the support and suggestions and I certainly didn't intend to start an argument between people.

More a debate than an argument. I like reading about the benefits of things that I'm not using. Sometimes I'll find a compelling reason and make a switch.

I wish that I knew what I know now before I started acquiring equipment. I've bought a lot of stuff that just sits idle. (my 5 gallon cooler isn't in that category, but my 15 gallon is :) )

There have been times when I wished that my 5 gallon cooler was a little bigger. But I get by. One time I mashed at 1 qt per pound of grain and batch sparged twice to get wort volume where I wanted it. The beer turned out fantastic.

I ran across a new Rubbermaid 10 gallon round cooler on sale. It was cheap. I passed. I even have a false bottom for a 10 gallon cooler already. I have no regrets sticking with the 5.

I generally make 5 gallon batches. But I'm more apt to downsize to a 3 gallon than upside to a 10. I like variety. I like to tweak recipes to see if it makes a difference. I have a friend who only makes 3 recipes. For him 10 gallon batches -- and a bigger MLT -- makes sense.

Get as much info as possible. Make a decision. Go with it and don't look back. You'll never find perfect equipment, but you can always improve a process and make it closer to perfect.
 
There's batch sparge, fly sparge, and no sparge - don't know of any "regular" sparge. But put simply:

No sparging is just that - you use more grains countering for the loss of sugars by not sparging

Batch sparging - after draining off your first runnings you add sparge water (dependent on how many sparges you plan to do meaning 1, 2, 3, etc). So let's say we do a double batch sparge like I do currently: I drain the first runnings then add the first batch sparge water, say for this example 2 gallons of sparge water, stir it up, let it sit for 5 minutes or so, then vorlauf which is to clear your running of particulate matter, then drain into the kettle that has your first runnings. After all the liquid is drained you add the second addition of sparge water, stir, wait 5 minutes or so, then vorlauf and drain again into your kettle. At the end you have your full preboil volume.

Fly sparging - you use another vessel (typically called a hot liquor tank) that contains your hot sparge water. From that vessel, usually elevated over the mash tun so it can gravity drain, you slowly trickle the water evenly over the grain bed to rinse the grains. This typically takes a longer amount of time as it's a slower flow. As that is going on you are also slowly draining the mash tun into the boil kettle as you want to be sure with this method that you keep about 1/2" or so of water consistently over the top of the grain bed. You basically don't want the grain bed going dry or draining faster than the addition of sparge water. You vorlauf as well with fly sparging but if I recall it's a one time thing since afterward the sparge is a constant flow.

That's a rough description so if I missed anything or messed up any info cut me some slack ;)


Rev.

That helps TONS! Thank you for clarifying that. I'll probably start with batch sparging, then maybe attempt fly later down the road after I get comfortable with all grain.

Save yourself some $$ and skip the false bottom - then put that money towards the 10 gallon cooler. You can make a manifold out of CPVC pipe for less than 5 bucks. Search for the directions on HBT.

I just finished some searching and making your own manifold sounds like a great idea! I might even go the copper route if I feel ambititous enough.

Go with the bigger cooler.

I started out with a 7 gal and ended up moving up to a 10 after changing to 7 gal batches.

Unless you're dead set on a round cooler, rectangular ones can be had a lot cheaper. Igloo's ice cube is a great cooler for the money. I see these 48 qts for $30 at Academy all the time

417ms064qvL._SL500_AA300_.jpg

Rectangular coolers do appear to be MUCH cheaper and then I can make my own manifold! How are coleman coolers or is there any brand or model that seems to perform better than another?

Thanks again!
 
Rectangular coolers do appear to be MUCH cheaper and then I can make my own manifold! How are coleman coolers or is there any brand or model that seems to perform better than another?

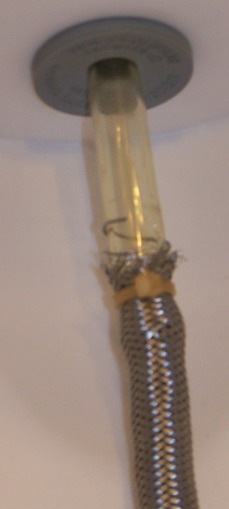
I've tried several different MLT setups. I've used SS braid and made manifolds from copper and pvc. The false bottom pictured below is the best setup I've used so far. It's also the most expensive. (surprise). But it works great and it won't ever wear out.

mltfittings.jpg


Everything is stainless, except for the outside metal washer. The threaded nipple is what goes through the cooler wall.

The o-rings are high temp (and thicker than they appear in the image). The larger washers compess the o-rings. I didn't have to modify my cooler, other than remove the plastic valve that was in it. This setup seals tightly. I don't have a problem with leaks. (You don't need the outer o-ring, but I use one anyway).

I use a plastic 90 degree elbow (pictured) to feed wort from the MLT valve to the BK. I have a gravity setup.

Not all the inside plumbing is shown. I have a stainless coupler that fits into the the female union. That connects to a short piece of silicone tubing. The silicone tubing attaches to the false bottom (pictured in lower right). I have small stainless tube clamps at each end. The tube doesn't come off, even if I stir the mash really vigorously.

I like that I can just unscrew the hose clamp on the fitting next to the MLT wall and remove the false bottom very easily. It only takes a second. This makes cleanup a cinch. When I'm done mashing I carry the cooler to a compost pile. I pour out the grain. I take out the false bottom. I wash everything up.

Cleanup is a breeze. It's fast and it's easy to get any and all reside out of the tun. Any reside is going to grow stuff. Even though the tun is before the boil, I still don't like to give bacteria even a speck where they can grow. I can quickly and easily get to every spot and clean it with just a rinse.

Another thing I like is that I don't get a lot of wasted wort with this system. Everything drains, and it drains fairly quickly. I've never had a stuck mash, at least not with this setup. I've had stuck mashes with other setups. I don't want to go through another one.

I don't have to vorlauf much. Usually a quart does it. After that the wort runs clean. First running or sparges, it's pretty much the same.

I use this same setup in my rectangular cooler, except that I use a round bazooka screen instead of the domed false bottom. I much prefer the false bottom. It might even work in my rectangular cooler. I just haven't tried it.

Lastly, if I ever do a mash that has a risk of getting stuck, I have a round nylon filter that I can put over the stainless dome bottom. The filter is the thing used on floor buffers. You can buy them at most hardware stores. They're a couple of bucks. I used one once. It was so hard to clean that I didn't use it again. If I make a beer with lots of rye or wheat, it's there if I need it. Again, I never want another stuck mash.

This isn't anything unique. I know a lot of people have the same setup. It works well for me.
 
I just finished some searching and making your own manifold sounds like a great idea! I might even go the copper route if I feel ambititous enough.

I use a copper manifold and I am VERY happy with it. I always get comments from other brewers how well it works. I have not had a stuck sparge since I went to it, and it is really easy to clean.
 
I'm on the cheaper is better end of the spectrum--that way I can buy more ingredients. I have around $11 in my MLT setup. I bought a 40qt cooler at a yard sale for $1, $4 braid, $2 valve, $1 keg bung, $3 worth of tubing.

Get around 75-80% efficiency and have never had a stuck sparge--even with 50% wheat and no rice hulls. I wrapped a piece of stainless welding wire around a pencil to form a spring and stuck it in the braid to help the braid hold its shape, then zip-tied everything together. I think the build may have taken ~ 1 hour.

braid2.jpg

braid1.jpg

344.jpg
 
I don't know about your numbers, but with my 72% efficiency, I'm limited to 1.065 beers with my 5 gallon MLT. I have a purchased false bottom, with the traditional ball valve.
LOL. You go grrrrllll.

Look, none of us can predict the future. I am glad I got a 10 gal MLT 3 years ago {and returned the 5gal one}, for many reasons mentioned by others here. My personal experience: Just recently, I started brewing with a friend and we each want to get a keg fill after it is all said and done after brew day.
good luck
 
After searching online for a square cooler around the 40qt. range (Target, Walmart, Lowes, Home Depot, and Sears), I've discovered that no one has a decent cooler in stock. Target has a 48qt rolling coleman cooler, but I really don't know about that.

Bascially, I might be stuck using the 10 gallon round cooler. However, my LHBS sells a 10 gallon converted round cooler that includes a false bottom, valve, and some tubing for around $100. All Grain Equipment The other issue, this guy has been a complete d*ck to me and some of brew friends lately, so I'm trying to avoid giving him anymore business.

Are using brass valves and other misc. parts ok? My local lowes and HD do not sell stainless parts.

Thanks guys!
 
Are using brass valves and other misc. parts ok? My local lowes and HD do not sell stainless parts.

Yes, using brass is fine. The whole lead thing in brass is rather blown out of proportion, it's only small trace amounts and we're adults, not babies.

I'm certain you gotta be able to find a 10 gallon round Rubbermaid cooler somewhere online for quite cheap. Try Amazon, Ebay, Craigslist, the classifieds here, etc. I would skip the false bottom and get a bazooka screen (or a braid) like I mentioned earlier, they're like $17 or less. You'll need to crimp/fold the end as they are typically 12" long so you need to fold like an inch or so but that's super simple. I started my first AG batch with a false bottom and opened the spigot to zero flow. I later found that the false bottom doesn't sit completely flat and was slightly warped. Not sure if that was a one off problem or if many are a bit warped but I'd tend to think many are as it would be difficult to ensure they're all perfectly flat, or that the bottom of your cooler is for that matter. Since returning my false bottom and using the bazooka screen everything has been flawless for me.


Rev.
 
Stick to your guns and boycott crappy businesses. Brass fittings are great.

That's the plan and I'm going to start ordering my ingredients online too.

Yes, using brass is fine. The whole lead thing in brass is rather blown out of proportion, it's only small trace amounts and we're adults, not babies.

I'm certain you gotta be able to find a 10 gallon round Rubbermaid cooler somewhere online for quite cheap. Try Amazon, Ebay, Craigslist, the classifieds here, etc. I would skip the false bottom and get a bazooka screen (or a braid) like I mentioned earlier, they're like $17 or less. You'll need to crimp/fold the end as they are typically 12" long so you need to fold like an inch or so but that's super simple. I started my first AG batch with a false bottom and opened the spigot to zero flow. I later found that the false bottom doesn't sit completely flat and was slightly warped. Not sure if that was a one off problem or if many are a bit warped but I'd tend to think many are as it would be difficult to ensure they're all perfectly flat, or that the bottom of your cooler is for that matter. Since returning my false bottom and using the bazooka screen everything has been flawless for me.


Rev.

Thanks for the tip on the bazooka tube! I think I'm going to go that route; simple, cheap, and very effective. However, now I need help on what fittings, valves, washers, and gaskets I need. Will any of these https://www.homebrewtalk.com/f51/cheap-easy-10-gallon-rubbermaid-mlt-conversion-23008/ parts work using the bazooka tube?

Home Depot currently has a 10 gallon cooler in stock for around $40.
 
s2cmpugh said:
That's the plan and I'm going to start ordering my ingredients online too.

Thanks for the tip on the bazooka tube! I think I'm going to go that route; simple, cheap, and very effective. However, now I need help on what fittings, valves, washers, and gaskets I need. Will any of these https://www.homebrewtalk.com/f51/cheap-easy-10-gallon-rubbermaid-mlt-conversion-23008/ parts work using the bazooka tube?

Home Depot currently has a 10 gallon cooler in stock for around $40.

The build should be exactly the same. The bazooka screen should attach as easily as the SS braid.
 
My bazooka screen screwed right into the inside end of the 3/8" ball valve. The inside opening is a 1/2" fitting. By the way, just be careful when you are stirring to not stir cylindrically at the very bottom of the mash tun since you don't want to whack the rigid tube. I stir over it then I stir linearly back and forth on each side of the screen just to make sure everything is stirred up and the bottom. Since the screen is aligned with the ball valve it's a no brainer, easy to do.


Rev.
 
I have a 5 gallon and it treat me just fine I plan on building a 10 gallon and using the 5 for my HLT I can see it being really nice to have both

the best part about my 5 is when it is pre-heated the mash It holds its temp 100% for at least an hour due to no head space
 
The build should be exactly the same. The bazooka screen should attach as easily as the SS braid.

I started out with a SS braid. I clamped it on a short piece of vinyl tubing, which ran through a bung in the cooler wall. The tubing had a hose clamp as an on-off valve. That was my first and cheapest design. It served me for a time.

After the braid slipped off the tubing twice in 3 mashes I found a short piece of copper tube. I clamped the braid and vinyl tube onto that and ran it through the bung. It was an improvement. The braid still flailed around when I stirred the mash. I tried various things to hold it down. Some things worked better than others.

I finally bought a bazooka screen, ball valve and hardware to install it. That worked even better. I moved that into my rectangular cooler and put a domed false bottom in my round cooler. I like the false bottom best of all. The little elbow that goes through the FB nearly touches the bottom of the MT. Gets every drop of wort. Drains faster than anything else I used before it. Doesn't make any better beer, though. They all work. :)
 
One more voice in the crowd: I was researching the same thing a few months back. I was _convinced_ I had no interest in doing more thhan 6 gallon batch, and to be honest, I'm quite OK without going over the top with big beers all the time, so I had just about talked myself into the 5 gallon cooler.

I read just enough on HBT to give me a little doubt on my position, however, and I went with the 10 gallon instead.

Fast forward a few months and a handful of AG batches, and I've now got a pair of kegs (acquired legitimately!) to convert and I'm starting to wonder if the 10 gallon MLT is going to cut it long term! ;)

As for your fittings: I was also determined to do a fully DYI set up for my bulkhead, valve, and bazooka-style-screen. However, I couldn't find appropriately sized SS washers locally to save my life, and eventually broke down and bought them from the LHBS. Happily, I have a far more pleasant LHBS than it sounds like you've got, and I walked away with a nikel plated brass ball valve for about $15 and the bazooka screen for about $20, and a greatly reduced headache!
 
using all those parts EXCEPT the 3/8" FEMALE barb adpater. In its place will be the 1/2NPT bazooka tube that screws onto the inside part of the cooler/valve assembly to "sandwhich" everything together. Am I correct?

Yep, that's exactly how it goes ;) When you install it after crimping the end to fit in the MLT just make sure to hand tighten the bazooka screen - you don't need to go nuts and tighten the hell out of it and will only risk damaging the screen or the fitting that holds onto it.


Rev.
 
Perhaps it was already said, but Home Depot sells both 5G and 10G coolers, the difference in price being pretty negligible. I appreciate Revvy's comments immensely, and he's right... but if you're currently building your brew system, you will likely be more "set" going with the 10G first.

Or... consider get a 40+ quart rectangular cooler. That's what I went with a while ago, mainly because I had a clean one sitting around... and I still use it! You can get a good Igloo at Target for $20, or you can find any brand pretty cheap on Amazon. HERE IS A LINK to my cooler-mash tun build. I've since made a couple changes to the process (since I've built a few for friends)... let me know if you plan to go this route and I'll tell you what I now do differently.

Cheers!

Yeah I think I'm going to go the 10G route.

However, my problem now is figuring out how I'm going to connect the male end of my bazooka screen to the other fittings and valve. Ideas?
 
This is what I have:

Bronze Cooler Valve Kit w/ barb : Northern Brewer

The metal barrel at the back end that goes inside the cooler is female 1/2". Maybe just find out what that part is.


Rev.

So I just decided to purchase the bronze cooler valve kit instead. After picking up all the parts, no luck on finding the appropiate size s/s washers, and adding everything up, I decided to just purchase a "pre-made" kit. I did however pick up my 10 gallon mash tun!
 
So I just decided to purchase the bronze cooler valve kit instead. After picking up all the parts, no luck on finding the appropiate size s/s washers, and adding everything up, I decided to just purchase a "pre-made" kit. I did however pick up my 10 gallon mash tun!

Surprisingly, finding the right size SS washers can be tricky. I finally find them at my LHBS.
 
After picking up all the parts, no luck on finding the appropiate size s/s washers, and adding everything up, I decided to just purchase a "pre-made" kit.

This was exactly what I went through... Annoying as all get-out. Folks kept pointing me to online resources for those SS washers, but once you paid for them and for shipping, the DIY valve cost more than the "pre-made" one from my LHBS.
 
Surprisingly, finding the right size SS washers can be tricky. I finally find them at my LHBS.

Interestingly, Amazon sells huge lots of SS washers, in pretty much whatever size you want (mine have 1/2" holes for rectangular coolers), for a really great price! I think I paid about $10 for 30+ washers. Not bad.
 
This was exactly what I went through... Annoying as all get-out. Folks kept pointing me to online resources for those SS washers, but once you paid for them and for shipping, the DIY valve cost more than the "pre-made" one from my LHBS.

Bingo! I added up the cost of all the parts and even some washers from Fastenal (which had to be ordered along with shipping cost) only to find that the "pre-made" valve assembly from northern brewer was less, INCLUDING shipping! No brainer on that decision, and I'm certainly capable of waiting a few days on delivery.

Since I'm using 1/2" parts, I need washers that are about 7/8" and after running around town I discovered those are hard to find....very hard in fact.
 
So I just decided to purchase the bronze cooler valve kit instead. After picking up all the parts, no luck on finding the appropiate size s/s washers, and adding everything up, I decided to just purchase a "pre-made" kit. I did however pick up my 10 gallon mash tun!

Too bad I didn't catch you in time. I have that setup in all stainless and better gaskets for only $2 more.
 
Any tips on installing this in my 10 gallon round cooler? How tight does it need to be tightened down?

Which part are your referring to, the barrel or the mesh bazooka screen? If it's the metal inner tube it doesn't have to be too tight. I just used pliers and tightened the best I could. For the bazooka screen simply hand tighten it, don't go nuts because you can break it from the clamp that holds it onto the screw-in part.


Rev.
 
just went thru this same thing. I bought a 5 gallon but returned it & decided to go for a 10 gallon so I could brew some bigger beers. I figured it was better to spend a little more now then to have to buy a second larger one later. Now it's just a matter of Brass or SS???
 
Which part are your referring to, the barrel or the mesh bazooka screen? If it's the metal inner tube it doesn't have to be too tight. I just used pliers and tightened the best I could. For the bazooka screen simply hand tighten it, don't go nuts because you can break it from the clamp that holds it onto the screw-in part.


Rev.

Really just referring to the valve and bulkhead assembly. I kinda figured the bazooka screen would just need to be hand tight.
 
Which part are your referring to, the barrel or the mesh bazooka screen? If it's the metal inner tube it doesn't have to be too tight. I just used pliers and tightened the best I could. For the bazooka screen simply hand tighten it, don't go nuts because you can break it from the clamp that holds it onto the screw-in part.


Rev.

I put everything together tonight, but I have a slight leak. It drips about 1 drop every 20 seconds or so around the bulkhead. Is there a way to fix this? I've tightened things down as far as I feel comfortable, but should I go tighter?

And this is filling the cooler with 7 gallons of cold water.
 
Hmm, mine doesn't leak at all. I would make sure you have the O ring placed correctly and make sure the bolt that presses against it is facing the correct way - it has a round cutout on one side and is flat on the other. Also tighten till it's nice and snug but don't Mr.T it.


Rev.
 
Back
Top