DIY glycol chilled plastic conical fermenters

Homebrew Talk - Beer, Wine, Mead, & Cider Brewing Discussion Forum

Help Support Homebrew Talk - Beer, Wine, Mead, & Cider Brewing Discussion Forum:

This site may earn a commission from merchant affiliate links, including eBay, Amazon, and others.
Thanks.

I guess the AC control makes sense when you put it that way:compressor must be on or off. Hope that fan doesn't blow dust and crap all over the place... I don't think I could get the partial styrofoam fan shroud back onto it now.

I think that for me, installing the cooler fittings through the lid, that I will want to use the cam locks rather than direct plumb. How do you seal off the thermowell for the cooler? Thinking just some silicone caulking.

Seems like that lip, during a vigorous fermentation would permit krausen to rise about the lip, but below the lid, and would likely then be very difficult/impossible to clean. I think I'm going to try and trim away as much as possible.

I bought a can of the clear sealant spray when we were all discussing the air tightness and gaskets a while back. It's that stuff from the info-mercial where he sprays a screen door installed at the bottom of a boat then goes out into the lake with it. Not sure I'm going to use it or if it is food safe. Actually got it for a gutter leaking onto my pool deck, but thought it might help seal the lid insert.

TD


Sent from my iPad using Home Brew
 
I didn't seal the thermowell in the cooler. It is several inches above the liquid level and I drilled it so it fits pretty snugly. Silicone should work fine though.

I have yet to get my conicals to seal. I am using a 1/4" o-ring. The gasket someone posted earlier that fits around the edge of the lid seems like a good option, but I have not been able to justify spending $40 each for gaskets. I am kegging a beer tonight and will have the system available to start messing with the sealing. I am also trying to get wifi working on my controller so I can start sending data to the web.
 
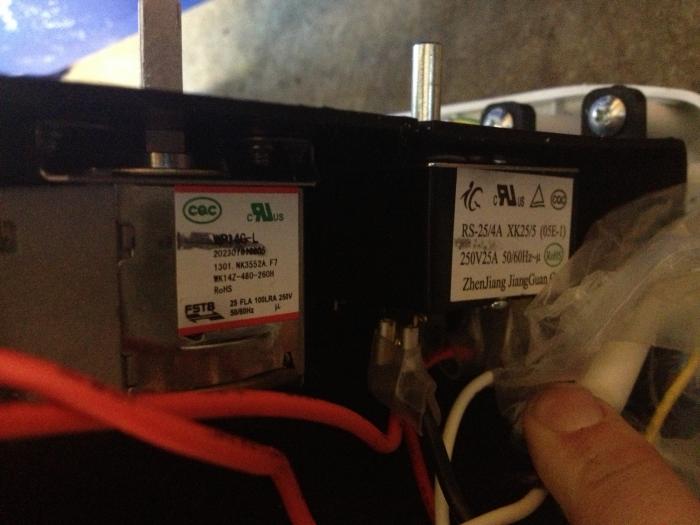
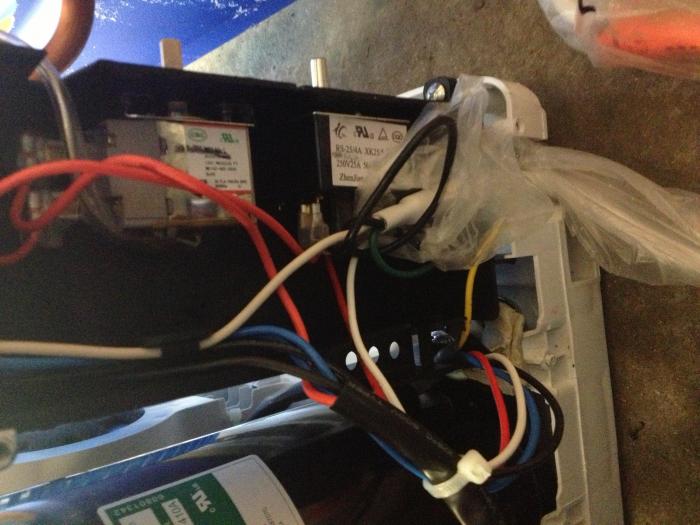
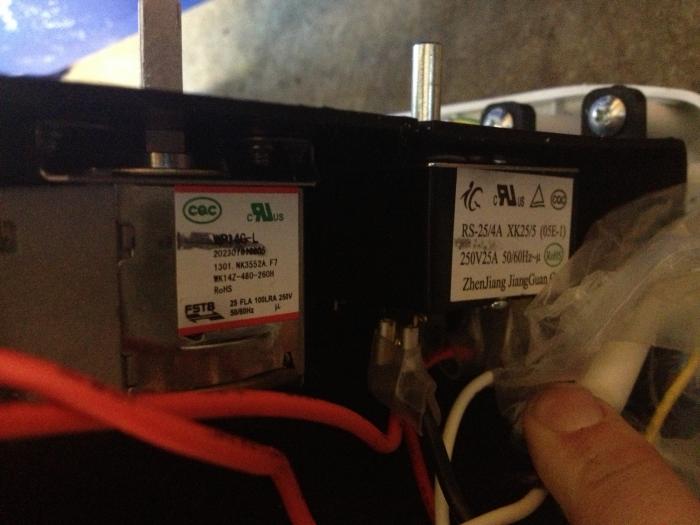
I'm not very good at reading electrical diagrams and I'm trying to rewire my AC units controls. Could someone help, I bought the same Frigidaire unit previous discussed in this thread.
 
Can you post pictures of your controls and the wiring inside? Generally, you just need to bypass the temperature control part. There will be power and neutral and ground connections into the controls from the plug, the power will be routed through the switch and the Power and neutral will go out of the box to the fan and the compressor. Grounds will connect to metal parts of the assembly like the compressor and coils.
 
Don't waste your time on the gasket. The type I bought did not work


Sent from my iPhone using Home Brew
 
Don't waste your time on the gasket. The type I bought did not work


Sent from my iPhone using Home Brew

was that the red one custom 18" from that gasket company (that I bought three of still in the bag)?

Gotta look up the return policy.

What was the issue with it?

I saw some folks doing a totally new lid with O-ring, and plexiglass top with screws to tighten against the O Ring.

Frankly, I would like an air tight seal so I can use it for lagering beer inside for 6-12 weeks if necessary, or even long term aging/conditioning.

TD
 
Tricky, it was that same gasket. At first I thought it was air tight, but after actually fermenting in it the smell of fermentation was so strong in my fermentation chamber while the blowoff hose was silent.


Sent from my iPhone using Home Brew
 
I bought a can of flex seal. Not sure if it'll help. It definitely the lid that's leaking though?? Is it the threads that leak on the insert and lid or is it leaking around the insert, or can't you tell? I'm wondering if you could try pressurizing the conical with a couple psi to see if you could see where tr leak is coming from. Packet has previously said he has no ill effect from air leak. I suppose that is all good since the original Pasteur flasks were not air tight either. I'd really feel better if I knew my tanks were air tight though since I'd planned to do lagering in them possibly after fermentation is done. I know a lot of yeast clings to sides and all but suppose could always transfer from one tank into another.

TD


Sent from my iPhone using Home Brew
 
The lid is in 2 pieces you have the ring that screws into the conical and the lid that screws into the ring. You would need to take the ring off and put a good bead of silicone under it then reinstall it. If you us a oring I would put a little keg lube on it to make sure the lid does not bind on the oring and stretch it when you screw the lid down. Alternately you could do what I did. I removed the lid and that ring that is screwed on and made 8 evenly spaced holes around the outside of the raised lip that that insert was screwed into. I put a ss bolt through each hole with an oring between the head of the bolt and the conical. I locked the bolt in place with a ss nut. I put some high density foam gasket material on the raised lip and made a new lid out of this HDPE sheet, attaching it with some wing nuts. I have done 6 batches with this so far and my airlock bubbles every time.
 
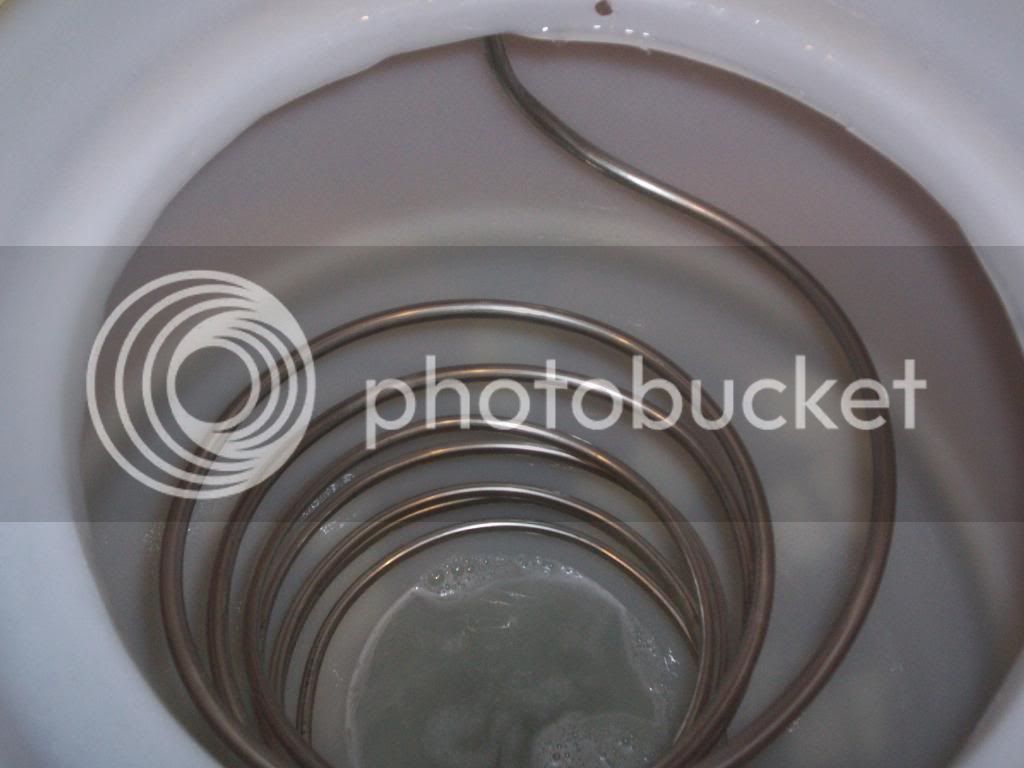
I can post a pic of my fermenter but I have something in it right now. Should be done in a week after I empty it I can take a pic with the lid off. I put the coils through the top of the conical near the edges. I used 3/8 stainless steel tubing for the coil and used 3/8" compression x 1/2" mpt adapters to seal where the coil passes through the conical. The plastic is thick enough that I was able to tap 1/2" threads to thread the adapters into. For the adapters all you have to do is run a 3/8" drill bit through them to remove the stops that keep the tubing from passing all the way through it.
 
Sort of guessing that the specs packet gave for the coils is going to be different from what you have there. Let me know please. Do you use the CIP ball? Can you remove the coils for cleaning?

Looks cool!

TD
 
I made the coil just small enough to squeeze through the opening then expanded it a little to reach the holes through the top once it was inside. I use a cip spray ball the 1/2" one from brewershardware it works good, no need so far to remove the coil. If needed though I can just remove the compression nuts and the orings that seal the nuts to remove the coil.
 
Chris, what did you cut the plastic sheet with? I think I am going that route. Beer was fine this time despite a non air tight seal, but I just don't always trust it. I don't need the glycol since I have a duel controlled roll in chamber in my garage


Sent from my iPhone using Home Brew
 
I'm about 12 batches in so far for my 3 conicals. I've only had the blow off tube have bubbles going through it once with some weizen yeast. But it was also blowing out the side of the cover where it meets it match on the top of the fermentor.

I don't think the lack of being air tight is really an issue unless you're putting more than 10-12 gallons in a 15 gal fermentor. If you've got some really active yeast, you'll have some mess to clean up at highest activity. But I think there's always a bit higher pressure of CO2 inside that takes care of things. I've left beer inside of them for up to four weeks now and haven't noticed and O2 or staling issues.

I do plan on going the secure lid route myself shortly doing one at a time. I like the designs I see here. I have one of those tri-clamp CO2 thingies I'd like to use to do closed keg transfer with. I'd also not like to have the repeat of the shmoo going all over the place with that one fermentation.

All in all, I love the system. Packet's design rocks. I can keep temps to within a half degree if I want. Really helping me to become a better brewer as I'm a bit of a noob.

Sorry I haven't posted more info here. I've been straight out work wise since I started putting the thing together but if anyone needs help, feel free to ping me with a message.
 
Chris, what did you cut the plastic sheet with? I think I am going that route. Beer was fine this time despite a non air tight seal, but I just don't always trust it. I don't need the glycol since I have a duel controlled roll in chamber in my garage


Sent from my iPhone using Home Brew

I used a band saw with a wood blade on it. It cut real easy you should be able to use a jigsaw on it if you dont have a band saw.
 
I'm about 12 batches in so far for my 3 conicals. I've only had the blow off tube have bubbles going through it once with some weizen yeast. But it was also blowing out the side of the cover where it meets it match on the top of the fermentor.

I don't think the lack of being air tight is really an issue unless you're putting more than 10-12 gallons in a 15 gal fermentor. If you've got some really active yeast, you'll have some mess to clean up at highest activity. But I think there's always a bit higher pressure of CO2 inside that takes care of things. I've left beer inside of them for up to four weeks now and haven't noticed and O2 or staling issues.

I do plan on going the secure lid route myself shortly doing one at a time. I like the designs I see here. I have one of those tri-clamp CO2 thingies I'd like to use to do closed keg transfer with. I'd also not like to have the repeat of the shmoo going all over the place with that one fermentation.

All in all, I love the system. Packet's design rocks. I can keep temps to within a half degree if I want. Really helping me to become a better brewer as I'm a bit of a noob.

Sorry I haven't posted more info here. I've been straight out work wise since I started putting the thing together but if anyone needs help, feel free to ping me with a message.

In the meantime, try using fermcap in your fermentations. It could save you a lot of cleanup.

TD
 
ImageUploadedByHome Brew1398386021.180855.jpgImageUploadedByHome Brew1398386031.371734.jpgImageUploadedByHome Brew1398386045.106930.jpg

Was brewing today and stumbled upon this idea. Those homer buckets aren't food grade though.

When the inner ring on the tanks slips around the bucket, it's a perfect fit near the collar area. Would probably be easy to seal there. Then could use a gamma lid on the bucket top. Plus the specified coil dims would also work with the gamma lid, which is an air-tight solution.

I cut the lip out of one conical today. Kinda worried it poses rough edges to promote colonization? Leaving it in I think is worse as could catch crud here that might not be cleaned by the CIP ball from previous krausen for instance. With the rim silicone sealed in place would not be easily able to clean without removal. A sawz-all works really well by the way. However, the gamma lid bucket idea might work best with a small remnant of the lip. I might try it out. Not sure yet.

Comments?

Pic one shows the collar for gamma lid in the untrimmed conical with lip the native collar has been removed. This seems a bit flimsy to me.

Also, sort of wondering how well hot glue gun might work for mating plastic pieces to each other? I mean we don't seem worried about fermenting in plastic so what the heck.

TD


Sent from my iPhone using Home Brew
 
Interesting idea. Would you screw the gamma collar on? Or is that where the hot glue comes in? With sticky o-rings, you may have to put a bit of force onto the collar when opening it, so if it is just glued, it might give out at some point.

I would be concerned with hot glue. I am not so concerned with fermenting with it in the conical since there is not much if any direct contact with the beer. I would worry whether it would hold up to cleans. You would need to find out what material it is and if it is compatible. Keep in mind that the conical is NSF, so it doesn't have lots of nasty chemicals that will leach out over time that some plastics do.

I think the Gamma Lid Collar needs a bucket to snap onto. The bucket would need to be cut and tapers at the base but appears to fit well into the Conical lid collar. The seal would need to be friction and silicone. This would indeed be a fragile point subject to stress. If you left the handle on the bucket, I suppose you could use that for leverage to prevent from spinning while placing the gamma lid on/off, but it would look pretty stupid.I'm wondering if you could seal the bucket on the inside with silicone, and the outside with hot glue.

Anyways, I siliconed one conical today and will see if it it air tight for me. Any way to test with conducting an actual fermentation?

Seems I have a few more things to order as I realized I forgot to buy/order a few odds and ends along the way.

Have the stand and chiller done, and the conical bases done plus 1 lid. Control panel about 95% done, just need to connect the wires for the probe receptacles on the box. Couldn't cut the dip tubes without a better tubing cutter that I'll need to order.

Question about fitting the coils through the lid. How do you get them into the compression fittings which are slightly angled through the lid? Also need to trim them down as the ends are too tall. How long should they be? Also the coils are rather tight. Should I stretch them out a bit?

TD
 
The coils are a bit tricky and you will need some trial and error. I have some spring type tubing benders that I used to get the right angle on the coil ends. You will need to do this as the angle is too much to just torque them over into the compression fittings. I think it is also important if you want to have any hope for an airtight fit, otherwise, the orings will not seal. The coil is tight and I did not do anything about it. It cools fine, but I wouldn't mind some separation between coils for cleaning. As far as the length of the ends, what I did is set them so they sit as low in the conical without touching the temperature probe well as possible. I think I have about an inch of clearance or so. The thought was that if I have a smaller batch, I would still have some of the coil submerged. Sounds like you are getting close. Good luck.
 
Thanks.

Those spring benders are the one that slip over the tube to let you bend by hand? I have some of those. Seems like I should take my time with this step. I really want an airtight fit so I can lager in them.

I'm saving the plumbing until last. I bought a 2x6 to mount the PEX tubing to using the plastic standoff mounts. These would've been impossible to glue or affix directly to the aluminum without significant expense or frustration. I want to mount all the lines below the surface of the stand so it's just the cam lock fittings and tubing adapters showing above. That has proven to be the trickiest part in figuring how to do it. I have the right sized grommets for the deck. Had to buy additional PEX fittings. I think I'll probably bolt to board below to some of the legs for easy removal and pre plumb all that I can before bolting in place. That's going to take a while to do right.

I hope that I can finish it next weekend.


Sent from my iPhone using Home Brew
 
It is a little tough to see, but I think that all you need to do is bypass the unit on the left by connecting the two red wires together that are plugged into it. This is the thermostat and you will not need it since the temperature controller will take care of cycling the AC on and off. Is it just the two red wires plugged into it?

The switch on the right controls the mode. I left it on my system and set it to High AC. It is nice to have if you want to manually shut off the AC for some reason and if you leave it in it will minimize the rewiring you need to do. If you really don't want to rewire anything, you can try setting the thermostat to it's lowest setting so it will stay on. This may not work if the temperature outside of the conicals is lower than the lowest setting on the AC unit (probably 55-60F), so it is better to bypass it. Hope this helps.
 
Thanks.

I ended up trying to find an adapter for a ball lock gas post to 1/2" mpt. I ended up giving up the search and settled on a $6 part from mcmaster. 1/4" flare to 1/"2 mpt. Agree that it's not too helpful to have a pressure gauge when you already know the pressure from the regulator. This part though will let me hook up a gas line using a flare nut like I use for my beer gun, to a CO2 source.

I wonder if the gasket material used on the blichman conical and hop rocket can be used in this application, minus the compression ring.

Anybody know where they get these?

TD


Sent from my iPad using Home Brew
 
Also,

the dip tubes. I had to buy a new cutter. my old one didn't work.
http://www.amazon.com/gp/product/B001P81OK6/?tag=skimlinks_replacement-20
this one works like a charm.

As far as sizing the dip tubes. it is hard to tell. in general, what is considered ideal? It seems you would probably want the dip tube centered over the bottom drain in the center of the conical. in order to do this, you'll need to trim the short side of the dip tube.

Are the dip tubes intended to rotate? It seems this may depend on how tight your weldless bulkhead has been tightened. If they are supposed to be fixed, then how far above the bottom of the conical drain are they ideally positioned?

Also on the weldless bulkheads. It is obvious where the large O-rings go. Where do the small O-rings go, and do they include an extra because there are two per fitting.

thanks!

TD
 
Last edited by a moderator:
Diptubes: Ideally, you should be able to spin them so you can get above the yeast level, but this type is not set up to do that. You will end up loosening one of the bulkhead nuts. I cut mine so it could spin without hitting the thermowell that is across from it. I then set it so the opening is facing down. As long as you dump the yeast before transferring, this works well and you can drain the most beer from the conical. I can't remember exactly, but I think the small o-ring goes inside the compression fitting on the tube. If you can't figure it out, let me know and I can look at my system.
 
Waiting for a fitting from mcmaster to come, then I'll pressure test my first conical with about 2-3 psi and some 50:50 dish soap and water to see if there are any air leaks. I really am considering the plexiglass option. This would allow several benefits it seems: definite seal. Visibility into tank, could fit a keg lid into the top if you wanted, Blichmann style, for dry hopping or other additions without removing the lid. Could utilize pressure relief valve from keg similar to Blichmann (wonder if they sell those lids by themselves).

Will wait and see about my seal first.

TD


Sent from my iPad using Home Brew


Will get a pic with the lid off when I empty it.


Don't forgot to post the pic. Would also like to see now you mounted this with all those wing nuts, and remain air tight. On the inside of the O ring? How did you get a seal on the coolant lines through the tank?

TD


Sent from my iPad using Home Brew
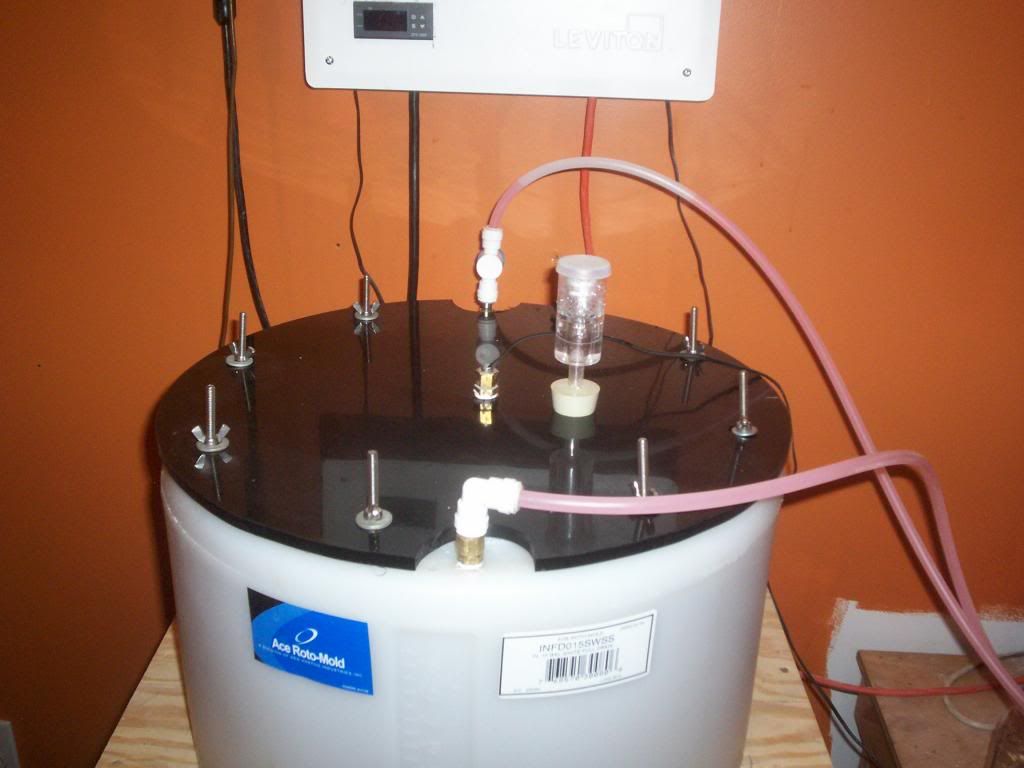
 
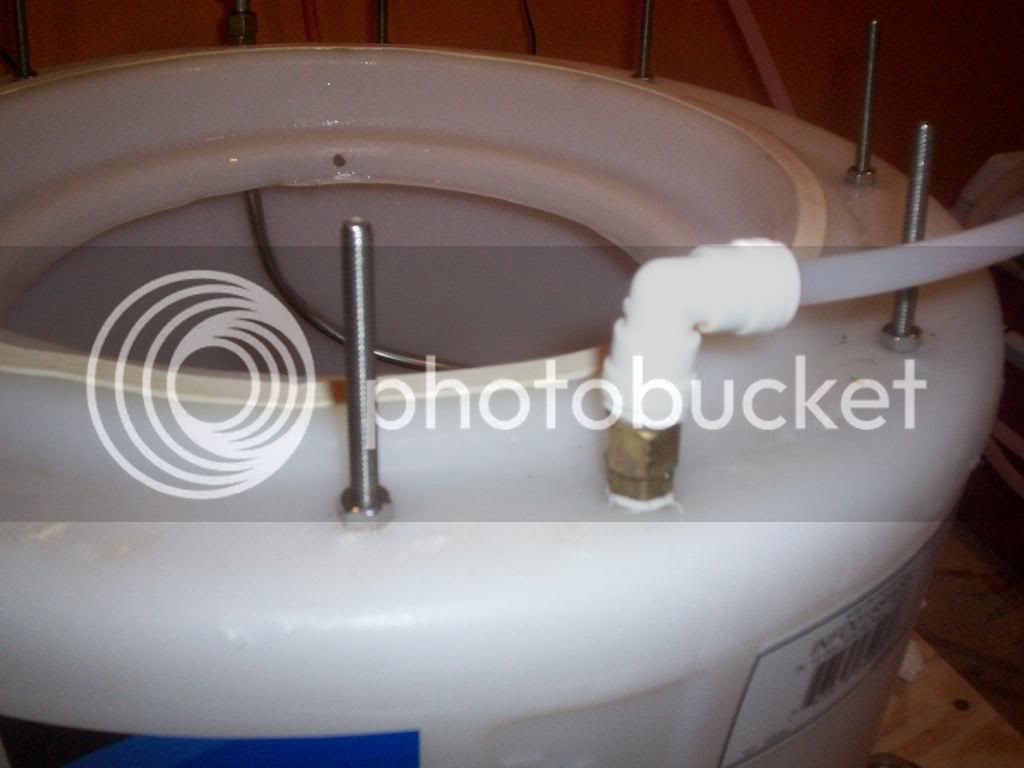
The airtight seal is made with foam rubber weather stripping that is stuck to the top of the conical around the raised part that the threaded insert was screwed into. I will be emptying it this weekend so I will get a pic with the top off after I clean it. The airtight seal for the coil is made with 2 of these. You need to take a 3/8 drill bit and run it through them to clear out the stop inside that keeps the 3/8 tubing from passing all the way through. I put the coil inside the tank and passed the 2 ends through the compression fittings from the inside. I put 2 orings around the tubing between the fitting and the nut replacing the feral to make the airtight seal. Its hard to see in that pic with the john guest fittings on the tubing. Eventually I am going to get some quick disconnects as those john guest fittings can be finicky if you take the tubing out of them to many times.
 
I wasn't able to muscle the SS tubing into the compression fittings and I am now the proud owner of $100 tubing bender.

I have one conical all put together except for the dip tube, which I botched and had to buy another. I'll practice with the one I botched to get it just right then cut the others to match.

I am awaiting a CO2 tank refill so as to pressure test the first one under air pressure. For gaskets, I have the red manway gaskets, that someone said didn't work. What was the O ring originally spec'ed out by packet? I never did find that. I'm kind thinking that its going to be the plexiglass option for me. I really wanted to build this so I could make lagers, and lager them in the plastic without interrupting my ale fermentation fridge, which I suppose could do double duty as a lagering chamber now however. Maybe I will just use as is and not worry about the lack of air tightness. I would be upset if there was no airlock activity though.

Anyways, I cut the SS stems from the coils so they were even and so that the coils hang into the coniclal at the right depth. Waiting on the CO2 refill, and the tubing bender.

By the way, the fitting I used for the air tightness check is a 1/4" Male Flare to 1/2" MPT made of brass. This goes into a SS coupling, and the other side fitted with a TC fitting and this goes onto the blow-off TC atop the lid. It was a $6 part from McMaster.

TD
 
Finally got a chance to empty it. Here are a few pics with the lid off.


I put an oring under the head of each ss machine screw.
 
Back
Top