Weldless brew stand.

Homebrew Talk - Beer, Wine, Mead, & Cider Brewing Discussion Forum

Help Support Homebrew Talk - Beer, Wine, Mead, & Cider Brewing Discussion Forum:

This site may earn a commission from merchant affiliate links, including eBay, Amazon, and others.
So my steel came today from McMaster Carr... I paid about $160 with tax and shipping. Looking forward to starting my build over my holiday vacation! I think Santa is bringing me 3 banjo burners and a package from bargainfittings.com... I have been stockpiling materials for the past few months... hope to be up and running by newyears day!

HAPPY HOLIDAYS!
 
I just got my cam locks and casters in today. Now all I have to do is pick up a abrasive disk for the miter saw and some black iron pipe to hard plumb all my burners. I am going to support the burners with the iron pipe, rather than running a beam below the burner.
 
Got my brew rig started today. Went to fire up the miter saw and got nothing. Had to cut everything by hand with a angle grinder. Everything turned out ok, it just took a lot longer than anticipated to get everything cut. Got the main body finished, bolted on the casters, and got the cross beams for the keggles installed. Tomorrow I will finish up bracing for the main body and installing pump mounts. I will update with pictures when i can.
 
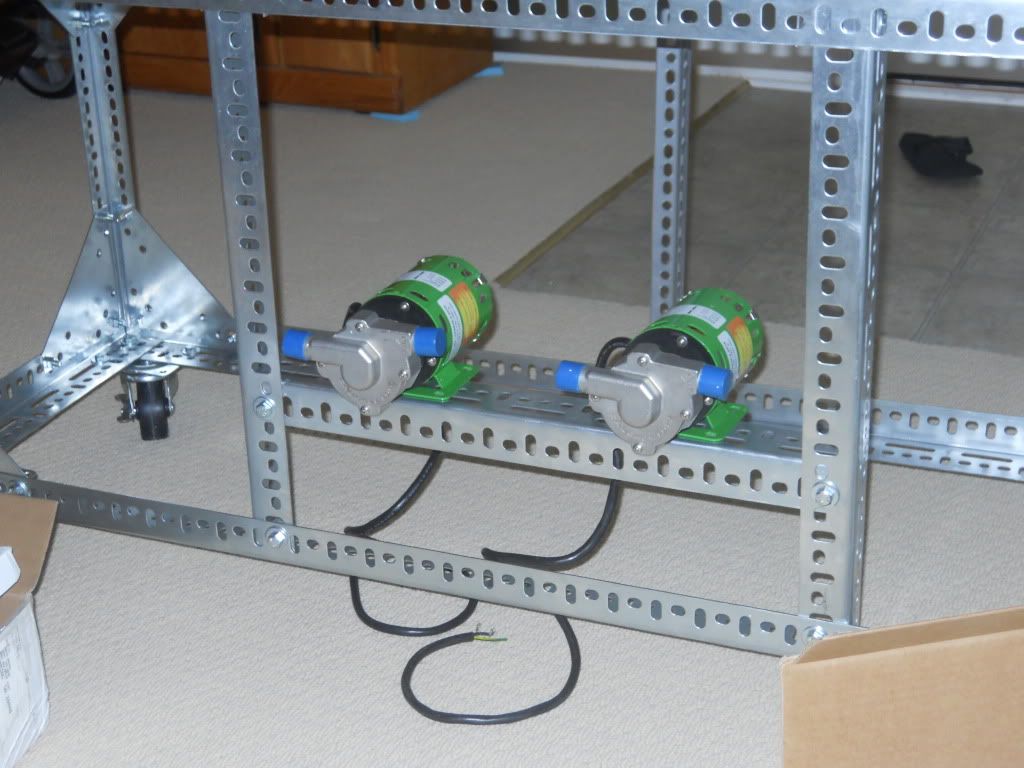
Looks great! What was the total cost (minus pumps) if you don't mind me asking...
 
Finally got the pictures uploaded onto the new laptop. Here's the progress so far, still gotta hard plumb the gas lines.
DSCN0390.jpg

Nice way to mount the pumps. I'm going to add this modification to mine.
 
Thanks Bender, I had an extra 6' length of the 2-1/4" x 1-1/2" angle so I moved the single frame support to the back side of the frame and cut it into three 21" lengths. Come to think of it, I still have to fabricate the pump shroud. I did see a stop sign the some kids in the neighborhood pulled down last week. I wonder if its still there.
 
I wonder how hot the stand gets around the burner? I remember from welding class that fumes from galvanized steel are -really- bad for you. A quick google tells me that at 900F you start to run in to trouble, which is well below welding temperature... not sure what a banjo would do to it :)
 
From what i have read, i thought the fumes burned off after the first heating and after that you didn't have to worry. I planned on doing a test run with water to burn off the galvanized coating and test all the weldless fittings.
 
From what i have read, i thought the fumes burned off after the first heating and after that you didn't have to worry. I planned on doing a test run with water to burn off the galvanized coating and test all the weldless fittings.

Not sure, but sounds reasonable to a non-engineer.
 
going to get started on building this stand soon, what did those of you who have built it already used to cut the steel. I don't have access to many power tools would a hacksaw work or would my arm be ready to fall off after the first cut. What would be the prefered tools for the job, maybe I can rent them for a day or try to borrow from friends/family. thanks in advance.
 
going to get started on building this stand soon, what did those of you who have built it already used to cut the steel. I don't have access to many power tools would a hacksaw work or would my arm be ready to fall off after the first cut. What would be the prefered tools for the job, maybe I can rent them for a day or try to borrow from friends/family. thanks in advance.

IMO, the tool of choice would be a cut-off saw with a metal cutting abrasive disc installed.

Harbor Freight sells some for cheap: http://www.harborfreight.com/power-tools/cutoff-saws.html

You will get much more precise cuts using this type of saw rather than a hack saw or a hand held offset grinder with a metal cutting disc. When fabricating/welding metal, it's important that the members are true and square with a close fit. This makes the welding much easier and improves the structural integrity. You don't want to be making the cuts by hand with a hacksaw. Trust me on this.
 
IMO, the tool of choice would be a cut-off saw with a metal cutting abrasive disc installed.

+1 - I planned on using a miter saw with an abrasive blade but it crapped out on me. I got pretty good results with an angle grinder. After I made the initial cuts with the angle grinder I stacked the pieces together and clamped them to the workbench with a c-clamp and trimmed up any parts that were a little off.
 
I just joined this forum today looking for ideas for a brew stand and ran across this posting. This stand rocks...I was in HD yesterday and thought of this very thing. I just went through all 10 pages and got all my questions answered, except I was wondering what type of pump is used.

Inspired,
BrewRick
 
The pumps with the green motor casings are chugger pumps. They will run you around $100 bucks. I got two from Chuggerpumps.com and it cost 11 bucks in shipping from New Jersey to Atlanta. The pumps with black motor casings are March 809's and run anywhere from $115 - $145 depending on where you get them. Pretty much the only difference between the two is that the chugger has a stainless steel head.
 
Thanks. How do the 6" burners work? I noticed the original post had burners that looked to be about twice the size...probably more than twice the costs too.
 
I have not had a chance to hard plumb my burners in yet. The bigger burners in the earlier posts are 30 bucks from agrisupply.com and the 6 inch burners are 10 bucks. It puts out 70k btu's so figure it'll be enought to boil a 10 gallon batch without any problems.
 
The burners in the picture look very similar to the Bayou Classic KAB4's I have and will be mounting on my weldless stand (this weekend?!?). They'll run you about $80 on Amazon and put out 200,000+ BTUs. They'll heat 10 gal in no time flat :) Not sure how well they'll do running two off of one propane tank though. I will likely start by running them separately...
 
got my shipment from McMasters today! Any one have any advice on tools to use for the job, having a hard time tracking down a "top cut saw". Looking to start this weekend if I can borrow or if not rent the tools this weekend.
 
A chop saw (miter saw) with an abrasive blade would probably work best. I got good results with an angle grinder with an abrasive metal cutting blade. But if you have the option, I would go with the chop saw.
 
A chop saw (miter saw) with an abrasive blade would probably work best. I got good results with an angle grinder with an abrasive metal cutting blade. But if you have the option, I would go with the chop saw.

That's exactly what I did, worked great.

I got my plate chiller in today, and have both of my burners now as well. Hoping to get more done on the stand this week. Just waiting on some fittings to come in for the BK/HLT/MLT.
 
The burners in the picture look very similar to the Bayou Classic KAB4's I have and will be mounting on my weldless stand (this weekend?!?). They'll run you about $80 on Amazon and put out 200,000+ BTUs. They'll heat 10 gal in no time flat :) Not sure how well they'll do running two off of one propane tank though. I will likely start by running them separately...

As someone else mentioned, they are 30 bucks at Argi Supply.
 
I built this thing according to Sam's specifications, including casters. Any one have any problems with this thing beign slightly unstable? It is all square and level, but when the casters are all pointed backwards and I push on the middle of the front rail, it wants to tip over. not sure I like that Idea. although, if the casters are "wheels out" it is stable.
 
I built this thing according to Sam's specifications, including casters. Any one have any problems with this thing beign slightly unstable? It is all square and level, but when the casters are all pointed backwards and I push on the middle of the front rail, it wants to tip over. not sure I like that Idea. although, if the casters are "wheels out" it is stable.

I haven't loaded it up yet, but I can see this being a problem. You could either put some weight at the bottom or just set and lock the wheels before brewing, which would be a minor inconvenience IMO. I'd imagine this would be a problem whether we used angle iron or welded steel, though.
 
I built this thing according to Sam's specifications, including casters. Any one have any problems with this thing beign slightly unstable? It is all square and level, but when the casters are all pointed backwards and I push on the middle of the front rail, it wants to tip over. not sure I like that Idea. although, if the casters are "wheels out" it is stable.

Did you order the material from McMaster's? I'm debating on getting the galvanized angle versus the zinc coated angle at Home Depot. I know it'll cost me a bit more, but I'm worried about the galvanizing fumes when burning.

I'd be interested in finding out how your stability problem is solved...what about having only one set of casters that turn?

BrewerRick
 
I too am very interested to hear more about the possible stability issue. Has anyone else had this problem? Also, won't the galvanizing burn off after the first burn? If not, I read somewhere that muriatic acid will remove the galvanization. Could you remove the galvanization on the top portion of the brew stand and then paint over it with some high temperature grill paint to seal and prevent rusting?
 
The galvanizing burns off after the first few sessions. I haven't had a stability problem, but I'm on a flat surface and once I get the keggles filled up I don't move it.
 
Yeah, bought all the materials from McMaster Carr. I thought about once the keggles were full that it would probably be more stable, but just got the thing built, so I havent tried it yet. With 2 youngins' though, I want to make sure my **** is wired tight before I fire the burners.
 
Yeah, bought all the materials from McMaster Carr. I thought about once the keggles were full that it would probably be more stable, but just got the thing built, so I havent tried it yet. With 2 youngins' though, I want to make sure my **** is wired tight before I fire the burners.

I'm in the exact same boat, however I only have one little one with another on the way. Of course I don't ever plan on letting them be in the near vicinity while brewing but I want to take every precaution for safety just in case. Since I haven't heard much about stability being an issue and the galvanization is a non-issue post primary burn I think I'm all in and will order the parts tomorrow!
 
it is the cheapest option I've seen (besides wood). I'm not concerned about the galvanized either. I figure I could just use chocks if the stability is really concerning.

One set of turning casters would probably work too. Although, as long as the wheels are outboard when you lock them, it should be all good.
 
I built mine today and it seems pretty stable. I haven't tested with all three kegs on and filled up though.
 
Back
Top