The 'Keezer' Project

Homebrew Talk - Beer, Wine, Mead, & Cider Brewing Discussion Forum

Help Support Homebrew Talk - Beer, Wine, Mead, & Cider Brewing Discussion Forum:

This site may earn a commission from merchant affiliate links, including eBay, Amazon, and others.
It can vary widely.

The forward sealing faucets are usually <$40 and the shanks can be as little as $10-15. Total assembly per tap could be $50ish, give or take depending a quality. But if you are budgeting, I would plan on $50 per tap and then your hoses and keg connections. Manifolds and secondary regulators also add cost.

Manifolds for single pressure distribution are in the $10 per distribution. Secondary regulators run closer to $30 per distribution.

By the time you add keg connections and hoses, I would budget $75 - $100 per tap. I know that sounds high, and I know people can get it lower. But truly, if you don't have all the parts sitting in front of you and you add up all the costs of every little connection, hose clamp, keg connection, hose, shank, faucet, tap, etc, it really is that high. A lot of people will say they did it less, but if you don't count the "I picked this up from a buddy, or found this at a bar going out of business..." type of acquisitions, then you are looking at $75-$100 per tap. OH, thats not counting the keg it self.

I can't speak for all the DIYers on here, but on most of my projects the end costs is usually higher than the original budget due to all the quick trips to the hardware store for this valve or hose clamp etc.

Warren
 
Great job Jester! Looks great.

As far as cost goes, I think when you start a project like this, it's best not to save the all the receipts. You really don't want to know what you spent. Plus, if your SWMBO asks, you can honestly say you don't know.
 
I am curious though, what specifically did you insulate the tap box with? fiberglass, green friendly blow-in insulation, styrofoam.....? I noticed you had some duct work in there when I was looking at your 3D model, but i didn't see what you are using to pump air up and into the box. (the tap box, not the fan to pull air along the sides of the kreezer)

I used 2" rigid foam to replicate what is in the 3D model. I have not rigged it up yet, but cooling to the tap box will be a fan mounted on the bottom of the lid, with a large vent hose dangling to the bottom of the freezer for cold air pickup.

I hate to even ask...
What was your total price on all of the CO2 fittings and taps?

Ugh - you know, I started keeping track of all the expenses on this, but along the way I decided I didn't want to know anymore :eek:

I don't have the costing, but here is a list of parts for each tap:

Beer Side
  • Ventmatic Faucet
  • Stainless Washer (replaces the stock black plastic one)
  • El Cheapo Black Handle (to be upgraded at some point)
  • 4" SS Shank (probably should have gone with the 6", but they work well enough)
  • SS Tail
  • Tail Washer
  • Tail Nut
  • Beer Line
  • Ball Lock Liquid Connector
  • 2 Oetiker Clamps

Gas Side
  • Guage
  • Regulator
  • Nipple (to connect to the next reg in the manifold)
  • Shutoff
  • Check Valve
  • PC Fitting
  • Hose
  • PC Fitting
  • Ball Lock Gas Connector

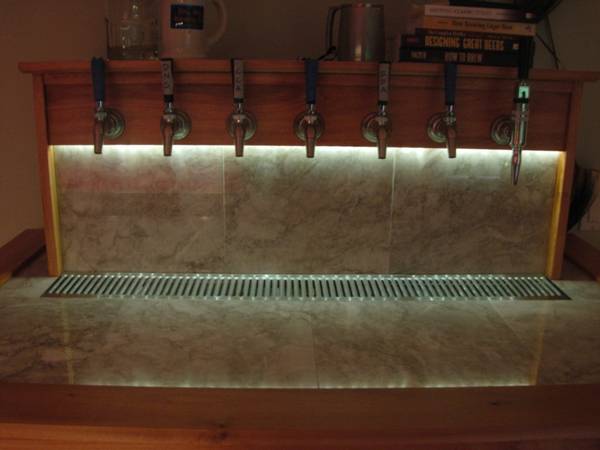
There are a few misc plumbing bits for the manifold, but the above counts for all but a few dollars of the total plumbing bill. Of course, nobody really needs 7 regs for 7 kegs, but they were cheap, and I was sort of going for a 'showcase' piece with this, so I went for it.
 
Great job Jester! Looks great.

As far as cost goes, I think when you start a project like this, it's best not to save the all the receipts. You really don't want to know what you spent. Plus, if your SWMBO asks, you can honestly say you don't know.

Thanks!

Yeah, I started not tallying costs. It's all worth it when I can pull a pint from it! Also, I'm lucky in that my lady encourages my beer projects.

:mug:
 
how are you running your lines from the kegs to the taps? Did you drill a hole through the lid of the freezer?

Ok, as promised, a photo of the holes through the lid:

KeezerHoles.jpg


There is a matching hole on the other end of the chase as well.
 
what specifically did you insulate the tap box with?

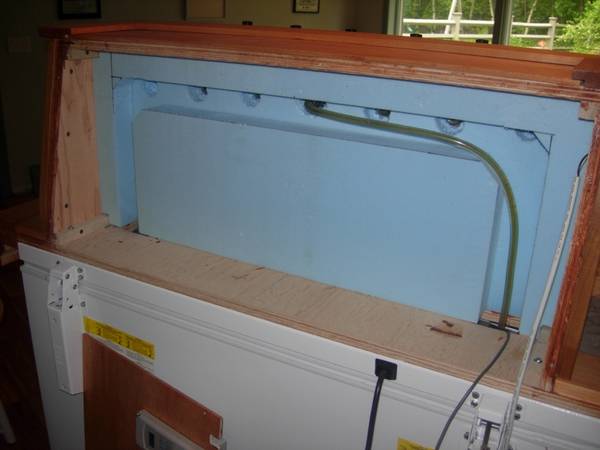
Here are some pics of the foam in the tap box

First, the back all closed up (there will be a panel on there when complete with some override switches for the exterior duct fan and the tower fan, and a switch for the rope light)

KeezerBack.jpg


With the back cover removed, here is the first (last?) layer of foam

KeezerFoam1.jpg


With that layer removed, here are the two layers that make the chase. (gotta get the other 4 taps plumbed) you can also see the two outermost holes for expanding to 7 taps in the near future.

KeezerFoam2.jpg
 
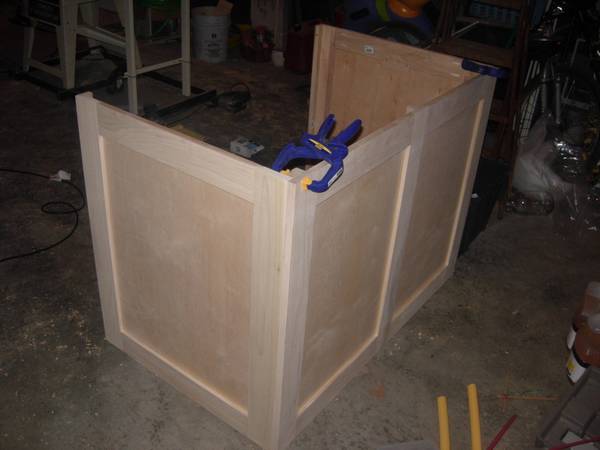
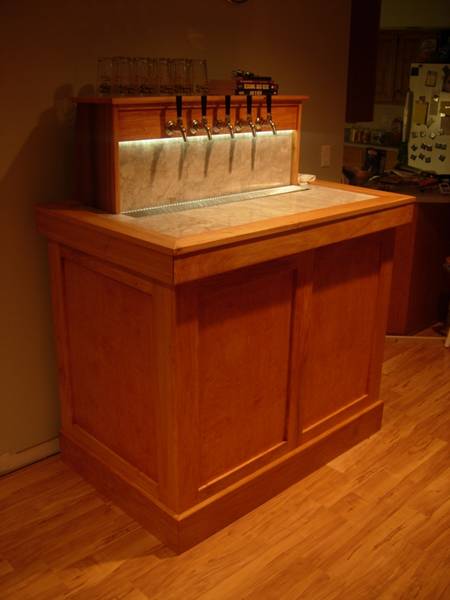
And now, some new progress, I have the sides for the cabinet fabricated. Now they need to be attached, and the final skirt trim applied around the bottom. Getting close now!

KeezerSides1.jpg

KeezerSides2.jpg
 
Just in case you guys weren't jealous of him enough already, he has to go and turn out something like this. But seriously, congratulations on the end of a project well done..:mug:
 
got a (side-view) picture of it opened up?

*edit*

so, the rollers are completely hidden? really cool!!

Here ya go!

OpenLid.jpg


And yes, the casters are hidden behind the apron. The apron just rests in place so it can be easily removed or the height adjusted (if the keezer was put on carpet, for example) Originally I was going to do something with a couple of dowels in the front with multiple height holes for adjusting the level of the apron, but it fit so well it doesn't need it - it's a press fit.
 
That is very nice. Though I'm not sure I would have stolen the base molding off of my home to finish a keezer.

...then again...maybe I would...;)

I'm off to throw rocks at my keezer now.
 
Here ya go!

And yes, the casters are hidden behind the apron. The apron just rests in place so it can be easily removed or the height adjusted (if the keezer was put on carpet, for example) Originally I was going to do something with a couple of dowels in the front with multiple height holes for adjusting the level of the apron, but it fit so well it doesn't need it - it's a press fit.

freaking excellent!!!
clap2.gif


So, you don't mind if we borrow your ideas, do you? SWMBO wants me to re-do the craptacular bar that the previous owner built and your keezer looks like it'll fit the bill just fine.
 
:mug::mug::ban::mug:That is absolutely unbelievable Jester. I just picked up a 10cuft chest freezer today for real cheap. No matter what anyone on here does, your will still but them to shame. That is so very very very nice.
 
That is very nice. Though I'm not sure I would have stolen the base molding off of my home to finish a keezer.

Heh heh - I didn't steal the molding - I'm completely redoing the room. Chair rail and panel wainscoting. It's the next project on the list. Of course, the Keezer HAD to get done first!!

freaking excellent!!!
clap2.gif


So, you don't mind if we borrow your ideas, do you?

Not at all! Just don't make it purtee-er than mine! ;)
 
im for sure stealing this setup whenever the time comes when will that be well who really knows hopefully not to much further off
 
Jester I just want to thank you for building that....I've been talking SWMBO into letting me upgrade my ugly ass Kegerator for some time....I showed her the finished picture of your's and...for fathers day yesterday she bought me a 15.5 cu. ft. chest freezer, and two personalized tap handles. Her conditions are it has to look as nice as yours and I always have to have apfelwein on tap....
Needless to say I may be asking you a lot of questions coming up.

Like: for starters what program was that, that you were using for the sketch ups?

Glad I could help :D

The drawing program is a freebie from Google called SketchUp. A short time with the tutorials gets you up to speed pretty fast.
 
any bribes to get the plans published? Maybe materials lists and costs?

Hey, Jester, did you put yours on casters, or was the freezer on it's own already?
 
any bribes to get the plans published? Maybe materials lists and costs?

Hey, Jester, did you put yours on casters, or was the freezer on it's own already?

Well, I don't know about bribes - pretty much everything you need to know is already in the thread. Actual measurements would be pretty useless, because it's all based on the dimensions of whatever freezer you start with. I'd be happy to answer whatever questions, however.

As for materials/cost, I sort of stopped paying attention to the $ after a while. It was not inexpensive, but for me it was worth it. :)

There are pictures of the casters somewhere in the thread - I made my own base and attached them. The freezer is just a regular Kenmore.
 
<---Needs to read the whole thread.


Has anyone done a real consideration of whether or not it's okay to put CO2 tanks into freezers? And does anyone have a source for nitrogen mixes for stouts?

I might have to gift my current kegorator to the brother and build something like this in the fall when it cools down in the shop. Or when I get the full 15 kegs lagering in the new vessel and need to slow down on the brewing a bit. :)
 
Man, that's nice.

So, are you going to leave the simple black tap handles, or buy/build some fancy ones? I kinda like the simple look, myself.
 
So, are you going to leave the simple black tap handles, or buy/build some fancy ones? I kinda like the simple look, myself.

Well, for the time being they are staying simple black - I like the clean look, too. I might see if I can get some nice aluminum ones turned - a friend of mine runs a local machine shop. But even then they would be very simple in design - just silver and shiny! :D
 
Hrm. One of my neighbors works stone and does custom stone for a living. He's offered several times to make something for me when he's got extra. Maybe I should have a top made to fit around the coffin out of a solid piece, with a spot for the drip tray.

I bet that'd tax the hinges a bit. :)


Looks like yours has a sled unit, which the freezer sits on, a cabinet wrap-around, which sits on the sled around the freezer, a base trim that just sits in place, and a top/lid unit.

I don't see a photo detailing the top of the cabinet part with the lid on showing how it may vent, but I would guess the lid trim has a gab between it hanging from the lid and the cabinet wood, so it can intake air around the top of the cabinet?

I think if I break this huge project down into parts I might not be as intimidated. :) Well... maybe just a little less intimidated. A good excuse for buying some better woodworking tools.
 
Man, Jester, that is sweet. I'm finishing up a keezer project myself and you've given me some good ideas I'm going to incorporate into mine. I like the idea of having the wood skirting be removable.

Great job!:mug:
 
:mug::rockin: OMG that thing is awesome...im inspired now to build something. i wonder if it is possible to mount the taps to one side and have half the lid open for access so you wouldn't have to open the part with taps on it to add or remove cornies?
 
i wonder if it is possible to mount the taps to one side and have half the lid open for access so you wouldn't have to open the part with taps on it to add or remove cornies?

Brewpastor's conversion (where I originally stole the idea for this) has the entire area in front of the taps hinged to give access to the kegs. A very cool way to do it, but I was looking to make it easier to build (mechanically anyway!).
 
Beautiful, I'm planning on putting my stout tap in the middle. I have to wait till the money situation gets better, but as you said one step at a time. :)
Thanks to your project and several others, which gave me an idea of what is possible, my keezer exists. :mug:
 
Back
Top