Yeast Washing Illustrated

Homebrew Talk - Beer, Wine, Mead, & Cider Brewing Discussion Forum

Help Support Homebrew Talk - Beer, Wine, Mead, & Cider Brewing Discussion Forum:

This site may earn a commission from merchant affiliate links, including eBay, Amazon, and others.
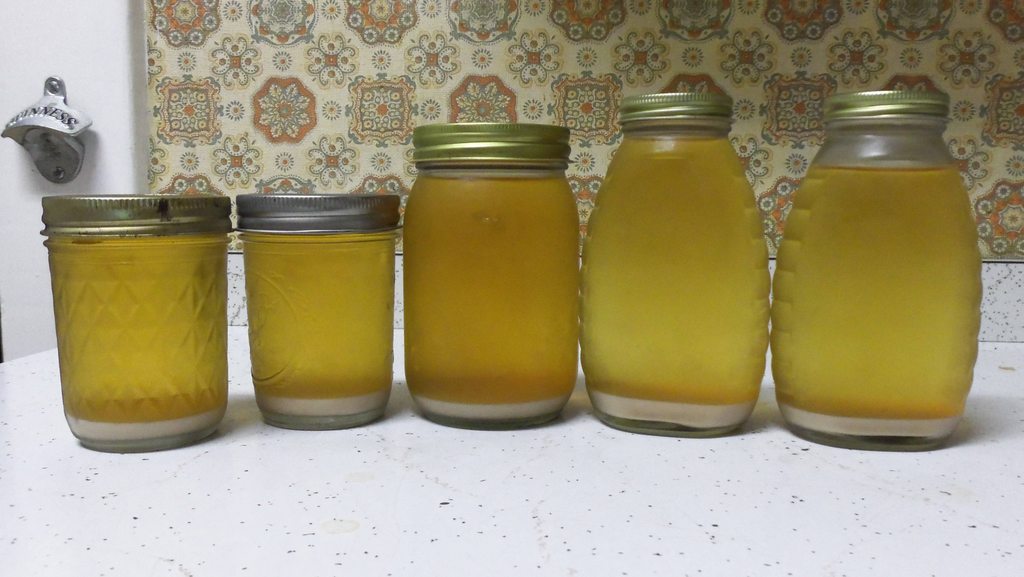
By the looks of the photo it seems like you brought over quite a bit of the trub. Here's what I do, and it always turns out just like the photos from the original post.

Once the beer has been racked out, I shake the carboy like mad to loosen everything before I add the water, just so I don't have to shake as much once I've added the water that has had the oxygen driven off. Once everything is loose and the clumps are gone, I add water to the carboy, shake just to mix, let it sit for 10-20 minutes and then I pour the liquid on top - being very careful to not disturb the settled trub - into my 1 gal jug. I let that sit fxor another 10-20 minutes and then I very carefully pour the liquid on top into 2-4 pint jars.

As far as how long I let it sit, I pour to the next jar once I start to see yeast settling. It's usually pretty obvious because you'll start to see a layer form that's much lighter in color than what's already settled. Hope this helps.

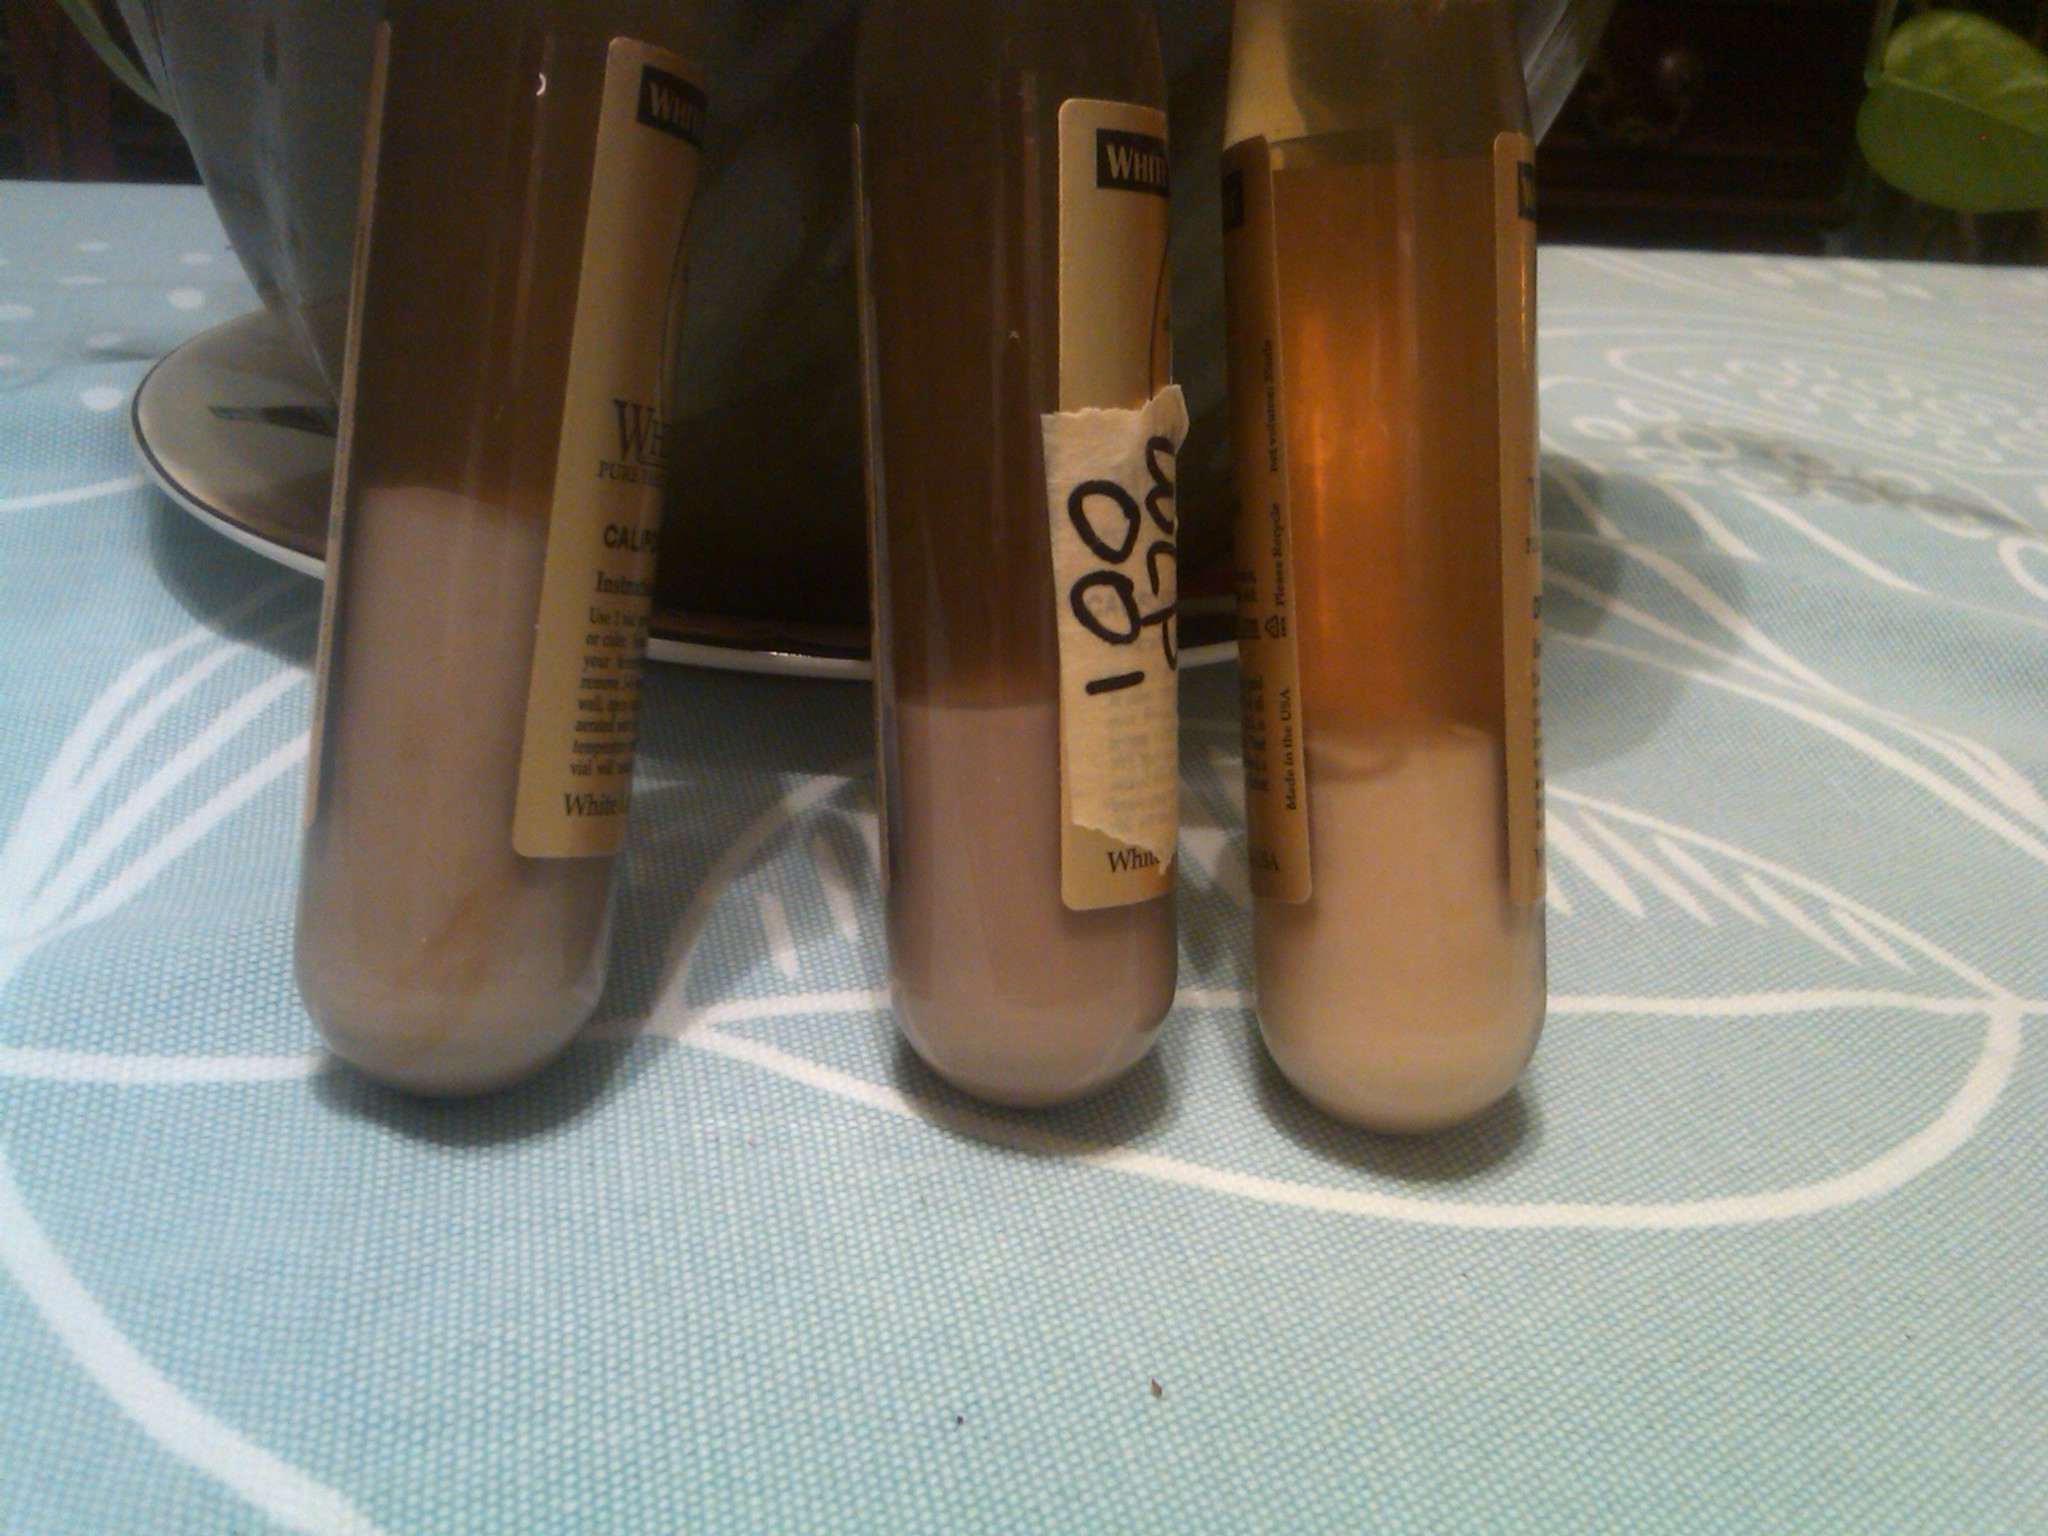
I guess my problem is that it seemed like the layer sitting on top was extremely thin in the carboy after letting it sit. It seemed difficult to just pour that off, I would say the top was under 1/4" thick.

If I want to salvage could I boil some corn sugar and make a mini starter then decant it off add cooled boiled water and refrigerate?
 
To clarify, I don't try to pour off or transfer the thin layer of yeast that's started to settle in the carboy. At the first sign of settling, most of the yeast is still in suspension. Seeing the yeast start to settle is just an indication that the heavier trub has mostly settled out and the lighter yeast is now starting to settle out too. But you don't really want that to happen. You want as much of the yeast as possible to be in suspension so when you pour the liquid into your 1 gal jug, you'll be pouring mostly yeast and not trub.
 
shaunvfx:

To maximize washed yeast and minimize trub...

(1) If pouring, add the boiled and cooled water, then immediately lay the carboy on its side and add a rag to prevent the carboy from rolling off the counter [table, or what have you]. Wait 25 to 30 minutes, then pour into mason jars.

(2) If using a racking cane, add the boiled and cooled water, then immediately place a rag [newspapers, or what have you] under the bottom of one side of the carboy. This way, the trub will fall to the opposite corner... and after 25 to 30 minutes, you will be able to siphon off more washed yeast and less tru, which is pretty much the entire goal here.

I have been doing (2) for my last several washing as wel as using 25-50% more water than before. This has made it much easier to see the yeast separating and racking this is now easier.
 
My 2 cents as someone who just used washed yeast for the first time and who's jar looked like it had more trub than yeast is to relax. If you make a starter, you should be fine. Yes, too much trub may not be the best thing but you'll get better.
Mine had me worried but 18 hours later I got results. Maybe not as fast as I wanted but I made sure that my starter was big enough to do the job.
Next time I'll do even better. You're getting great info here too!
 
I followed the directions and had great success. Here is a pic of the final product.

FVOjlh.jpg
 
So I made a starter out of some 1056 I washed back in July, and pitched it in a brown ale I made last Wednesday. I did 3 steps for the starter getting it up to 2L and 230 billion cells. Each step fermented fairly aggressively and always had a nice krausen when I swirled (no stir plate yet) it. I pitched into the 5.5gal batch on Wednesday night, and had visible activity on Thursday afternoon. It never got real aggressive though. I could have used an airlock no problem in the 6 gal carboy. My last batch was the two hearted clone that I pitched a starter built up from dregs, and the fermentation was very aggressive, blowing out the blow off tube for 2 days. Do you think I am going to have issues with this batch or should I just RDWADHB?
 
So I made a starter out of some 1056 I washed back in July, and pitched it in a brown ale I made last Wednesday. I did 3 steps for the starter getting it up to 2L and 230 billion cells. Each step fermented fairly aggressively and always had a nice krausen when I swirled (no stir plate yet) it. I pitched into the 5.5gal batch on Wednesday night, and had visible activity on Thursday afternoon. It never got real aggressive though. I could have used an airlock no problem in the 6 gal carboy. My last batch was the two hearted clone that I pitched a starter built up from dregs, and the fermentation was very aggressive, blowing out the blow off tube for 2 days. Do you think I am going to have issues with this batch or should I just RDWADHB?

Every fermentation is different. If you have activity and pitched the right amount of yeast, I would definitely RDWHAHB.
 
I followed the directions and had great success. Here is a pic of the final product.

FVOjlh.jpg
Just a follow up to my prior post https://www.homebrewtalk.com/f163/yeast-washing-illustrated-41768/index165.html#post4604650.

I wasn't sure how much yeast was on the bottom of the jars so I decanted almost all the liquid from one jar and poured it into an empty vial. This is what it looked like. The one of the right is WLP001, mine in the middle is WLP001, the one on the right is WLP007.

CjoU5.jpg
 
It may have been covered previously but I cannot find any reference to finally rinsing and storing yeast under distilled water.
I note in the YEAST book that it is recommended that yeast be stored under sterilized, distilled water.
Any thoughts on the use of distilled water vs any other sort of water for maximizing the period that rinsed yeast could be stored?
 
el_caro said:
It may have been covered previously but I cannot find any reference to finally rinsing and storing yeast under distilled water.
I note in the YEAST book that it is recommended that yeast be stored under sterilized, distilled water.
Any thoughts on the use of distilled water vs any other sort of water for maximizing the period that rinsed yeast could be stored?

Sterilized is the way to go. I used a gallon of distiller once and my yeast ended up with an infection.
 
Thanks Jon
Sorry for the confusion. I was not advocating avoiding the sterilization process for the water but rather interested whether distilled water without any impurities would enable rinsed yeast to be stored longer than using other types of water.
 
el_caro said:
Thanks Jon
Sorry for the confusion. I was not advocating avoiding the sterilization process for the water but rather interested whether distilled water without any impurities would enable rinsed yeast to be stored longer than using other types of water.

I doubt that it would help at all. Just use boiled water, that makes it sterile and deoxygenated.

You are trying to preserve a living thing, no matter what it is going to lose its vitality over time.
 
It may have been covered previously but I cannot find any reference to finally rinsing and storing yeast under distilled water.
I note in the YEAST book that it is recommended that yeast be stored under sterilized, distilled water.
Any thoughts on the use of distilled water vs any other sort of water for maximizing the period that rinsed yeast could be stored?

Thanks for the question.... I learned something today!! :rockin:


http://answers.yahoo.com/question/index?qid=20080526210705AAG8GI7
Whats the difference between sterilized water and distilled water?

5 years ago

minefinder
Best Answer - Chosen by Voters

Sterilized means that all the bacteria and viruses have been removed or killed, such as by UV irradiation or boiling.

Distilled means the water has been boiled, the steam collected, and condensed back into pure water.

Sterilized water is not necessarily pure and could still be toxic, as it could contain poisonous substances in solution such as mercury, lead, or arsenic. This question is in the water sports section, so for example chlorinated pool water would be sterilized but not necessarily toxin-free. The chlorine has sterilized the water by killing microorganisms, but that has not removed toxins including the chlorine itself.

Distilled water will be 100% pure water with no impurities at all.
 
My 2 cents as someone who just used washed yeast for the first time and who's jar looked like it had more trub than yeast is to relax. If you make a starter, you should be fine. Yes, too much trub may not be the best thing but you'll get better.
Mine had me worried but 18 hours later I got results. Maybe not as fast as I wanted but I made sure that my starter was big enough to do the job.
Next time I'll do even better. You're getting great info here too!

+1 Awesome advice. I have been washing yeast for a year or more now following Bernie's original guide and tweaking based on posts here and my own thoughts/experience. I get tons of good yeast now, most of my fermentations start in less than 4 hours (based on CO2 evidence...I am sure it started sooner as it takes time for CO2 to build up and start bubbling in my bucket). Definitely do a starter! You can also rinse the yeast over and over and over to get rid of the trub, though in the beginning I just used something that looked similar to your pix and it worked great and made awesome beer. As the saying goes, relax...

Cheers!
 
My second try with the same yeast, 001, was bubbling away in 6 hours. It was actually a bigger starter that made the difference.

My only challenge now is to find enough space to keep my yeast.

I hear ya! I dedicated a dorm size fridge for yeast and hops and the yeast took over. Eventually I bought the 4 oz jelly jars and started washing all the pints and quarts and downsizing them to the 4 oz jars. Now all my yeast fits in the door and I have lots of room for hops. :ban:
 
Once your yeast settle out you can just leave enough liquid in to make a slurry and then transfer them to old White Labs tubes or get new ones from Amazon or other sources. They are sometimes called baby soda bottles. You can store a lot of those in a small space. They are easy to sanitize.
 
Hi folks,

My apologies for asking if it's already been asked 100 times, I read the first 7 pages and didn't find the answer.

Pretty simple question, I did this yesterday and ended up with about 1/2 - 3/4 inch of nice yeast on the bottom of 3 jars. My question is do I now have yeast for 3 different batches, or are you suppose to put all the yeast from all the jars into the starter for one batch? Assume this will be different depending on how much yeast you get after washing, but what is the standard, all into one, or good for separate batches.

Thanks guys, great instructions, it was super easy to do.
 
It depends on how many yeast cells you caught and how many you need. The general rule is that a mL of dense yeast solids has 4.5 billion cells in it. Figure that you have probably about 15% trub even if you washed well, and your compacted slurry is probably not completely densely packed, and the viability won't be 100%. You'll have to guess some numbers there, then multiply the fraction by the volume of slurry you've got.

Enter those into your favorite yeast calculator (treat it as liquid yeast and adjust the viability/pitch volumes to match the number of cells you think you have) and see how much of a starter you need. You can use more starter volume or multiple steps to get by with a single jar worth, or you can pitch more than one jar and reduce the growth factor you need.

On a recent lager, I came up with a number of about 15 billion cells per washed pint (this might have been for one jar, I don't recall exactly, but they didn't end up with much settled slurry). For my fairly high-gravity lager, I needed a couple gallon-sized steps up even starting with two washed jars. Using yeastcalc, if you had a typical-gravity ale, you'd probably need a couple stage starter to get the proper pitch rate unless you have a much better harvest rate than I did.

Others may have advice based on more experience. I've only done this once, and it seems to have worked. But I don't know for sure whether my pitch rate was correct (though the lager DID take off in < 12 hours).
 
Oh, I see. I haven't used a yeast calculator yet so I'll have to play around with that and see what I come up with. Or maybe I'll just pitch the whole lot and see what happens! Thanks for the reply, off to play with yet another thing I had no idea I had to know lol.
 
I've only washed yeast once so far but I'm planning on washing yeast from a batch of NB's Brickwarmer tonight. The question I have is, the recipe for the Brickwarmer calls for steeping orange peels during the boil. I removed them when I racked the wort into my fermenting bucket, but I was wondering if, after washing the yeast, would there still be much of a citruis flavor? I also brew a Great Lakes Christmas ale clone that uses the same yeast and was planning on re-using the washed yeast from the Brickwarmer to brew my Christmas ale clone but I don't want to if it will be too citruisy tasting...
 
My second try with the same yeast, 001, was bubbling away in 6 hours. It was actually a bigger starter that made the difference.

My only challenge now is to find enough space to keep my yeast.

LOL! My wife was telling her co-teachers about what a mad scientist I was turning into with all of these mason jars of washed yeast I was making. First of all, I've only washed one batch of yeast and have only 4 mason jars.

So anyway, we are having her school's Christmas party at our house last weekend and everyone wanted to know where all of the mason jars were. I had to disappoint them to tell them there were only four in our basement fridge but assured them that number would be growing soon! :mug:
 
Let's say I don't have enough time or desire to wash the yeast on he same day as transferring/bottling the beer, but can the following day. Would I be better off just covering back my primary bucket after transferring the beer off or should I transfer the trub to a glass jar and then store in the fridge overnight?
 
mtnagel said:
Let's say I don't have enough time or desire to wash the yeast on he same day as transferring/bottling the beer, but can the following day. Would I be better off just covering back my primary bucket after transferring the beer off or should I transfer the trub to a glass jar and then store in the fridge overnight?

I've had success jus putting the airlock back on a letting it sit a day or two. I try to leave a layer of the beer covering the trub/yeast.
 
Last time I re-harvested, I took two pint sized glasses full of yeast, after letting it settle in a gallon wine jug (my go-to starter and yeast washing vessals)

My first glass went off without a hitch, but my second had a lot of trub in it. so I shook it up a lot and let it resettle, but the trub all settled ontop of the yeast!
I thought it was funny, so I poured it out (the yeast had settled at that point, so the trub and beer just poured out perfectly), and added a fresh bottle of canned beer on top of it.
(beer from the same batch mind you, harvested about 2 days previously)

It seemds to have worked too! no trub in the jar, no exploded jars (I had to vent a few times tho nothing serious), and my yeast is still under a protective layer of brown ale, and I've got a 2ed sample of yeast to work with

all well lol
 
I'm brewing a hefeweizen in the next few days and I have some washed jars of WLP300 yeast that have been sitting in the fridge for about 6 months. from what I gather they should still be good. I used 2 jars in a 1 liter of wort starter (1 liter of wort in a 2 liter jar) instead of just one to give me a few extra viable cells... do I need to do anything to the starter since it's a tad old on the washed yeast? step it up? or just give it an extra day (usually do a 24 hour starter)?
 
I'm brewing a hefeweizen in the next few days and I have some washed jars of WLP300 yeast that have been sitting in the fridge for about 6 months. from what I gather they should still be good. I used 2 jars in a 1 liter of wort starter (1 liter of wort in a 2 liter jar) instead of just one to give me a few extra viable cells... do I need to do anything to the starter since it's a tad old on the washed yeast? step it up? or just give it an extra day (usually do a 24 hour starter)?

I've heard that for any of the Hefeweizen yeasts they need to be used within a couple of weeks, otherwise they will not make the best beer possible.
 
yeah, I'd like to know too. I've used 2-3 month old Hefe yeasts without problem (just haven't tried something as old as 6 months before)
 
I recently used a 6 month old jar of WLP007. It wasn't "washed" perse but watered down enough to fill my jars. WLP007 is a clumping yeast that is hard to separate.

The 1.5L starter was slow to take off but when it did it did very well.

Older yeast becomes less viable, that's a given. With an ample starter however, you can bring it back to life. 6 months is the oldest I have used thus far.

kewl, I'll give it a whirl then, the starter is showing signs of activity after 24 hours so late tonight "ll do my boil, if it doesn't take off I can always toss in some cheap WB-06 to finish it off
 
Where did you hear that?

I've heard it from several pro brewers that I have talked to. There are several podcasts out there too.
One from Brew Strong where Jamil talks about it is the 08-10-09 Yeast Washing episode. I don't remember the others ones that I have listened to that have talked about it.
 
Back
Top