
Some time ago, I decided to change my bottling away from glass and replace this with the PET plastic soft drink bottles that are readily available. I had a number of reasons for this change but the main one was I had simply become fed up with the work involved in filling forty four green Grolsch bottles at the end of every fermentation.
Those bottles, so lovingly collected, had served me well over the years. In the beginning, I had nearly twelve hundred but sadly, time and space constraints had whittled the collection down to a mere three hundred and now even these faithful servants were destined for the scrapheap. (I actually sold them).
The new plan centered on the two-liter (4 pint) plastic bottle. I had done as much research as is possible with the web and decided that the reported disadvantages of light strike and slight porosity to oxygen I could live with. The light strike situation, where the beer will supposedly de-grade or "skunk" due to ultra violet radiation passing through the clear plastic would be countered by storing the bottles in dark places.
Permeation of the bottle by oxygen is apparently a very slow process, two years, or so, and I'm confident that the beer will have been well and truly consumed within that cycle. The advantage of having far less bottles to fill, the ability to see the condition of the beer in the bottle, less risk of breakage and the enormous burst pressure in excess of 8 Bar (125 psi) convinced me that this was the way to go.
Getting organized
My fermenter, another faithful servant of over fifteen years, brews 22 liters (6 gallons). It actually will do 24 liters (6.3 gallons) but I like to leave a generous head space, this ensures that the brew does not rush out the airlock in those first few enthusiastic hours of a yeasts life. This volume of brew, 22 liters, will obviously need eleven x 2 liter bottles. (I was always good at math). The plan is to have four brews in constant cycle and based on consuming one bottle per day this would mean that the oldest age of a bottle would be forty-four days or approximately six weeks.
For me, this is fine. I only brew using extract cans and when I find an acceptable "vin ordinaire" brew for day-to-day consumption I tend to stick with it. Over the years, this has been Cooper's lager, brewed with Light Dry Malt and dextrose, served, and drunk very cold and I see no reason to change.
The four "vin ordinaire" brews are to be supplemented with four "special" brews, each of these also being 22 litres or eleven bottles. These brews can be anything that takes my fancy, still in the extract style but covering whatever is available on the market. The length of storage of these will mainly depend on my patience, however if I'm to be mindful of light strike then I will have to consume them within two years. I think I'm up to this task.
Therefore, in total I was looking for eighty-eight 2-liter PET soft drink bottles. The first problem was one of getting the collection together. The sight of me ratting through the neighborhood rubbish bins and dumpsters I knew would not go down well at home, so I decided to purchase. The easiest way is to buy them, eleven at a time, at the local supermarket. Of course, they will be filled with soft drink and must to be either consumed or discarded. This also has the advantage that the bottles are new and you know their history. Grabbing one out of a dumpster and it could have been filled with anything!
I brought the "no-name" generic cola for roughly a dollar a bottle and I figured I was doing the world a service by tipping the revolting concoction down the sink, the worst brewed beer is infinitely better than that muck. I washed the bottles out with very hot water and left them at that. I'm not the biggest fan of chemical sterilization of bottles and have not done it for years, for me, hot water is sufficient. (Please don't berate me, I've been doing it this way for a long time, and it works for me).
Problems
Seldom are things as easy as you imagine them, and if they are, it generally means that you're doing them wrong. In this case, the first hurdle was encountered even before the initial bottling. Empty PET bottles are terribly unstable in the vertical position, the slightest breeze or vibration sets them tumbling. I tried to ignore this but it was a fiasco. By necessity, I bottle in the open, and as luck would have it, a stiffish breeze was blowing. I spent the first twenty minutes chasing bottles and in the end taped them together as a makeshift solution but there had to be a better way.
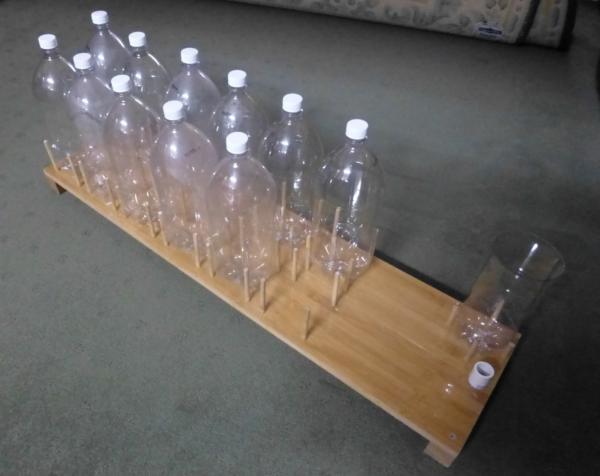
I decided to make a simple jig to hold the bottles firmly in place. I had some old bamboo flooring and decided to use this as I figured that bamboo would not be too bothered if it got wet from time to time.
I marked out the diameters of twelve bottles and drilled four 5mm (1/4") holes evenly around each diameter. I used 5mm (1/4") pegs, 100 mm (4") long and glued them into the holes. A smaller diameter was added to take a drip bin (more on that later). I added a couple of pieces of timber at each end to act as feet; this makes it easier to pick up. The resultant jig holds the bottles firmly and it fits on to the small bench I use to bottle. Progress indeed!
The jig is light and easy to carry around. It allows me to set up and charge the bottles with carbonating sugar replace the caps and then take the jig and bottles to the bottling station for filling.
Filling the bottles
When I fill, I use gravity and a bottling wand with a shut off valve located on the bottom of the wand. This is standard practice however; I have modified the filling process for ease and ac-curacy.
More than anything, I hate working on the floor, however if this is to be avoided then the fermenter must be placed higher than the workbench. In fact, it must be placed so that the bottom of the container is higher than the top of the bottle to be filled, otherwise the bottle will fail to fill to the correct level. I have a small block and tackle and I haul the fermented up into the open roof of the shed where I do my filling. This necessity to conform to the law of gravity can only be ignored by using a pump and I cannot be bothered with that.
With the fermenter now in place and the wand connected to its tap with a flexible hose. The bottling can now commence. This second time of filling with these 2-liter containers went much more smoothly thanks to the jig, yet I could see that there were further improvements that could be made. If the flow of beer from the fermenter could be made to stop automatically at the correct fill level in the bottle, then this would leave me free to do other tasks whilst the filling process was taking place.
I decided to try to do this using an old balance scale. I made a bottle-holding jig and fitted it the scale so that now I was certain that the bottle would not fall off. I used weights on the other side of the scale until they balanced a bottle filled to the correct level with water.
The filling wand had to be fixed to a post so that its position remains fixed. After more than one at-tempt I managed to get the sys-tem working and it has made the job of bottle filling much more pleasant. As can be seen from the sketch, as the bottle approaches equilibrium with the weight and the scales come into balance, the valve at the bottom of the wand commences to close. The whole sequence is very gentle and it allows me to be shaking the previously filled bottle to dis-tribute the carbonation sugar and then burping it to rid it of oxygen.
When the bottle is filled, the wand is lifted and swung over the drip bin as the wands DRIP! (Drives me nuts!). I place the next bottle on the scales, lift, and position the wand in the bottle and away we go again.
I have also fitted a flow tap between the fermenter and the filling wand to control the flow in the first two bottle fills. I found that these were too vigorous and foaming in the bottle spilled out the top before the beer had reached the correct level. This fixed the problem.
My aim is to do a complete fill with no drips or spillage but I confess that I have yet to achieve this.
Conclusion
I have been using the bottles for some time now and they continue to impress me. I have to admit, I have put a lot more effort into setting up than I ever did when I was using the Grolsch bottles, also I'm retired now and have a lot more time to devote to my hobby.
The four small indents at the base of the bottle are perfect as sediment traps for the dead yeast and Coopers extract sediment always seems to set hard. The caps appear to last quite well and I have not replaced any as yet. If a bottle leaked its gas, I would simply recharge it with sugar and replace the cap. This is another advantage of the PET bottle, it is very easy to verify the state of the carbonation by pressing on the side, and they are drum tight after a few days.
Adding a label is still something that I'm working on. I print them on my printer and use top quality 180-gsm paper, then I spray with two coats of gloss varnish before finally cutting out the label. The adhesive is spray contact. So far, the results have been a bit up and down and they are still in the unfinished projects basket.
It is obvious that I am a big fan of these containers; however, not everything is perfect with them, two liters of beer at then burping it to rid it of oxygen.
One sitting may be daunting to some, and any unconsumed beer would tend to go flat in the refrigerator if left overnight. (This is an assumption, two liters is not the biggest challenge I have faced). Another irritation is the fact that the bottles must be stored upright if the sediment is to remain at the bottom and the beer be sparkling. I have found this to be one of the biggest nuisances with them.
When pouring beer, the first couple of glasses are clear and bright, however as the bottom is approached the sediment does make its presence apparent, and this set me thinking, could the beer be forced out while the bottle remained vertical? You bet it could! I now have a system where each bottle is like a little keg and I enjoy draught beer every night
I told you I was retired and had plenty of time! I'll write a bit on the system if anyone is interested. 'Bye for now, and thanks for your time and interest in this article.
Cheers,
Deeferdog.
Bio-My forum name is deeferdog. I live on the Gold Coast in sunny Queensland, Australia. I am retired so have time to enjoy life and drink well crafted beer. I have been brewing almost continuously for over fifteen years, exclusively using extract kits. I get just as much enjoyment fiddling around with the equipment as brewing and drinking the product.

Those bottles, so lovingly collected, had served me well over the years. In the beginning, I had nearly twelve hundred but sadly, time and space constraints had whittled the collection down to a mere three hundred and now even these faithful servants were destined for the scrapheap. (I actually sold them).
The new plan centered on the two-liter (4 pint) plastic bottle. I had done as much research as is possible with the web and decided that the reported disadvantages of light strike and slight porosity to oxygen I could live with. The light strike situation, where the beer will supposedly de-grade or "skunk" due to ultra violet radiation passing through the clear plastic would be countered by storing the bottles in dark places.
Permeation of the bottle by oxygen is apparently a very slow process, two years, or so, and I'm confident that the beer will have been well and truly consumed within that cycle. The advantage of having far less bottles to fill, the ability to see the condition of the beer in the bottle, less risk of breakage and the enormous burst pressure in excess of 8 Bar (125 psi) convinced me that this was the way to go.
Getting organized
My fermenter, another faithful servant of over fifteen years, brews 22 liters (6 gallons). It actually will do 24 liters (6.3 gallons) but I like to leave a generous head space, this ensures that the brew does not rush out the airlock in those first few enthusiastic hours of a yeasts life. This volume of brew, 22 liters, will obviously need eleven x 2 liter bottles. (I was always good at math). The plan is to have four brews in constant cycle and based on consuming one bottle per day this would mean that the oldest age of a bottle would be forty-four days or approximately six weeks.
For me, this is fine. I only brew using extract cans and when I find an acceptable "vin ordinaire" brew for day-to-day consumption I tend to stick with it. Over the years, this has been Cooper's lager, brewed with Light Dry Malt and dextrose, served, and drunk very cold and I see no reason to change.
The four "vin ordinaire" brews are to be supplemented with four "special" brews, each of these also being 22 litres or eleven bottles. These brews can be anything that takes my fancy, still in the extract style but covering whatever is available on the market. The length of storage of these will mainly depend on my patience, however if I'm to be mindful of light strike then I will have to consume them within two years. I think I'm up to this task.
Therefore, in total I was looking for eighty-eight 2-liter PET soft drink bottles. The first problem was one of getting the collection together. The sight of me ratting through the neighborhood rubbish bins and dumpsters I knew would not go down well at home, so I decided to purchase. The easiest way is to buy them, eleven at a time, at the local supermarket. Of course, they will be filled with soft drink and must to be either consumed or discarded. This also has the advantage that the bottles are new and you know their history. Grabbing one out of a dumpster and it could have been filled with anything!
I brought the "no-name" generic cola for roughly a dollar a bottle and I figured I was doing the world a service by tipping the revolting concoction down the sink, the worst brewed beer is infinitely better than that muck. I washed the bottles out with very hot water and left them at that. I'm not the biggest fan of chemical sterilization of bottles and have not done it for years, for me, hot water is sufficient. (Please don't berate me, I've been doing it this way for a long time, and it works for me).
Problems
Seldom are things as easy as you imagine them, and if they are, it generally means that you're doing them wrong. In this case, the first hurdle was encountered even before the initial bottling. Empty PET bottles are terribly unstable in the vertical position, the slightest breeze or vibration sets them tumbling. I tried to ignore this but it was a fiasco. By necessity, I bottle in the open, and as luck would have it, a stiffish breeze was blowing. I spent the first twenty minutes chasing bottles and in the end taped them together as a makeshift solution but there had to be a better way.
I decided to make a simple jig to hold the bottles firmly in place. I had some old bamboo flooring and decided to use this as I figured that bamboo would not be too bothered if it got wet from time to time.
I marked out the diameters of twelve bottles and drilled four 5mm (1/4") holes evenly around each diameter. I used 5mm (1/4") pegs, 100 mm (4") long and glued them into the holes. A smaller diameter was added to take a drip bin (more on that later). I added a couple of pieces of timber at each end to act as feet; this makes it easier to pick up. The resultant jig holds the bottles firmly and it fits on to the small bench I use to bottle. Progress indeed!
The jig is light and easy to carry around. It allows me to set up and charge the bottles with carbonating sugar replace the caps and then take the jig and bottles to the bottling station for filling.
Filling the bottles
When I fill, I use gravity and a bottling wand with a shut off valve located on the bottom of the wand. This is standard practice however; I have modified the filling process for ease and ac-curacy.
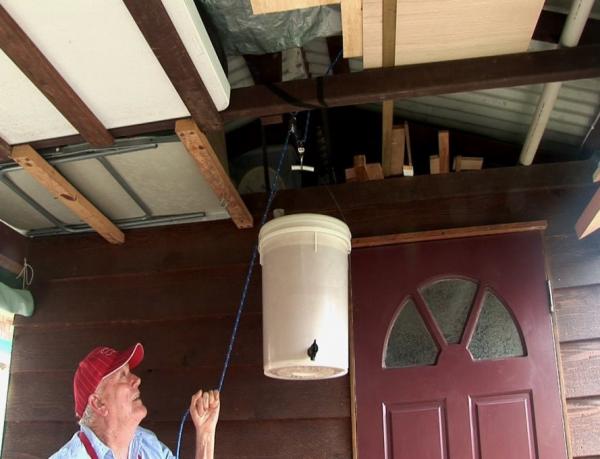
More than anything, I hate working on the floor, however if this is to be avoided then the fermenter must be placed higher than the workbench. In fact, it must be placed so that the bottom of the container is higher than the top of the bottle to be filled, otherwise the bottle will fail to fill to the correct level. I have a small block and tackle and I haul the fermented up into the open roof of the shed where I do my filling. This necessity to conform to the law of gravity can only be ignored by using a pump and I cannot be bothered with that.
With the fermenter now in place and the wand connected to its tap with a flexible hose. The bottling can now commence. This second time of filling with these 2-liter containers went much more smoothly thanks to the jig, yet I could see that there were further improvements that could be made. If the flow of beer from the fermenter could be made to stop automatically at the correct fill level in the bottle, then this would leave me free to do other tasks whilst the filling process was taking place.
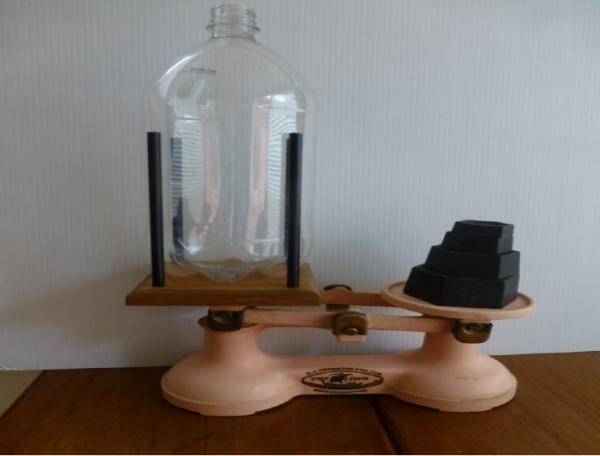
I decided to try to do this using an old balance scale. I made a bottle-holding jig and fitted it the scale so that now I was certain that the bottle would not fall off. I used weights on the other side of the scale until they balanced a bottle filled to the correct level with water.
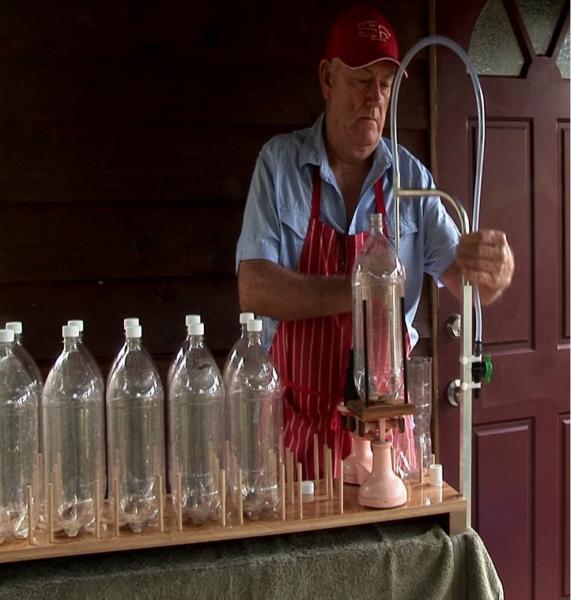
The filling wand had to be fixed to a post so that its position remains fixed. After more than one at-tempt I managed to get the sys-tem working and it has made the job of bottle filling much more pleasant. As can be seen from the sketch, as the bottle approaches equilibrium with the weight and the scales come into balance, the valve at the bottom of the wand commences to close. The whole sequence is very gentle and it allows me to be shaking the previously filled bottle to dis-tribute the carbonation sugar and then burping it to rid it of oxygen.
When the bottle is filled, the wand is lifted and swung over the drip bin as the wands DRIP! (Drives me nuts!). I place the next bottle on the scales, lift, and position the wand in the bottle and away we go again.
I have also fitted a flow tap between the fermenter and the filling wand to control the flow in the first two bottle fills. I found that these were too vigorous and foaming in the bottle spilled out the top before the beer had reached the correct level. This fixed the problem.
My aim is to do a complete fill with no drips or spillage but I confess that I have yet to achieve this.
Conclusion
I have been using the bottles for some time now and they continue to impress me. I have to admit, I have put a lot more effort into setting up than I ever did when I was using the Grolsch bottles, also I'm retired now and have a lot more time to devote to my hobby.
The four small indents at the base of the bottle are perfect as sediment traps for the dead yeast and Coopers extract sediment always seems to set hard. The caps appear to last quite well and I have not replaced any as yet. If a bottle leaked its gas, I would simply recharge it with sugar and replace the cap. This is another advantage of the PET bottle, it is very easy to verify the state of the carbonation by pressing on the side, and they are drum tight after a few days.
Adding a label is still something that I'm working on. I print them on my printer and use top quality 180-gsm paper, then I spray with two coats of gloss varnish before finally cutting out the label. The adhesive is spray contact. So far, the results have been a bit up and down and they are still in the unfinished projects basket.
It is obvious that I am a big fan of these containers; however, not everything is perfect with them, two liters of beer at then burping it to rid it of oxygen.
One sitting may be daunting to some, and any unconsumed beer would tend to go flat in the refrigerator if left overnight. (This is an assumption, two liters is not the biggest challenge I have faced). Another irritation is the fact that the bottles must be stored upright if the sediment is to remain at the bottom and the beer be sparkling. I have found this to be one of the biggest nuisances with them.
When pouring beer, the first couple of glasses are clear and bright, however as the bottom is approached the sediment does make its presence apparent, and this set me thinking, could the beer be forced out while the bottle remained vertical? You bet it could! I now have a system where each bottle is like a little keg and I enjoy draught beer every night
I told you I was retired and had plenty of time! I'll write a bit on the system if anyone is interested. 'Bye for now, and thanks for your time and interest in this article.
Cheers,
Deeferdog.
Bio-My forum name is deeferdog. I live on the Gold Coast in sunny Queensland, Australia. I am retired so have time to enjoy life and drink well crafted beer. I have been brewing almost continuously for over fifteen years, exclusively using extract kits. I get just as much enjoyment fiddling around with the equipment as brewing and drinking the product.
